- Home
- Craft Photography
15 Craft Photography Tips
Learn craft photography skills you can use to take great product photos for your Etsy shop, juried art show applications, social media, or your blog.
This 15-step action plan will teach you the craft product photography skills you need to start taking great pictures. You'll find answers to questions like:
- What camera settings are best for product photography?
- What type of equipment is used in product photography?
- How do you set up lighting for product photography?
- How do you photograph products with natural light?
- How do you style your product photography?
- How do you use product photography props?
- How can you edit your product pictures?
Keep it simple!
There are a million things you could learn about craft photography. If you're a beginner photographer, it can get overwhelming pretty quickly.
Luckily, you don't need to know a million things to start taking great photos of your handmade items.
We're going to focus on the basics you need to know to get started with craft photography.
Don't worry about everything else right now. You can expand your skills later if you find you need more.
First up: What is product photography?
Before you grab your camera, take a minute to understand what, exactly product photography (also known as commercial photography) is, and what you can accomplish with this style of photography.

Importance of Product Photography
When you sell crafts online or apply to juried art shows, shoppers and jurors have to decide whether to buy your product or accept you into a show without ever seeing your items in person.
Your photos are the best tool you have to convey the quality of your work.
The most charming handmade items won't sell online if the product photos are bad. The most skilled artisan won't be accepted into competitive juried art shows if the photos submitted with applications don't show the beauty of the work.
Product photography is not a place to cut corners if you're building a craft business.
Learn Craft Photography Skills
It will take some practice, but with some time, work, and the right basic equipment, this action plan will help you build these essential skills.
15-step action plan to learn product photography:
-
Define Your Product Photography Needs
- Clarify how you'll use your product photos.
- Determine whether you need lifestyle or product-only photos (or both).
- Decide whether you should DIY your product photos or hire a pro photographer.
-
Get the Right Equipment for Product Photography
- Identify the photography gear you'll need to get started.
-
Understand Photography and DSLR Camera Basics
- Learn about key DSLR camera settings for product photography.
- Try photographing your products in natural light.
- Explore photography backdrops.
-
Prepare to Photograph Your Products
- Try some standard product photography setups.
- Experiment with composition and design elements.
- Experiment with props to style your photos.
- Carefully prepare your products, props, and backdrops.
-
Edit Your Photos
- Learn some basic photo editing techniques.
-
Find Your Style
- Look for inspiration and find your brand's photography style.
- Make a plan to maintain a consistent look.
-
Practice, Practice, Practice!
- Grab your camera and start practicing.
I've tried to put the steps in a sensible order, but you can expect some back and forth. As you learn about and practice one skill, you may find you want to go back and revisit another skill.
Define Your Product Photography Needs
1. Clarify how you'll use your product photos.
Before you do anything else, you need to figure out exactly how you'll use your product photos.
There are plenty of reasons why you might need photos of your products. You might want to use product photos for:
- social media
- your website
- your Etsy shop
- print-based promotional materials
- juried art show applications
The way you plan to use your product photos can have a big impact on:
- the number of photos you'll need
- the way you light, compose and style the images
- the setup and equipment you'll need to use to get the results you want
The intended use of your photos can also have big impact on whether it makes sense to take your own photos or hire a pro.
Once you're very clear about how you want to use your photos, you'll be better prepared to make smart choices about your craft photography.
2. Determine whether you need lifestyle or product-only photos (or both).
Product photos fall into two broad categories — product-only photos and lifestyle photos.
Product-Only Photos
Product-only photos are pictures of the product alone with no props.
Often these photos have a white background, but some brands use black backgrounds, colored backgrounds, or black and white gradient backgrounds.
You might use product-only photos in online shops, juried craft show applications, and sometimes in social media posts.
Lifestyle Product Photos
Lifestyle product photos show the item styled with props, and possibly with a model. They are often shown in an environment that's related to the product.
You may use lifestyle product photos in your online shop, in blog posts, and in social media posts.
Craft show organizers typically want you to send product-only images with your application package. They usually do not want lifestyle photos. But requirements vary from show to show, so read the application instructions carefully.
Often, you'll require both types of images to meet your needs.
You can learn more about lifestyle vs product photography to better understand the best situations for each type of image.
3. Decide whether you should DIY your product photos or hire a pro photographer
There are times when it's appropriate to take your own product photos, and there are times when hiring a professional who specializes in craft photography will be the smartest choice.
To decide which option is most appropriate for your situation, read more about when DIY product photography makes sense for craft business owners and when it is better to hire a pro.
Get the Right Equipment for Craft Photography
Photography gear can be shockingly expensive.
Luckily, there are ways to get started on a budget. You don't have to immediately buy every piece of high-end gear someone recommends. In fact, it can be smart to start with some basics and add to your photography equipment as you practice and see what you need over time.
4. Identify the Photography gear you'll need to get started.
I've outlined 9 pieces of equipment needed for product photography. These items are the essentials you need to get started.
Happily, 8 of the items are either free, common household items, or can be bought for less than $10.
I've also included some nice-to-have extras that aren't essential but can help you take better product photos and make your photo sessions run more smoothly.
Understand Photography and DSLR Camera Basics
You don't need to know about every feature on your camera or buy a fancy photography lighting kit to start practicing. Learn how to use some essential functions on your camera, grab something to use as a backdrop, find some good natural light, and you can get started.
5. Learn about key DSLR camera settings for product photography.
If you're using a DSLR camera for your craft photography, you'll need to learn about a few key camera settings for product photography including:
- ISO
- shutter speed
- aperture
- camera modes
- white balance
Once you understand how these settings affect your photos and know how to adjust them on your camera, you'll have a solid foundation to start practicing photographing your products.
Keep it simple!
DSLR cameras have countless settings. If you're a beginner, you should ignore most of them, or you will quickly become overwhelmed.
Master the basics first. You can learn about more advanced techniques later if you decide you need to.
Jessica Marquez' Craftsy class Product Photography at Home is an excellent place to start.
I love this product photography course because it is designed specifically for craft artists.The instructor provides exactly the right level of detail. There's enough information for a beginner to get great results but not so much that it becomes overwhelming.
6. Try photographing your products in natural light.
So much of your success in craft photography hinges on learning how to light product photography well. With that in mind, you may be surprised to know that lighting is one area where you can often save money on equipment when you're getting started.
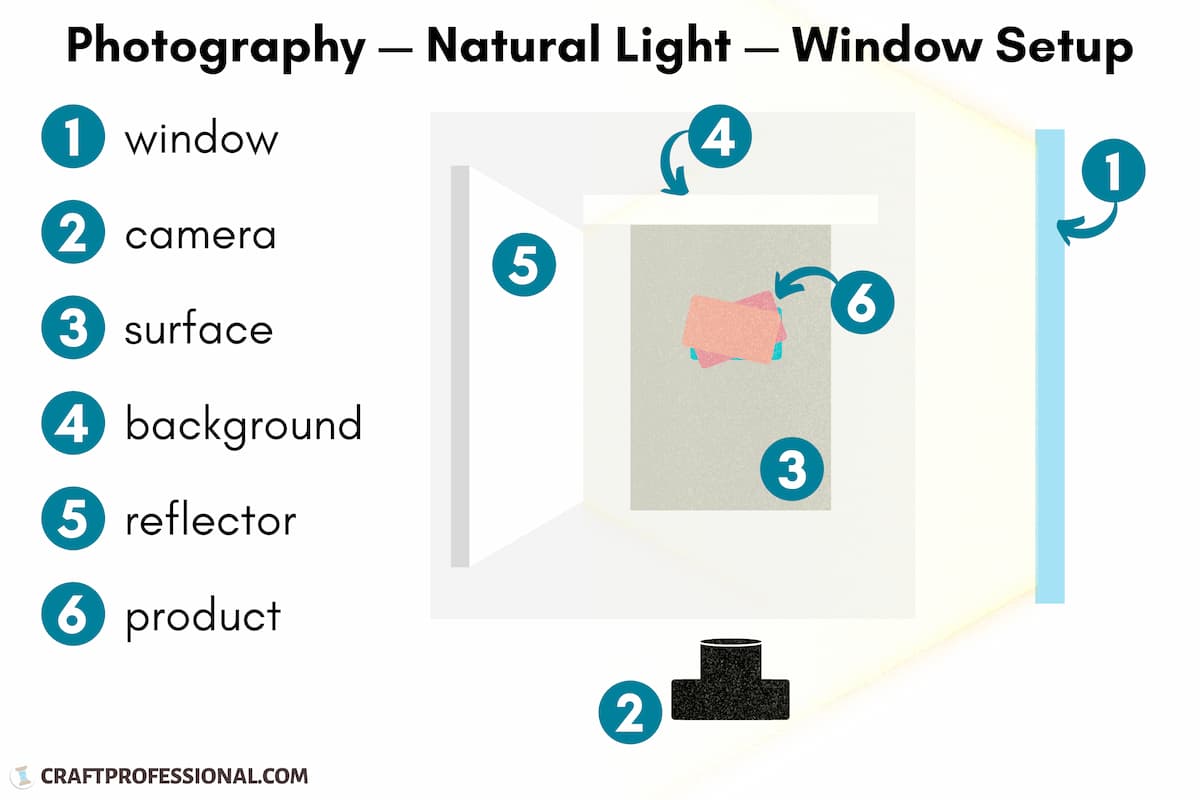
Using natural light in product photography is an excellent option, particularly for beginners. It's easy to get this lighting right, and the equipment you need to manipulate natural light is minimal and budget-friendly.
 Simple setup for photographing in natural light in front of a window
7. Explore photography backdrops.
Product photography backgrounds form the horizontal and sometimes vertical surfaces that appear in your images.
You can choose patterned backdrops that add color and texture to your photos. Backdrops that resemble wood, marble, or tile can suggest a specific location, like a stylish kitchen. Plain backdrops used in white background product photography will be an essential part or your photography tool kit.
A seamless photography backdrop is a sweep of paper or fabric that functions as a continuous horizontal backdrop and vertical surface.
The backdrops you use to photograph your handmade products will have an impact on the story your photos tell, so be sure to choose options that suit your brand.
Prepare to Photograph Your Products
You may be surprised by the amount of prep work required to take great product photos. All of that patient preparation will reward you with better photos and less time spent in post-production.
8. Try some standard product photography setups.
Just as there are a few fundamental camera settings you should master before you explore more complex functions, there are also a few basic studio setups you can start with.
Experiment with different product photography lighting setups until you find some arrangements that give a result you love.
A simple arrangement beside a window using natural light (step 6) is an easy and inexpensive way to get started.
If you want to try adding artificial light to gain more options and control of your lighting, consider light box product photography.
9. Experiment with composition and design elements.
Read up on photography composition tips for beginners to learn how to use simple composition rules and design elements to take more compelling photos.
If you apply the rule of thirds or the golden triangle to your craft photography composition you'll see an instant improvement in your images.
When you make good use of design elements like line, color, shape, light, texture and negative space, you'll create product photos that tell a story and build desire to purchase.
10. Experiment with props to style your photos.
You can use styling and props to create images that:
- define your brand
- connect with your target customers
- elicit emotional responses
- show size and ways to use your products
- and even prompt thoughts of smell, touch, or taste
Explore product photography styling and experiment with using props to tell a story, create an emotional response, and provide more information about your products.
11. Carefully prepare your products, props, and backdrops.
Before you take a single photo, you need to ensure everything that will be in the scene is as flawless as possible.
Make sure your product is perfectly clean.
If you're photographing glass, metal, or anything that can be easily smudged, take extra care to ensure those items are wiped thoroughly with a microfiber cleaning cloth that won't leave lint behind.
Look for any flaws in your product. An imperfect package, stray thread, or awkwardly placed seam can ruin the look of your product in photos.
Some of these problems can be fixed with photo editing, but those tasks are time consuming and best avoided when possible.
Check out any props, backdrops and surfaces you're using as well to ensure they are clean.
While you're at it, make sure your camera lens is clean.
Be careful when you move items. It's great to rearrange your setup to photograph different looks, but touch items minimally to avoid getting fingerprints on your clean items.
You can wear lintless gloves, particularly when photographing items like glass or metal, to help avoid creating smudges as you move items.
Edit Your Photos
12. Learn some basic photo editing techniques.
Some simple editing can make huge improvements in your photos.
You don't need to learn how to use complex photo editing tools, and you don't have to buy expensive software to get started.
Learn the basics of how to edit product photos, and then decide if you need more advanced skills or tools.
Find Your Style
Your craft photography will make a stronger impact if there's a clear, consistent style across all of your images.
Developing that style will take some time up front. But once you have your style locked down, you won't have to think about how you're going to set things up every time you want to photograph a new product. You'll already have a clear set of guidelines to follow.
13. Look for inspiration and find your Brand's photography style.
Develop a consistent product photography style, so your images all have a cohesive look that suits your brand. You may use elements such as color, props, backdrops, camera angles, or composition consistently throughout your photos to create a recognizable style across a variety of photos.
To get a sense of what could work for your brand, devote some time to analyze a range of product photography ideas. Keep a collection of the photos you love and make note of why you love them.
A secret Pinterest board would be perfect for this task. You can view my (not secret) collection of product photography ideas and inspiration on Pinterest to get started.
14. Make a plan to maintain a consistent look.
Once you have a good sense of the style you want to carry through all of your craft photography, it's smart to create a set of guidelines to help you maintain consistency.
You can use a product photography style guide to define details such as:
- the number and type of photos you'll take for each product
- the setup you'll use
- colors, backdrops, and props you'll include in photos
If you document all of these details, you'll be able to maintain a more consistent look over time.
Practice, Practice, Practice!
There are some wonderful courses and books that will help improve your craft photography.
But you need to combine that learning with hands on practice. It's the only way to fully develop your photography skills.
Remember when you were just starting to learn your craft? Your first few projects probably weren't flawless, but as you worked more, your skills improved and your projects became more impressive. Learning craft photography will be the same.
15. Grab your camera and start practicing.
Get your camera, and take some photos.
Check your work, and see what needs improvement. Learn more if you need to, make some changes, and try again.
Be patient with yourself. Don't expect perfection on your first photo session, and keep practicing.
Where to Learn More About Craft Photography
Taking the Craftsy course, Product Photography at Home is an excellent next step to mastering craft photography. The course is designed specifically for the needs of craft artists, and the lessons are clear and easy to follow.


New! Comments
Have your say about what you just read! Leave me a comment in the box below.