GET NEW FREE PRINTABLES BY EMAIL. SIGN UP FOR THE PRINTABLES NEWSLETTER.
- Home
- Craft Business
- Craft Photography
- Product Photography Lighting
How to Light Product Photography
How to light product photography and take high-quality photos of items you make to sell.
Good lighting is essential to getting the great images you need for your online store. This simple guide shows beginner photographers easy ways to light your products for best results.
How to Light Product Photography
There are countless techniques you can use to create beautiful lighting effects.
Forget about learning all of those fancy techniques (for now). Start with a few basic lighting setups that will set you up for success.
These popular setups are easy for a beginner photographer to get right and require minimal equipment. You'll be able to quickly start practicing hands-on and build your skills.
You can learn more advanced lighting techniques later if you like.
Here's what we'll cover in this product photography lighting tutorial.
1. Lighting equipment for product photography:
- light sources (natural or artificial lighting)
- reflectors
- diffusers
2. Two popular product photography lighting setups:
- side lighting
- backlighting
3. How to light product photography with different types of light sources:
- natural
- artificial
- light box
4. Frequently asked questions:
- How can you manipulate the amount of light coming into the camera?
- What is white balance and how do you control it?
1. Lighting Equipment for Product Photography
A simple photography lighting setup consists of two or three primary components:
- A light source
- A reflector to increase the amount and shape the direction of the light
- A diffuser may be needed to scatter hard light, soften shadows and reduce unwanted reflections
When you're setting up lighting for product photography, you're just arranging these two or three components in specific ways to create a desired effect.
1. Light Sources
You can light your photography with natural or artificial light.

Avoid using both types of light at the same time to light the same photo. For example, don't set up to photograph your products in front of a window and then add an artificial light source into the mix.
Photographers call this scenario "mixed lighting."
Working with mixed lighting is more difficult than working with a single type of lighting. There's no need to add extra complications to your photography. Do yourself a huge favor, and stick with a single type of light.
You can use more than once source of light without complicating the situation. Just make sure they are the same type of light. For example, if you're using artificial light, you can use two or more lights in your setup.
Using Natural Light in Photography
Natural lighting is an excellent option for product photography. It is free, and once you know some basics, (which we'll get to soon) sunlight is easy for a beginner photographer to work with.
Using Artificial Light in Photography
There is a dizzying array of lighting equipment for product photography. You could easily get lost down a rabbit hole researching this topic.
"Keep it simple" is the theme I've carried through the craft photography series.
We'll keep studio lighting simple by focusing on continuous lighting. Continuous lighting is an easy to use, budget-friendly lighting option for beginners.
Continuous Lighting
Continuous lighting is exactly what it sounds like — light that is continuously on. This is in contrast to the other types of lights you may come across, such as strobe lighting or speedlights, which provide a flash of light when you take a photo.
Continuous lighting is an excellent choice for beginner photographers.
Since continuous lighting is always on, you can see the effect it has on your scene. As you adjust your setup, you'll see and learn how shadows change when you move a light source or add a reflector.
Continuous lighting for product photography can be easy on your budget, too. In fact, Heidi Adnum, author of The Crafter's Guide to Taking Great Photos says,
"If you need to use artificial light, invest in cheap household or garden lights, such as desk lamps with adjustable heads — just make sure that their bulbs are white in color and that you defuse the light."
You don't have to run out and buy a fancy, super-expensive photography light kit to get started.
You can pick up some clamp lights with aluminum reflectors and fluorescent light bulbs.
Keep in mind, continuous light is not as bright as strobes or speedlights.
You'll need to consider the lower light conditions when you adjust your camera settings. Check out the frequently asked questions section at the bottom of the page to learn more about how camera settings and lighting work together.
You'll also need to consider the size of the space you're photographing.
Larger areas require more wattage. Tabletop photography for a small product, such as handmade soap, requires less wattage. Photographing a model wearing a dress would require more.
2. Reflectors
What does a photography reflector do?
A reflector is a tool that reflects light from your source and bounces it back onto your item. It helps you modify the light coming from your source.
You can use a reflector to change:
- the amount of light available to your camera
- the direction of the light
- and the color of light that falls on your scene
White Foam Board Reflectors
If you're looking for an inexpensive reflector, white foam boards will do the job beautifully.
For tabletop product photography, get two pieces of foam board. Tape the two boards together along the edge so they form a V shape. The boards will stand on their own, and you won't need to clamp them to anything to hold them in place.
This arrangement will keep your hands free for other tasks and makes it easy to move the reflector around as needed.
Commercial Photography Reflectors
You can also buy reflectors made specifically for photography. They typically come with white, black, silver, and gold surfaces and can be used as diffusers as well.
You'll need some way to secure this type of reflector to keep it in place. A reflector stand, some clamps, or a helpful assistant who will hold the reflector for you will all get the job done.
How to Use a Photography Reflector
Set up the reflector so it faces your light source with your product between the source and the reflector.
 Overhead view - Tabletop product photography with reflector.
This setup allows the reflector to bounce the light from your source back onto your product.
If you don't have enough light, placing the reflector in this position will increase the overall amount of light in your photos. It will also soften harsh shadows.
You can move your reflector around to create different effects. Start with the arrangement shown in the diagram, and then experiment with the placement of your reflector.
You can try changing the distance between the reflector and the product, or slightly change the angle of the reflector. Watch how each change impacts the light and shadows in your scene.
3. Diffusers
What is a diffuser?
A diffuser is a translucent panel that can be placed between your light source and the object you are photographing to make the light more scattered.
A Couple of Definitions for Clarity:
Translucent: We say something is translucent when light passing through the object is diffused. For example, a sheer curtain is translucent.
Diffuse: Diffuse means to take something that is concentrated (like a beam) and cause it to become spread out or scattered.
 Overhead view - Tabletop product photography with a diffuser between the light source and product.
What is a diffuser used for in photography?
When light passes through the diffuser, it spreads out and becomes more even.
If you need to get rid of harsh shadows or distracting highlights in your photos, try using a diffuser. It will help soften shadows and reduce or eliminate distracting highlights.
Keep in mind, you won't always need to use a diffuser to get the light just right.
You may already have diffuse light. For example, if you're photographing outside with sunlight on an overcast day, that sunlight will already be nice and even.
What can be used as a diffuser?
You probably already have something around the house that will do the job.
Any plain, white material that light will pass through is a good candidate. You can hang a plain white sheet or white curtains between your light source and the product.
If you're using studio lights, find a couple of plain white t-shirts, stretch them over the lights, secure them with elastic bands, and you'll have instant, free light diffusers.
Summary of Equipment Needed for Lighting Product Photography
You don't need to buy a lot of equipment to light product photography. This simple gear will get you off to a good start:
1. Light Source
- Sunlight (free) OR
- Artificial - two continuous lights (affordable and good for beginners) AND
- Photography light stands - if you're using artificial light, and the lights you buy don't come with stands
2. Reflectors
- 2 pieces of white foam board (budget-friendly) OR
- Commercial reflector for photography (can also be used as a diffuser)
3. Diffuser
- White curtains, sheets, or t-shirts (may already have around the house)
2. Product Photography Lighting Setup
As a beginner, you don't need to know every fancy lighting setup.
There are a few simple arrangements that reliably produce great results including side lighting and back lighting. You can use these two lighting setups whether you're photographing your products in natural or artificial light.
Practicing and experimenting with these two arrangements is a great way to get started with product photography.
How to Set Up Side Lighting
Side lighting is exactly what it sounds like. The light source is placed at the side of your product.
You can use one or two lights.
Side Lighting — One Light
The light source will be on one side of the item. This setup creates shadows on the opposite side of the item.
Side Lighting — Two Lights
Place one light source on one side of the product and the other light source on the other side of the product. This setup creates even lighting and shadows are eliminated.
How to Set Up Side Lighting Using One Light

- Prepare your item to photograph and set it up with any backdrops and product photography styling props you'll be using.
- Place the light source on one side of the object you want to photograph.
- Position a reflector on the other side to balance out shadows.
- If shadows are too heavy, add a diffuser between the light source and the object you're photographing.
- Take a few photos, and then experiment with camera settings and light placement (see below for details).
How to Set Up Side Lighting Using Two Lights

- Prepare and arrange your product, backdrops and any props.
- Place one light source on one side of the object you want to photograph.
- Place the other light source on the other side of the object you want to photograph.
- To start, keep each light at the same height, angle and distance from the product.
- For soft light, place a diffuser between each light source and the object you're photographing.
- Experiment with different angles and camera settings.
Experiment With Side Lighting
Change the Camera Settings
Your DRSL camera settings will have a big impact on how your camera uses the available light, so experiment with the settings.
If you have no idea where to start, check out the camera settings for product photography article for a thorough overview of the best settings for photographing your products.
Try Different Heights
Moving your lights higher or lower will have a big impact on the shadows. Higher lights will create shorter shadows like ones you'd see in nature. Lower lights will create longer shadows.
Try Different Angles
Move your light (or lights) so they face the product at different angles. Somewhere between 90 and 130 degrees from the camera will typically give the best results.
The image below shows you the light placed at 90 degrees from the camera (on the left) and at 130 degrees from the camera (on the right). You can try anything in between these two placements.

How to Set Up Backlighting
Side lighting works well for a lot of different types of products. However, if you're photographing something translucent, like glass, give backlighting a try.
With backlighting, the light source is positioned behind the product.

- Prepare and arrange your item, backdrops and any props.
- Place your light source behind the object you want to photograph.
- Place a diffuser between the light source and the object you're photographing.
- Try positioning two reflectors in front of the object you're photographing to bounce some light onto the front of your product. Place one on each side of the camera, just out of the camera's view.
More on How to Light Product Photography
Read more about these popular product photography lighting setups as well as how to set up front lighting.
3. How to Set Up With Different Types of Light
So far, all of the diagrams have illustrated how to light product photography using artificial light. We're going to look at how to set up three more scenarios:
- natural light — beside a window
- natural light — outdoors
- artificial light — in a light box
They follow the same concepts we've already examined with a few extra details to keep in mind.
How to Light Product Photography Using Natural Light
Lighting your photos with sunlight is a particularly good choice for beginner photographers. It's easy to learn and you don't need a lot of equipment to get started.
If you want to try using natural light for your product photos, you have two options:
- Set up inside beside a bright window.
- Set up outdoors.
Product Photography — Natural Light — Window Setup
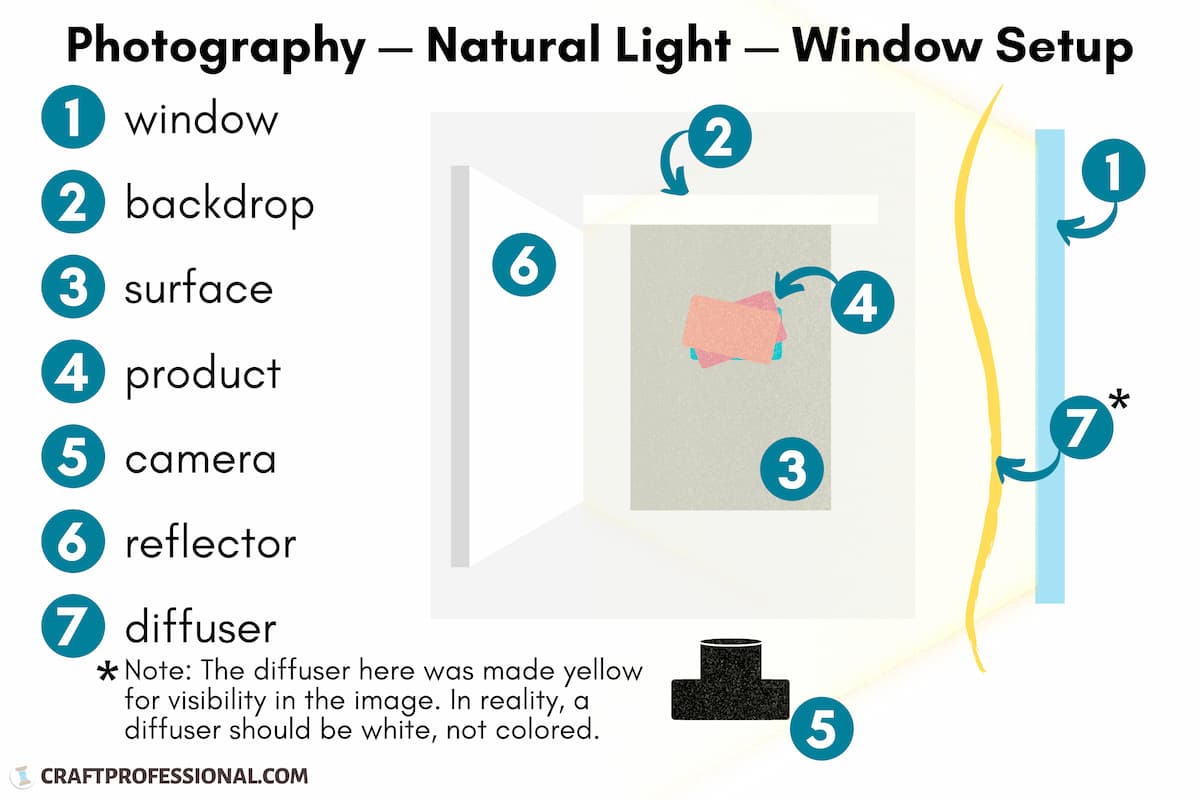
Create a tabletop photography setup inside beside a bright window. Follow the placement instructions for side lighting with one light source.
You can't move your light source, but you can move the reflector and experiment with camera settings for different looks.
Product Photography — Natural Light — Outdoor Setup
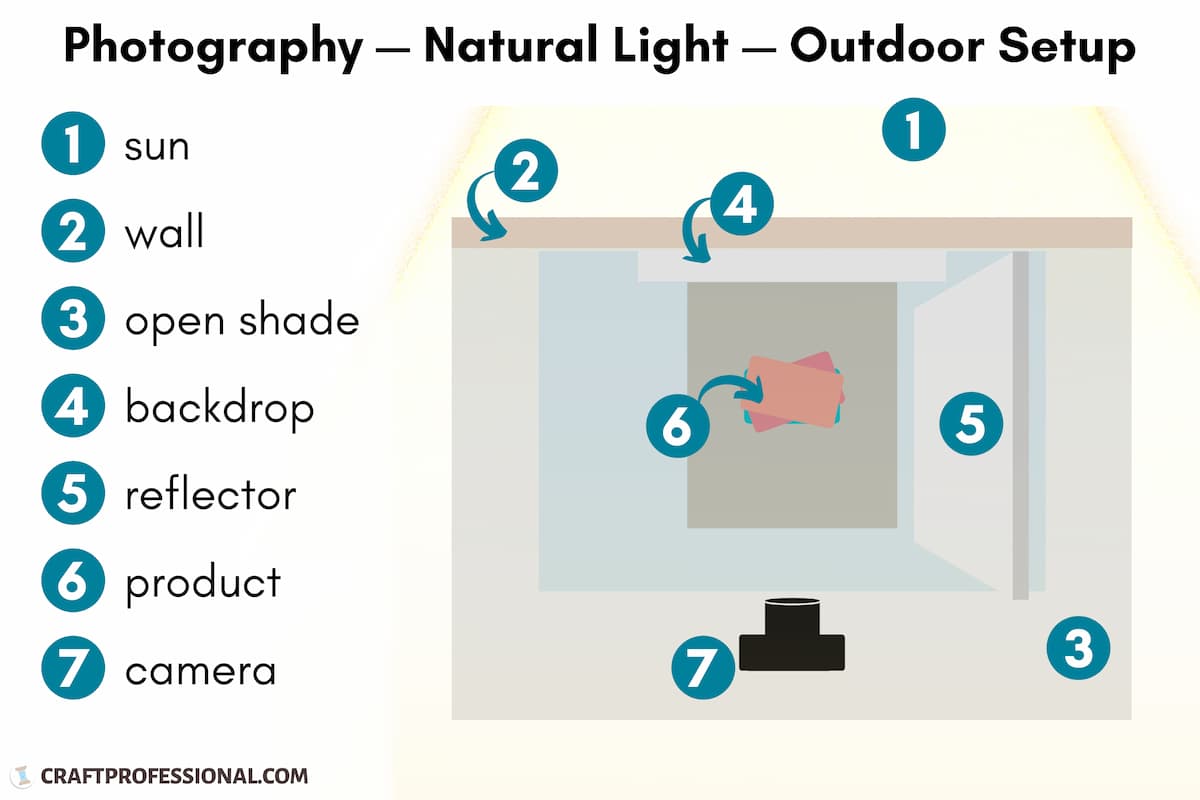
You'll find some of the best light for outdoor product photography in open shade, during the golden hour (just after sunrise or before sunset), and on overcast days.
I've written more about using natural light in photography here. There's more information about how to light product photography using window light, how to set up outdoors, and how the quality of light changes depending on the weather and time of day.
How to Light Product Photography Using a Light Box

If you want to make the leap from using natural light to artificial light, and you are photographing small objects that work in a tabletop setup, consider using a light box.
It's an affordable, easy way to start lighting your images with artificial light.
What is light box product photography?
A light box (or light tent) is a box that has one open end. The other sides are covered with a translucent white material. Items are photographed inside the light box.
A light box helps you create diffuse lighting. It allows you to control the environment and avoid common problems, such as unexpected reflections or color cast from items in the larger environment.
If, for example, you were photographing your items in a room you had painted a strong color, the color on the walls would affect the color of your photos. If you placed your products inside a light tent to be photographed, you wouldn't have to worry about the color of the walls.
The diagram above shows you how to light product photography using a light box. If you'd like more information, you can learn how to get started with light box product photography here.
4. Frequently Asked Questions About Lighting Product Photography
Camera Settings
How can you manipulate the amount of light coming into the camera?
There are 3 basic DSLR camera settings — ISO, shutter speed, and aperture. All three settings work together to create the overall look of your photo. Changing each setting changes the amount of light digital cameras can use.
ISO, shutter speed, and aperture can be adjusted independently of each other when you use your DSLR camera on manual mode. Alternatively, you can use a camera mode like shutter priority or aperture priority, to choose one of the settings, and your camera will choose the other two settings to give you a combination of settings that works for the amount of light available.
Learn more about the best camera settings for product photography.
White Balance
What is white balance and how do you control it?
White balance is a camera setting that helps ensure white items appear white in your photos. DSLR camera have several auto white balance settings that are simple to use. You can also adjust the white balance manually.
Learning how to use your camera's custom white balance feature is worthwhile. It will provide more precise results, making your colors more accurate and saving you time in the post-production editing process.
Check out the article "Camera Settings for Product Photography" linked above to learn how to use white balance presets and custom white balance on your DSLR camera.

Hi, I'm Lisa, the creator of Craft Professional. I create and share printable coloring pages, calendars, and simple creative resources for kids, adults, teachers, and busy families. Learn more about the site and the person behind it.
Home | About | Contact | Newest Updates | Newsletter | Privacy | Terms of Use | Advertising Disclosure
If you buy something through links on Craft Professional, I may earn a referral fee. Details are in my disclosure.
Copyright © 2006-2026 CraftProfessional.com - All rights reserved.