- Home
- Craft Photography
- Using Natural Light in Photography
Using Natural Light in Photography
Using natural light in photography is an excellent place to begin when you're learning how to light your product photos.
With knowledge of a few basic natural light photography techniques and some practice, a beginner can start taking great photos using window light or outdoor light.
Using natural light can help you save some money, too. Sunlight is free, and you can get other equipment you'll need to manipulate light without spending a lot of cash.
How to Light Product Photography With Natural Light
If you're using sunlight for your craft photography, you can either set up inside, near a bright window or outside.
With those options in mind, I've broken this tutorial down into three sections:
- General tips for using natural light in photography that apply to both situations
- Window light photography
- Outdoor product photography lighting
If you need a basic lighting overview before diving into specifics about using natural light in photography, you can learn the foundations of how to light product photography here.
1. General Tips for Using Natural Light in Photography
Work quickly. natural light is always changing.
Natural light is always changing. The angle, intensity, and color of the light will change depending on your location, the time of day, and weather conditions.
The shifting nature of natural light is part of the beauty of working with it, but it also poses some challenges. Natural light provides opportunities to play and experiment as it shifts, which can net some wonderful results.
The challenge, though, in working with natural light vs. artificial light, is you don't have a lot of control over the quality of light in your environment at any given moment. It can be hard to get consistency with your lighting, and achieving consistency across your images is important in product photography.
To keep the light and shadow in your product photos as consistent as possible, work as quickly as you can. Try to photograph several products quickly in a single session, before the light changes. Also, once you find a spot with great lighting conditions, try to schedule subsequent photo sessions at the same time of day.
Be aware of colors in your environment.
Product photos provide customers with important information that will play a role in their decision to buy.
With many products, color is an important factor for shoppers, and your images are the only tool you have to convey the color of your product to someone who can't see it in person. Your photos must accurately reflect the actual color of your products.
When you're photographing your product, strong colors nearby can wreak havoc on the way colors appear in your images. Whether you're photographing indoors or outdoors, be sure to notice the colors around you before you choose a spot to set up.
Trust me. I've made this mistake.
When I was working on an assignment for a product photography class I was taking, I decided the spot in front of my open front door would be a great, light-filled place to set up. I failed to consider the effect my red front door would have on my photos. Although I set the white balance on my camera, all of my images still came out with a noticeable reddish cast.
Check out Camera Settings for Product Photography if you want to learn more about how to set the white balance on your camera.
The colors around you can have an impact on your photos whether you're using natural or artificial light. However, a home photography studio using artificial light is generally a more controlled setting. If you're searching around for a spot with good natural light, it can be easy to forget to check other elements in the environment, like the colors around you.
Color can be corrected when you edit your product photos. However, the more you get right while you're taking the photos, the less time you'll need to spend fixing them in post-production.
2. Window Light Photography
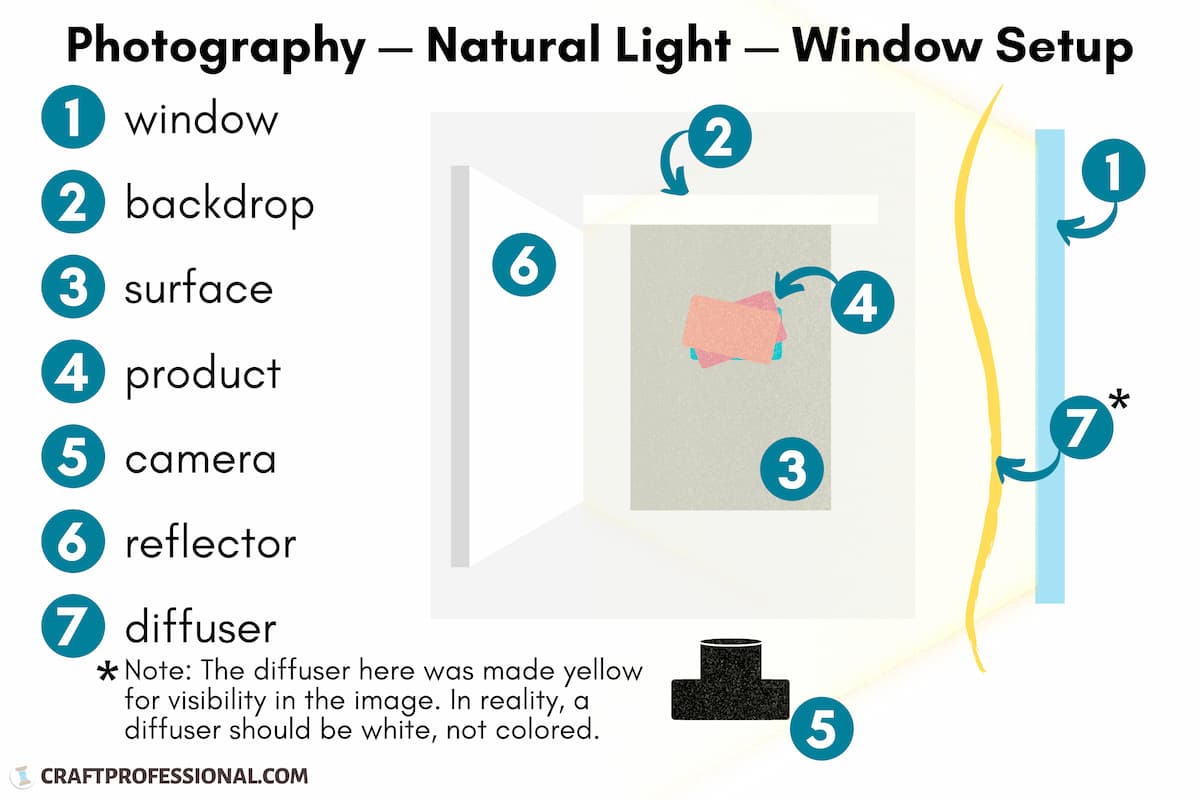
You can photograph your products indoors in front of a bright window and get excellent results. The digram below shows a standard tabletop product photography setup using window light.

Window Light Photography Setup
This arrangement is set up for side lighting, which means sunlight will fall on one side of your product, and the other side will be in some shade.
There are other effective ways to light your products to photograph. Side lighting is a good place to start. Try this lighting method first, and then learn about other product photography lighting setups you can experiment with.
1. Window
Choose a bright window. Check to ensure there's nothing nearby that would create unwanted color distortion or shadows within the area you're photographing.
Place a table in front of the window.
2. Backdrop
Set up the backdrop you'll be using in your photos so it is perpendicular to the window.
If your backdrop isn't freestanding, you'll need to secure it. You can buy stands made for this purpose. Alternatively, you may be able to find a way to secure your backdrop using items around the house.
3. Surface
If you're not using a seamless backdrop, place the surface surface you want your product to sit on in front of the backdrop.
4. Product
Arrange the item you want to photograph on the table. The part of the product you want to photograph should be perpendicular to the window, so the window light is falling on one side of the item.
5. Camera
Set up your camera so it is perpendicular to the window.
A tripod will be extremely helpful here. It will allow you to keep your hands free, maintain consistency with camera distance and angles, and take clear photos with no blur from camera shake.
6. Reflector
You'll probably want to reduce the shadow on the side of your setup that's facing away from the window. Placing a reflector on the table facing the light will accomplish that goal. White foam board will work well.
The reflector will bounce light from the window back onto your product. It will add light to the side of the product that's facing away from the window to balance out shadows and increase the amount of light overall.
7. Diffuser
A diffuser is a translucent panel you can place between the light source and your product. When light passes through the diffuser it becomes more even, and shadows appear softer.
Depending on the quality of light coming through your window, you may or may not need to use a diffuser with this setup. If you're seeing unappealing, harsh shadows, a diffuser will help.
Simply drape something white and translucent — like an inexpensive shower curtain — across your window to soften the shadows.
3. Outdoor Product Photography Lighting
Outdoor product photography is another great option. Like window light, outdoor light is free and easy for beginners who want to learn DIY product photography to work with.
You'll find outdoor light that's particularly great for product photography:
- on overcast days
- at the golden hour
- in open shade
Overcast Days
Overcast days provide diffuse light, which makes it a great time for outdoor product photography. You'll have plenty of even, natural lighting that will allow you to take photos with soft shadows that don't distract from your products.
The Golden Hour
Outdoor light is particularly beautiful in the first hour as the sun is rising and the last hour before the sun sets. If you hear photographers talk about "the golden hour" or "the magic hour" they are referring to these times.
When the sun is low on the horizon, you get diffuse light that has a golden hue. This time is truly magical. It's tough to take a bad photo outside during the golden hour.
Open Shade
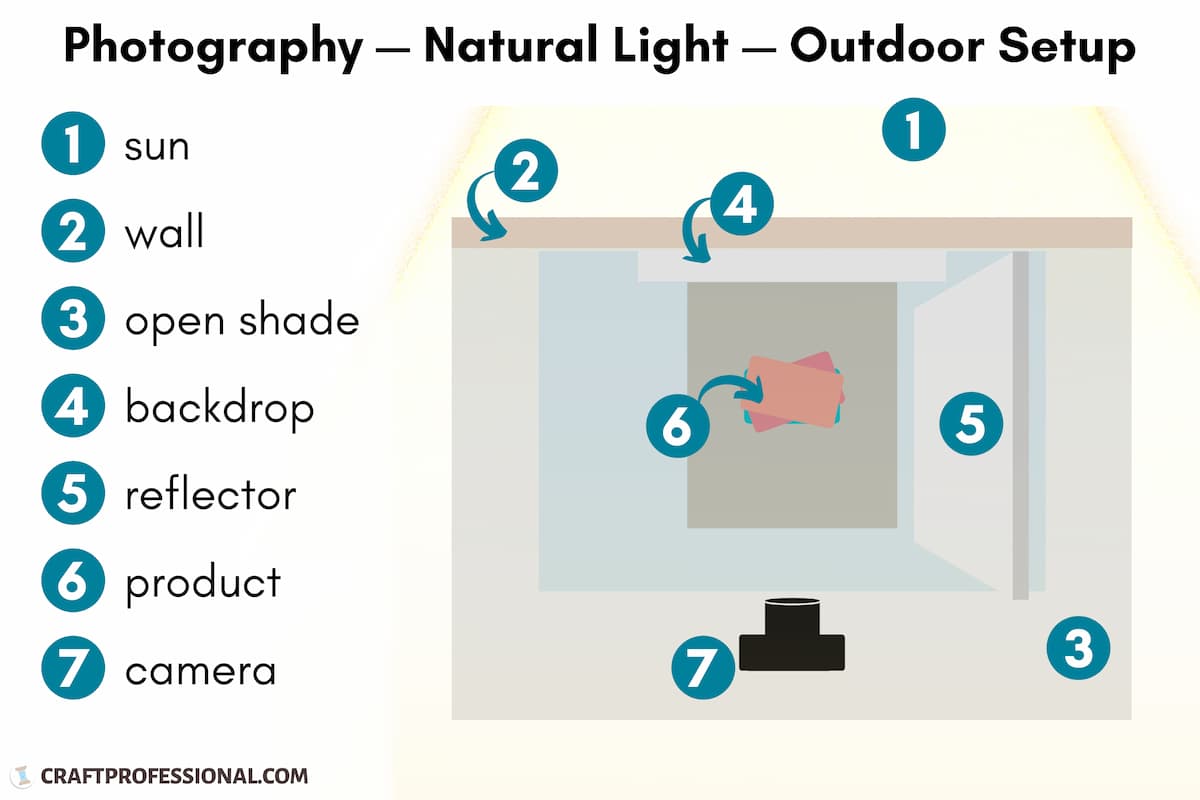
Open shade refers to places where the sun is casting a shadow, and there is nothing overhead. If the sun is shining behind a building, the space beside the wall at the front of that building would be in open shade.
The diagram below shows an outdoor tabletop photography setup in open shade.

The setup for open shade has the same components as window light photography. I didn't include a diffuser in this diagram. You probably won't need to use one in open shade.
Do keep in mind, if you set up beside a wall in open shade, light won't just be coming from the sun behind the building. The light that's reflected back at you from everything in the area will impact your photo.
Cambridge in Colour has a natural light tutorial you can check out if you'd like to take a deeper dive into learning about the ways natural light changes throughout the day and with different weather conditions.


New! Comments
Have your say about what you just read! Leave me a comment in the box below.