- Home
- Craft Photography
- Light Box Product Photography
Light Box Product Photography Guide
Light box product photography is an easy way for beginners to start taking photos of items to sell online.
Why start with light box photography and not some other setup?
- A light box eliminates many of the challenges involved in lighting product photography, making this setup easy for beginners to learn.
- Light box kits are reasonably priced and come with everything you need to light your photos.
If you'd like to use artificial light, and your products are small items that work for tabletop photography, light box product photography is a quick and affordable way to get started.
What is Light Box Product Photography?
Light boxes are boxes with sides made of white translucent material that allow light to pass through. They are commonly used for tabletop product photography.
The side facing the camera will open, and some light boxes also have top flaps that allow you to photograph different angles and styles, such as flat lays.
You'll sometimes hear people refer to them as light tents or lightboxes.
Items to be photographed are placed inside the light tent, which creates a small, controlled environment for product photography.
Lights are placed outside and aimed in the direction of the light box, so light can pass through the translucent white sides to illuminate the product inside.
The translucent sides act as diffusers, creating the even light and soft shadows that are ideal for high quality product photography.
Here's the tutorial you need if you'd like to learn how to take white background product photos without using a light box.
Don't Confuse Light Boxes with Softbox Photography Lighting
If you're just learning about all of the equipment needed for product photography, you might hear the terms "softbox" and "light box" and assume they refer to the same thing. Or you may get the two terms mixed up.
Light boxes and softboxes are both tools that can diffuse and soften light, but they are not the same thing.
You already know that light boxes are used to create a more controlled lighting environment when items to be photographed are placed in the interior space.
Softboxes , on the other hand, are designed to fit around the bulbs of photography lights. They are made of white translucent material, and light is diffused as it shines from the light through the softbox's translucent material.
Why Are Light Boxes Great for Product Photography?
When I was taking a product photography course, I wanted to make the leap from using natural light in photography to artificial light. After researching a lot of options, I decided to buy a light box product photography kit.
Here's why I decided a light box kit was the best way to start working with artificial light.
Light Boxes Are Easy to Use
Lightbox photography is a great way to eliminate a lot of issues that can cause problems for small business owners who are typically beginner photographers.
Elements in your environment can create unwanted effects in your product photos.
For example:
- Nearby strong colors can affect the color temperature of your light and white balance, which can make colors in your images inaccurate.
- Light from other sources can cause unintended effects.
- Reflective items you're photographing can pick up the reflection of anything in the space.
When you place your product inside a light box, you block out a lot of the external environment and eliminate those sources of problems making it easier for beginners to achieve high-quality images.
Light Box Kits Are Affordable and Complete
You can buy photo lightboxes individually or as part of a kit that contains other gear you'll need to light your photos.
My light box kit came at an affordable price and included with everything I needed:
- a light box and carrying case
- two lights
- two lightbulbs
- two adjustable light stands which, in a pinch, can also be used as camera tripods
- white backdrop, and several colored fabric backdrops
The kit had everything I needed to start using artificial light, and buying it saved me from spending a lot of time shopping around for several different products separately.
Before you buy your own lightbox kit, read any product descriptions carefully to make sure you're getting a product that will meet your creative needs.
Lightbox kits come in different sizes and configurations. Make sure the box is large enough to accommodate any product size you will photography. Also, check whether lighting is separate with stands (like mine) or built into the box.
Built-in lighting is fine if you don't want to experiment with different lighting angles. If you want to use different lighting setups, you'll need separate photography lights with stands.
Make Your Own DIY Lightbox
If a ready-made light box isn't in your budget, check out Digital Photography School to learn how to make your own DIY light box from a cardboard box.
Light Boxes Are Perfect for White Background Product Photography
If you need to take photos of your products on a plain white background, a light box is ideal for this purpose.
The white translucent sides of the box create diffused light. If you set up a light source on each side of the light box, you'll create good lighting — even with soft shadows — you need for white background product photography.
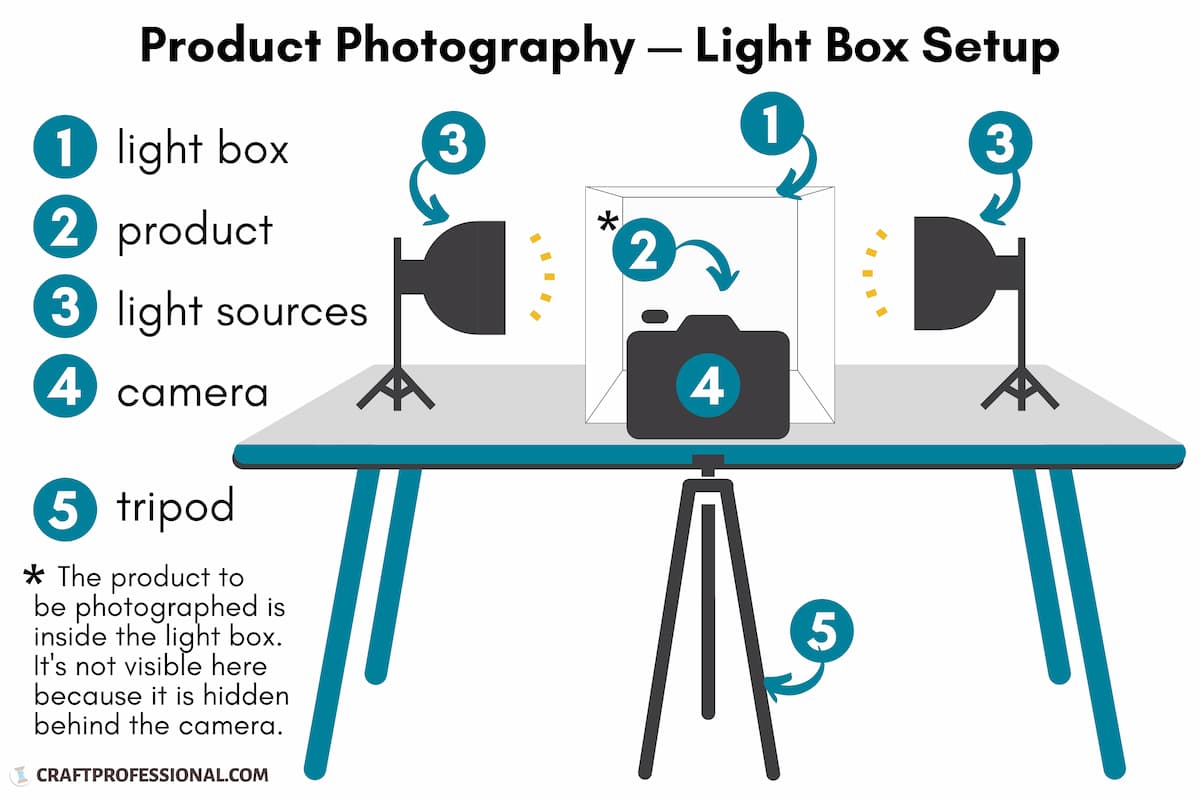
You can see this setup illustrated in the diagram further down the page.
If the items you need to photograph are small products, you don't have to limit yourself to white solid background photography inside your light box. You can also set up for lifestyle product photography inside your light box.
Components of the Light Box Kit Can Be Used for Other Lighting Setups
In my opinion, the best light boxes come with separate (i.e. not built-in) lights with stands.
A photography lightbox with separate lights that can be positioned anywhere is an excellent choice because it gives plenty of flexibility to set up your lighting in different ways. Plus, you won't be limited to photographing inside the photo light box. You can use the gear to photograph items outside of the light box as well.
The lights can be used to illuminate photos you take outside of a light box. My light stands can also function as camera tripods. And I've used the light box frame to support photography backdrops outside of the light box.
How to Use a Light Box for Photography

Light Box Product Photography Setup
1. Light Box
Place your light box on a surface with the open end pointing out toward the spot where you plan to set up your camera.
2. Product
Before you place your product, set up your backdrop inside of the box. Your light box will probably have clips in the top back corners. Use them to hold a backdrop, such as a sweep of white poster board, in place.
If you're not using a seamless backdrop, place the surface you want your product to sit on in the light box as well.
Place your product inside the light box. You can add some props if you like. Arrange everything using good product photography composition rules as a guide.
3. Light Sources
You can set up your light(s) in several ways.
If you'd like a soft shadow on the opposite side of the product, start with one light aimed at one side of the light box.
If you'd like even light throughout the image with no shadow on the opposite side of the product, use two lights. Place one light on each side of the light box as shown in the diagram above.
These arrangements are generally good starting places. You can experiment with different product photography lighting setups from here.
4. Camera & 5. Tripod
Set up your camera in front of the open end of the light box. A tripod is extremely helpful here. It will allow you to keep your hands free, keep angles consistent, and avoid camera shake.
Before you take any photos, check to confirm nothing unwanted appears in the camera's view. Make sure items that should be hidden, such as the clips you used to suspend your backdrop, or the outer edge of the light box opening, are out of the scene. Adjust your setup if you find any problems.
Start Photographing Your Products!
You're ready to start photographing your products.
Setting up for product photography can take a lot of time. Once you're set up, you might as well experiment with different lighting, camera settings, product styling, and composition. The more you experiment, the more you will learn and build your craft photography skills.


New! Comments
Have your say about what you just read! Leave me a comment in the box below.