White Background Product Photography Tutorial
Effective white background product photography is essential for showcasing products to sell or promote on social media, your own site, or a marketplace like Etsy.
Your products may be fabulous, but if you try to promote them using bad photos, people won't be able to see that. They simply won't sell.
Luckily, amateur photographers can learn to take simple product photos. You'll need the right equipment, some basic information, and some practice.
This tutorial will focus on working with a simple tabletop product photography setup using artificial light.
The aim is to keep it simple and easy to understand, so I haven't covered a variety of alternatives. There are links to more detailed information about each of the steps if you'd like to learn more.
You can also check out the comprehensive craft photography guide to review the topic in more depth.
Here's what we'll cover in this white background product photography tutorial:
- Essential Equipment for White Background Product Photography
- How to Set Up Your Backdrop
- How to Light Product Photography
- Position Your Product and Use Styling Props
- Set Up Your Camera for Product Photography
- Learn About DSLR Camera Settings
- Edit Your Product Photos

1. Essential Equipment for White Background Product Photography
You don't need to break the bank buying fancy photography gear to get great results. There's some essential equipment you'll need to set up a basic home photography studio as well as some very nice-to-have tools that will help you take great product photos.
If you'd like to learn more about each item, check out my more detailed guide to equipment needed for product photography.
Essential Product Photography Equipment
DSLR Camera
A DSLR camera will give you control of factors like light and shutter speed to allow you to take really fantastic photos. Canon and Nikon are popular DSLR camera brands.
A DSLR camera will give you control of factors like light and shutter speed to allow you to take really fantastic photos. Canon and Nikon are popular DSLR camera brands.
You can get by with a good mobile phone camera if a DSLR camera is absolutely not in your budget, but consider making it a priority to save up to buy a DSLR camera. It will make a big difference in your results.
Camera Lenses
Start with a kit lens - the lens that came with your DSLR camera when you bought it. It might meet your needs.
Specialty lenses designed for specific conditions exist, such as macro lenses for close up photos. Once you practice taking photos using your kit lens, you may decide you'd like a specialty lens to improve your photos or expand your options.
Tripod
You can get by without a tripod, but I'm including it in this list of essential equipment because having one will make the whole process a lot easier.
White Backdrop
If you're photographing smaller items, clean white poster boards or foam boards are great options for white background product photography.
Commercial white photography backdrops will work for photographing larger items.
Lights & Light Stands
Two continuous lights on adjustable light stands will be enough to get you started.
Diffusers
Diffusers create more even light and softer shadows. Any item made of plain, translucent white material, such as white sheets or curtains, will do the job.
Reflectors
Reflectors help you change the amount and direction of light in the space you're photographing. Inexpensive white poster boards or foam boards make excellent reflectors.
Styling Tools and Props
Adhesives, clamps, stands, and blocks will help you secure your backdrop in place, and position your product to photograph at different angles.
Styling props are optional, but they can add interest and convey important information about your products.
Photo Editing Software
Start with simple software and apps, so you can quickly learn how to edit your product photos.
2. Set Up Your White Backdrop
What to Use as a White Photography Backdrop
Popular backdrops for white background photography include:
- white poster board
- roll of white paper
- white commercial photography backdrop
White Poster Board
Poster board is a great option if you're photographing smaller items. It is inexpensive and easy to find at most stores that carry art, office, or school supplies.
With some care, poster board will stay clean and wrinkle free. But it's easy and inexpensive to replace if it does get marked.
Roll of White Paper
A roll of white paper is another inexpensive option. White paper rolls are larger than poster board, so this is a good choice if the items you're photographing are a bit larger.
Commercial Photography Backdrop
Commercial backdrops are available in a variety of materials and sizes. If your products are too large for tabletop product photography, a larger, commercial backdrop is a good option.
What to Look for in a White Backdrop
Before you set up your backdrop, make sure it is in great shape.
Perfectly Clean
Your white backdrop should be spotless.
Small marks may not be noticeable to you, but your camera will pick up every flaw. You can edit out a minor spot in post-production, but you'll save yourself a lot of time if you start with a flawless backdrop.
Wrinkle-Free
White background photography showcases a clean appearance. Any wrinkles on your backdrop will ruin that look, so it's wise to work with materials that will not wrinkle easily.
Correct Size
Ensure your backdrop is not too small. You need a backdrop that's large enough to create a white background all around the largest items you want to photograph.
Be sure to factor in some extra space, so you'll have room to frame your product in different ways or add styling props.
Flexible
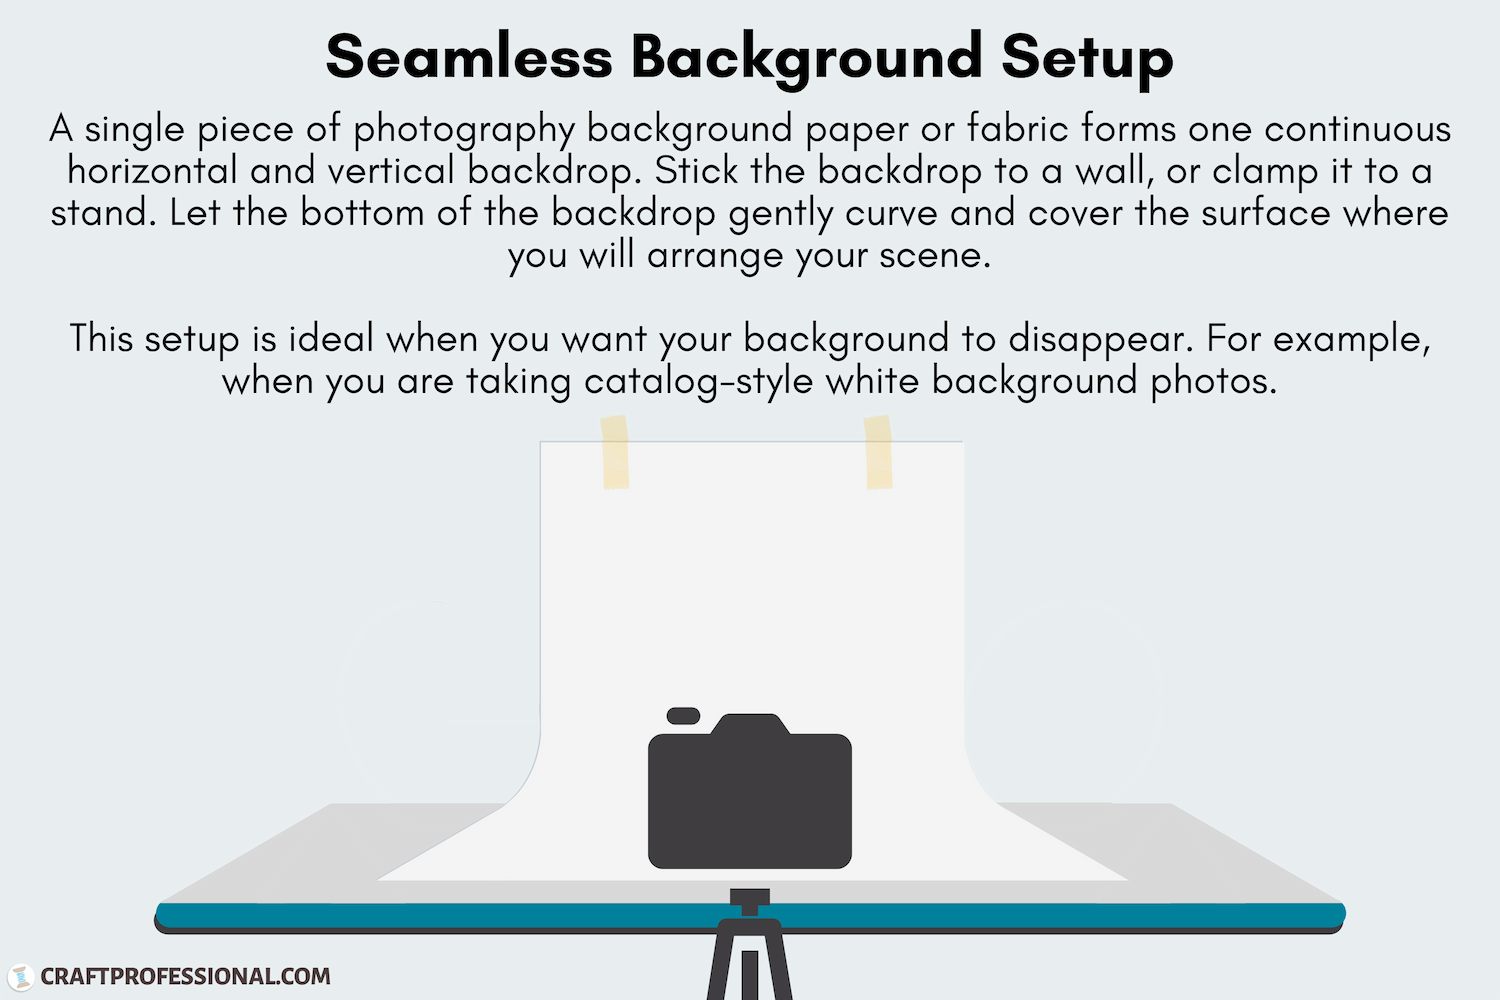
To get the clean look that's characteristic of white background product photos, you'll need a backdrop made from flexible material. The backdrop will be attached to a vertical surface and must be flexible enough to smoothly curve into the horizontal surface to create a seamless transition.
How to Set Up Your Backdrop

Tape it to a Wall
If you're photographing small items on a tabletop, push your table against a wall. Use low tack tape to secure your backdrop to the wall. Let the bottom half of the backdrop gently curve from the wall to the top of the table.
Secure it on a Stand
Larger backdrops can be hung from a commercial photography backdrop stand.
If you don't want to buy a dedicated backdrop stand, find a tall, sturdy item around your house to hold up the backdrop. Some clamps can help this type of DIY setup work.
Arrange the backdrop to avoid wrinkles, and create a gently curved transition from vertical to horizontal.
3. Lighting Setup for White Background Product Photography
Good lighting is essential for achieving quality product photos. Start with a simple side lighting setup and experiment until you're confident your photos are well-lit.
Later, you can learn more about how to light product photography, and experiment with different effects.
Side Lighting Setup With Two Light Sources
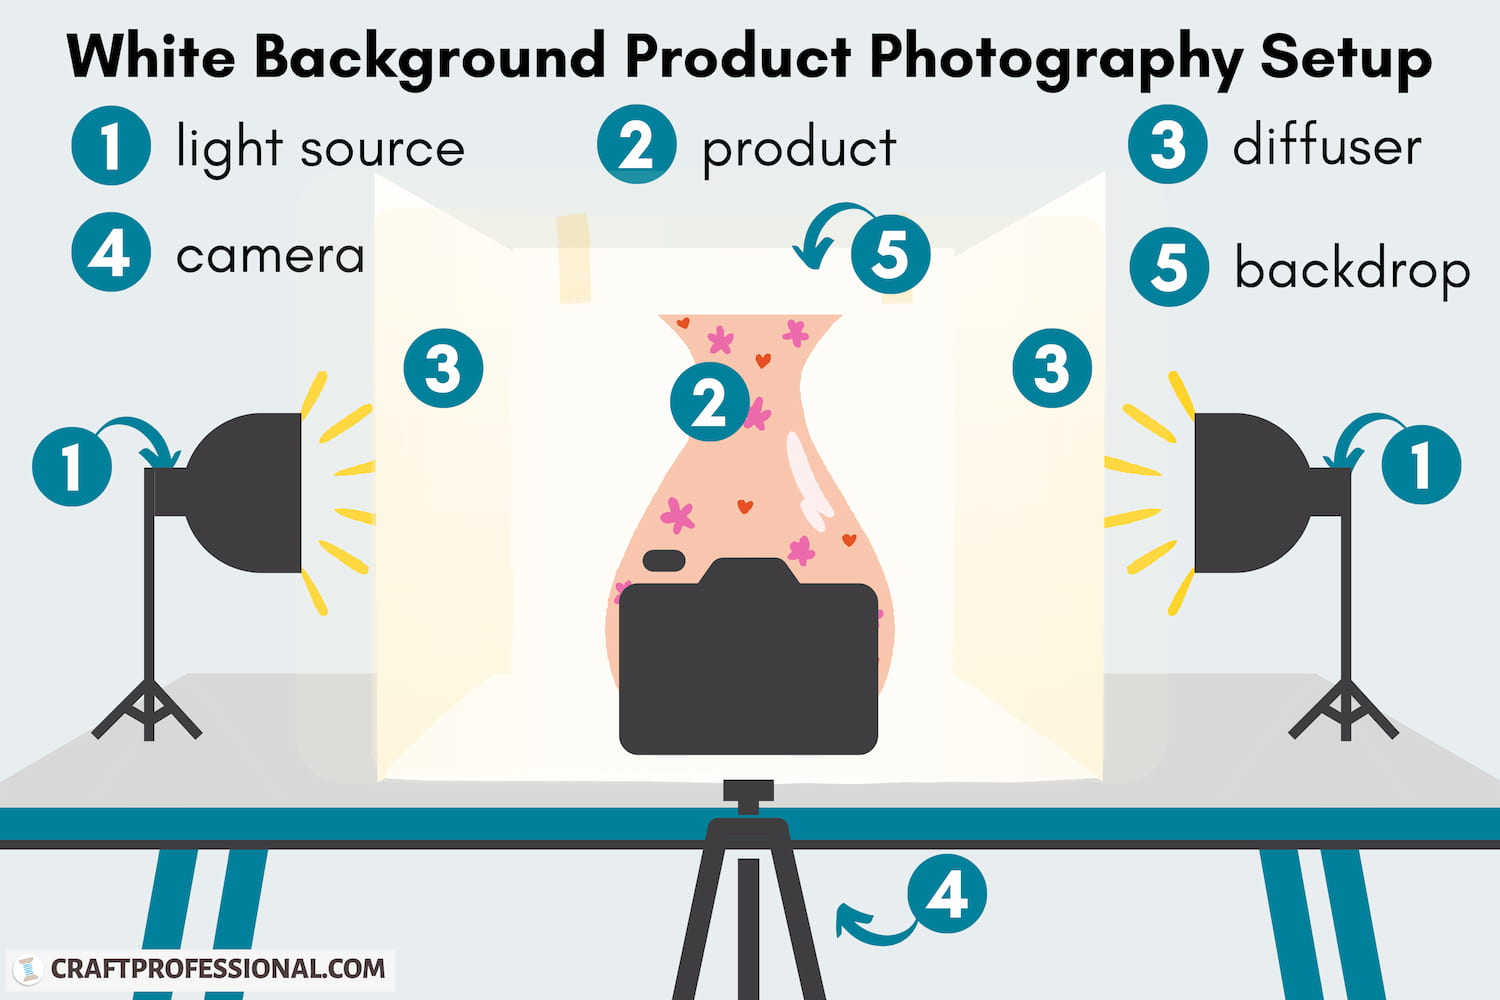
This simple lighting setup requires only two lights - one on either side of the product. It will create the clean look with minimal shadows that's characteristic of white background product photography.
Equipment You'll Use
- two continuous lights
- light stands - to easily adjust the height and angle of your lights
- two diffusers - to spread out the light and soften shadows
- two reflectors (optional) - to add more light and balance shadows
Simple Two-Light Setup
Place one light on one side of the item you're photographing. Place the other light on the opposite side. Both lights will be facing each other, and will be at a 90 degree angle from your camera.
Place one diffuser between a light and the product you're photographing. Add the second diffuser to the other side of your lighting setup, so it is between your second light and your product. The diffusers will spread the more evenly, which results in softer shadows.
Fine-Tune Your Product Photography Lighting Setup
Here are a few tips to help you address common lighting problems and make simple adjustments to your setup.
Take Some Test Photos
Take a few test photos to see how your lighting looks. Check for unwanted shadows, reflections, and determine whether you have enough light in the space.
If you're not pleased with the lighting in your test photos, try these simple changes. Check the results of your changes with more test photos.
Add Reflectors
Reflectors can help if you don't have enough light. They bounce light from your source back onto your product, thus increasing the amount of light in the space.
Move Your Reflectors
Shifting the reflector(s) will change the direction light travels. Small adjustments in the position and angle of your reflectors can have a big impact on your photo.
Move Your Lights
Changing the distance between your light sources and your product will change the amount of light in the area you're photographing.
Change the Angle of Your Lights
Positioning lights at a 90 degree angle from the camera is a good starting point, but you may want a different look.
Position your lights at any angle roughly between 90 and 130 degrees from the camera. As you change the angle of your lights, shadows will change.
Raise or Lower Your Lights
The height of your lights will also impact shadows. Raise your lights for shorter shadows. Lower your lights for longer shadows.
Great lighting is key to good product photography, so take the time you need to get your lighting right.
4. Position Your Product and Use Styling Props
The way you position and prepare your product before you start taking photos can have a huge impact on the quality of your photos.
Ensure Your Item is in Perfect Condition
Carefully check the product you will be photographing. Look for tiny imperfections (tears, smudges, or marks) on the product and the packaging.
Tiny marks that are not particularly noticeable will become strikingly obvious in a photo. If you find any imperfections, clean the product or choose another one.
Photograph Many Angles
Be prepared to take photos from several different angles so shoppers will be able to see everything about the product. Be sure to focus on key features that make your item special.
Consider Using Styling Props
Styling props can help show your product at different angles, add interest, and add information about your product.
Simple clear, acrylic blocks will help you position your products at different angles. Other items that you would typically associate with your product can be useful props that will add interest to your photos and provide information about size and function.
If you want to take your product photography styling to the next level, here's where you can learn more.
5. Set Up Your Camera for Product Photography
When you set up your camera, you'll need to consider the camera's angle and distance from your product. A tripod is an immensely helpful tool to help you keep your camera exactly where you want it.
Photo Composition
The way you arrange your product and styling props within your photos can have a big impact on the overall look of your images. Learn the basics of photography composition, and you'll be ready to set up for effective photos.
Camera Angles
The height (angle) of your camera relative to your product can have a big impact on the mood of your photos. You may want to experiment to find angles that showcase your product's best features and highlight the item's shape and details.
Crafter’s Guide to Taking Great Photos is an excellent source of detailed information about the ways camera angles impact the look of product photos.
Use a Tripod
A tripod is an extremely helpful tool for product photography. Securing your camera on a tripod will:
- free your hands for other tasks
- keep your camera in one place, so you can maintain consistency over several photos
- eliminate camera shake, so you achieve sharp, clear images.
Check Your Setup With a Test Photo
Once you have everything set up, take a few test photos to make sure everything looks good.
6. Learn About DSLR Camera Settings
You don't need to know about every setting on your DSLR camera to take great product photos, but there are some essential features you need to understand including:
- White Balance
- ISO
- Shutter Speed
- Aperture
- Camera Modes
Setting the white balance helps ensure the colors in your photo are true.
ISO, shutter speed, and aperture work in combination. Generally, they affect your camera's sensitivity to light, how much light your camera lets in, and whether images are sharp or have blurred areas.
Camera modes are settings on your camera that help you get the right combination of ISO, shutter speed, and aperture settings.
You'll need to spend a little time learning the basics of camera settings for product photography, and then experimenting with different settings.
7. Edit Your Product Photos
If you've done a good job with set up and choosing camera settings, your photos won't need a lot of editing. When you edit, don't go overboard. Ensure your photo looks realistic and accurately reflects the appearance of your product.
There's no need to understand complex photo editing techniques or splurge on expensive software.
Learn the basics of editing product photos such as adjusting brightness, contrast, and saturation, and you'll be able to significantly enhance your images.
Start Taking Great Product Photos!
These simple steps will set you on the path to taking high-quality product photos. Some experimentation and practice will be essential.
Spend time working with your camera and experimenting with different lighting and styling. You'll learn the best ways to photograph your particular products under the conditions you have available, and you'll be rewarded with the ability to consistently create stunning product images.


New! Comments
Have your say about what you just read! Leave me a comment in the box below.