- Home
- Where to Sell Your Crafts
- Pixlr Photo Editor
Pixlr Photo Editor Tutorial
How to Use This Free Online Image Editing App
Pixlr photo editor is simple to use, free, web-based photo editing software. It's an excellent solution for anyone who needs an easy tool for retouching photos.
If you're new to using photo editing software, you'll love Pixlr's simplicity.
It will allow you to take your images to the next level without spending a lot of time learning complex software.
Why Use Pixlr Photo Editor?
I earn a commission for purchases made through links on this page.
To learn more, please see my disclosure.
There are loads of free image editing software programs online. So why use Pixlr?
- It includes all of the basic digital image editing functions — like brightening and resizing photos — needed to make your photos look great.
- It's an easy photo editor. You don't need to learn a bunch of extra techniques to create awesome edits.
- Did I mention, you get the functionality of a powerful image editor for free?
If you're editing product photography (for craft show applications, for example) Pixlr photo editor is a particularly good choice. It's not surprising craft show organizers recommend this tool to vendors who need to edit product photos for juried art show applications.
What Can Pixlr Do?
Edit Photos
Pixlr is a good, free tool for editing photos.
If you need to crop, or resize images, adjust color, brightness, highlights, or shadows, Pixlr offers effective, simple tools that create an easy editing process.
Create Graphics for Social Media
You can also use Pixlr photo editor to quickly and easily make graphics for social media posts. The app features templates sized for popular social platforms and a variety of fonts and graphic images that make design simple.
Choose the Right Tool for the Job
There are several apps in the Pixlr family of tools.
To keep things simple, we're just going to look at the two apps that include all features you'd need for common photo editing tasks and making graphics: Pixlr X, Pixlr E.
- Pixlr X is easier to use.
- Pixlr E offers a larger array of powerful tools.
Both versions can be used on Mac devices or a PC computer online from the Pixlr site.
Alternatively, you can download and install Pixlr desktop from the company's site or Google Play if you like to work offline.
Let's compare Pixlr X vs. Pixlr E, so you can decide which version is best for you!
Pixlr X — The Easy Photo Editor
Use Pixlr X if you need to make simple edits to digital images, and you don't want to spend time learning how to use image editing software.
With Pixlr X you can:
- Open most image file types including: PSD (Adobe Photoshop), JPEG, and PNG
- Upload your own image if you're using Pixlr to touch up your own photos
- Or use one of Pixlr's stock images if you're using the app to design graphics for your blog or social media posts
- Crop, resize, and rotate your images
- Adjust brightness and color
- Save your edited photos to your computer using JPEG format or PNG format
- Use templates, text, and graphics to create images for social media posts
Pixlr E — The More Powerful Photo Editor
Pixlr E lets you use more advanced editing techniques and tools like:
- magic wand and lasso selection tools
- blur or sharpen images
- heal and clone
- color replace
- add gradient
- add shapes
- select colors with the color picker
This more advanced version of the software allows you to do some of the same kinds of cool photo edits you can achieve with the more complex (and not free) Adobe Photoshop!
Which version of the app should you use?
If you want to play around with some more advanced image editing techniques, check out Pixlr E.
If you want to do quick and simple image editing, stick with Pixlr X.
How Do I Use Pixlr Editor?
I spent some time working with the Pixlr photo editor. It was straightforward to use and didn't take long to learn.
I just clicked around to discover how to use the tools and was able to edit an image quickly.
It's fairly simple and intuitive. As long as you save a copy of the image you're editing so you don't lose the original, you can't really hurt anything by clicking around and seeing what each button does.
Here's a sample edit of a photo from Pixlr's collection of stock images to show you how the photo editor works.
How Can I Edit My Photos?
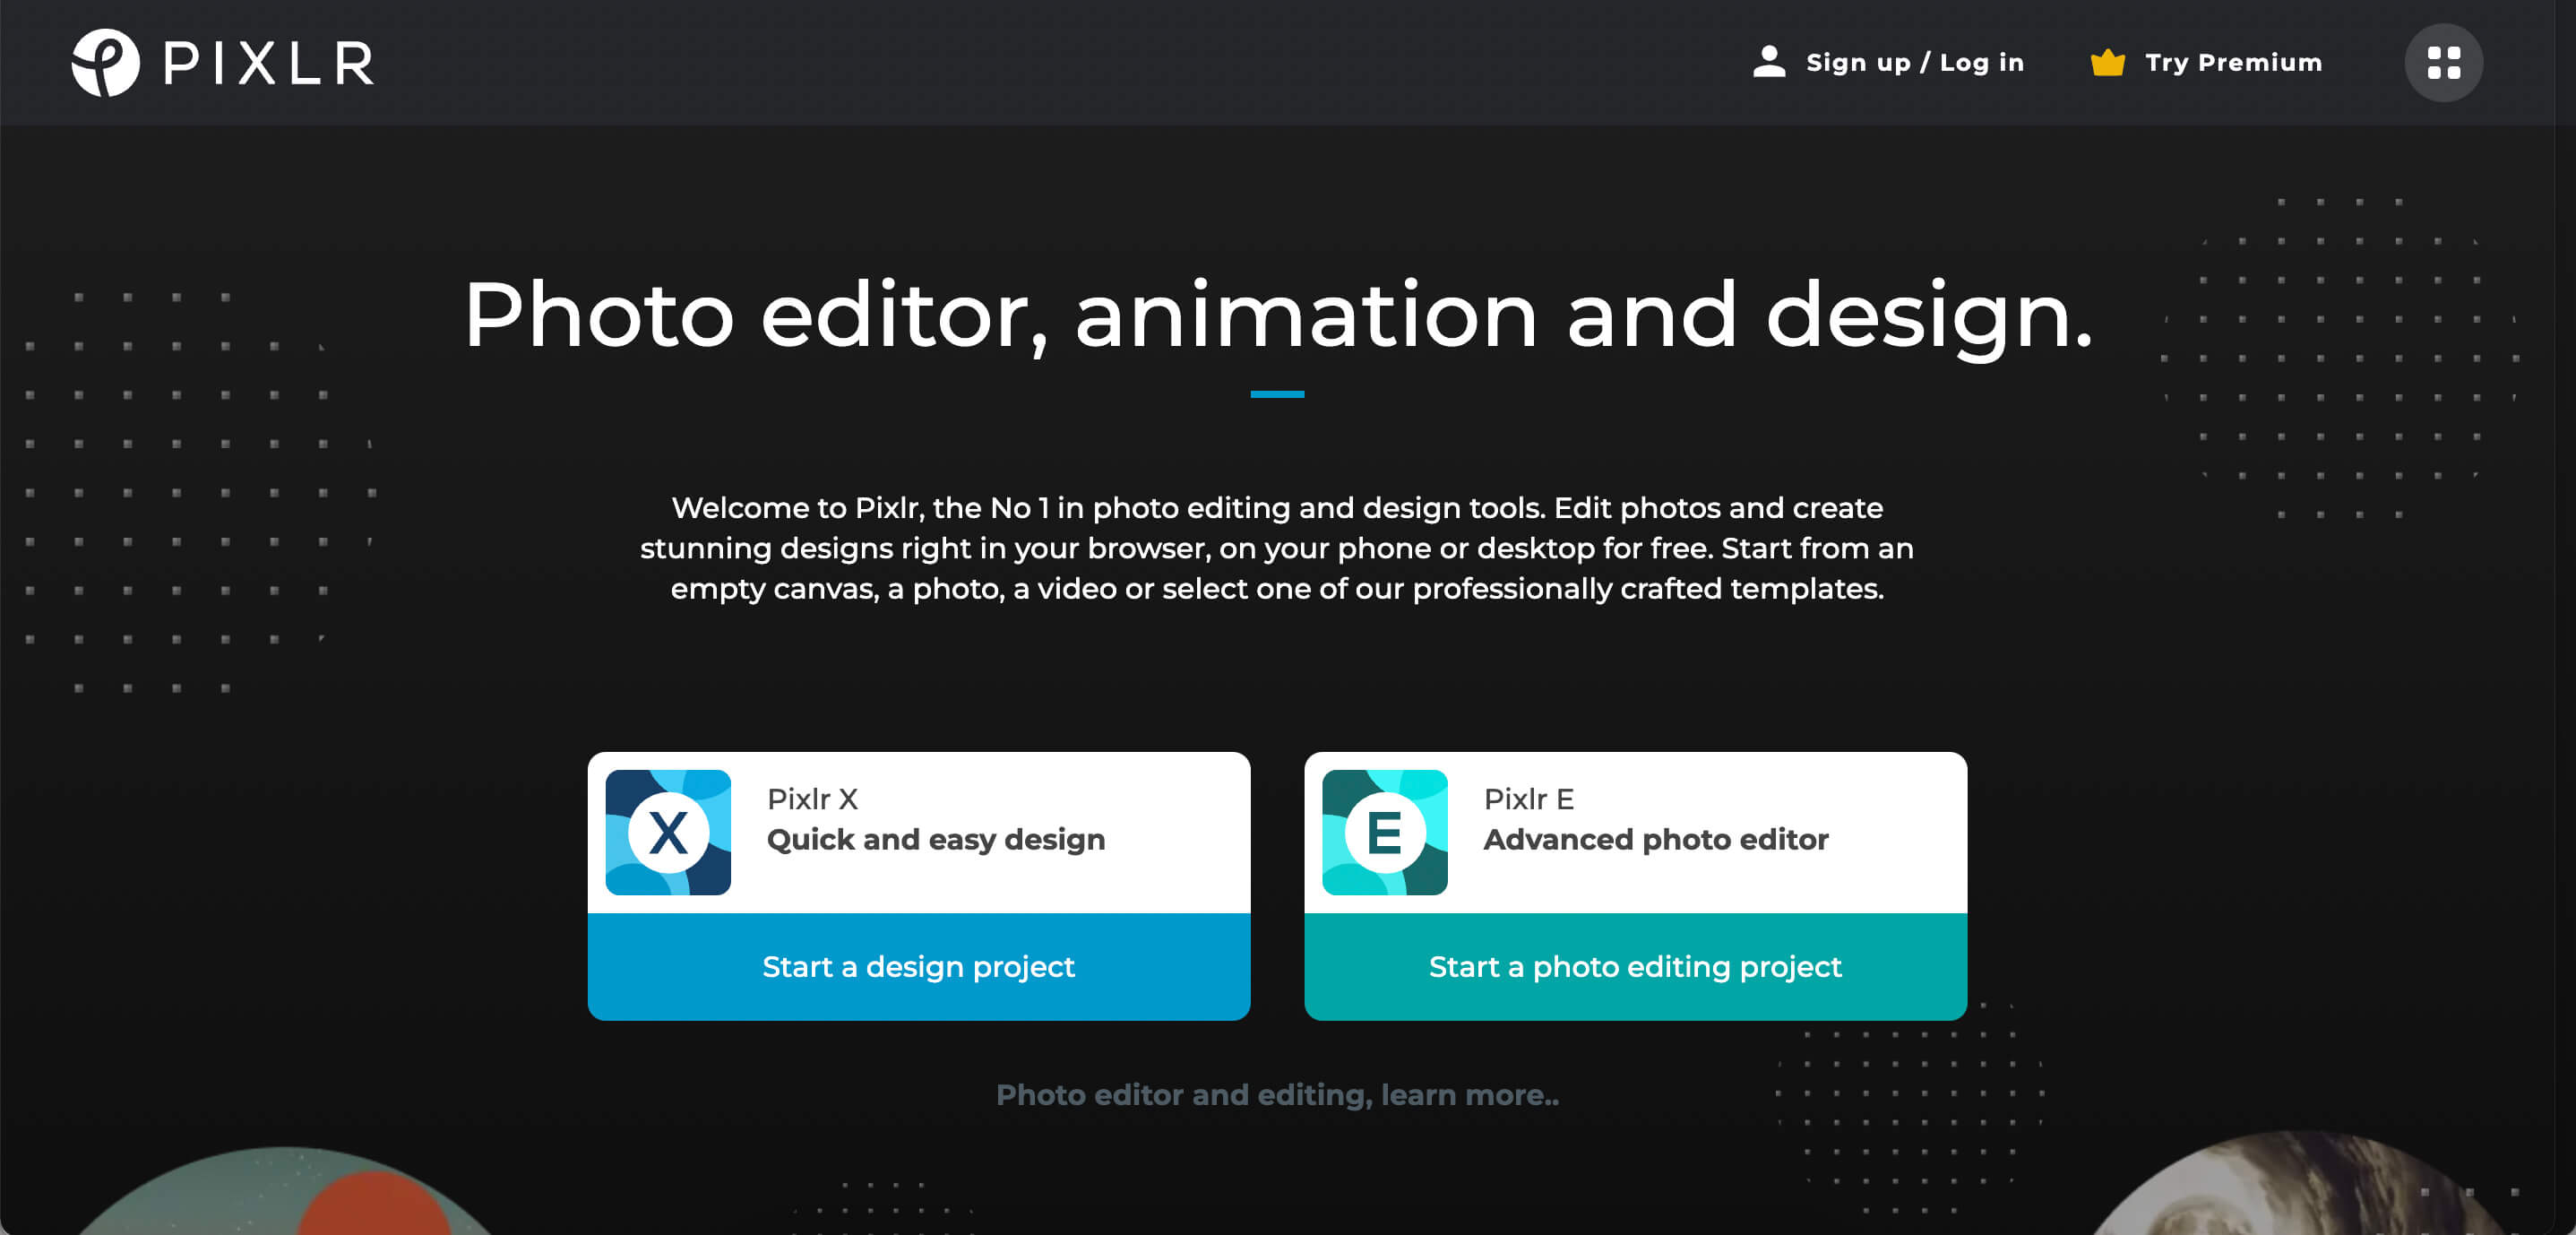
Head over to Pixlr's home page.
Click on the Pixlr X box if you want to use the simple editor.
Click on the Pixlr E box if you want to use the editor that has more features.
I've used Pixlr X in the examples below to keep things simple and to show just how much you can actually do with the most basic version of this tool.
How do you add pictures to the Pixlr app?
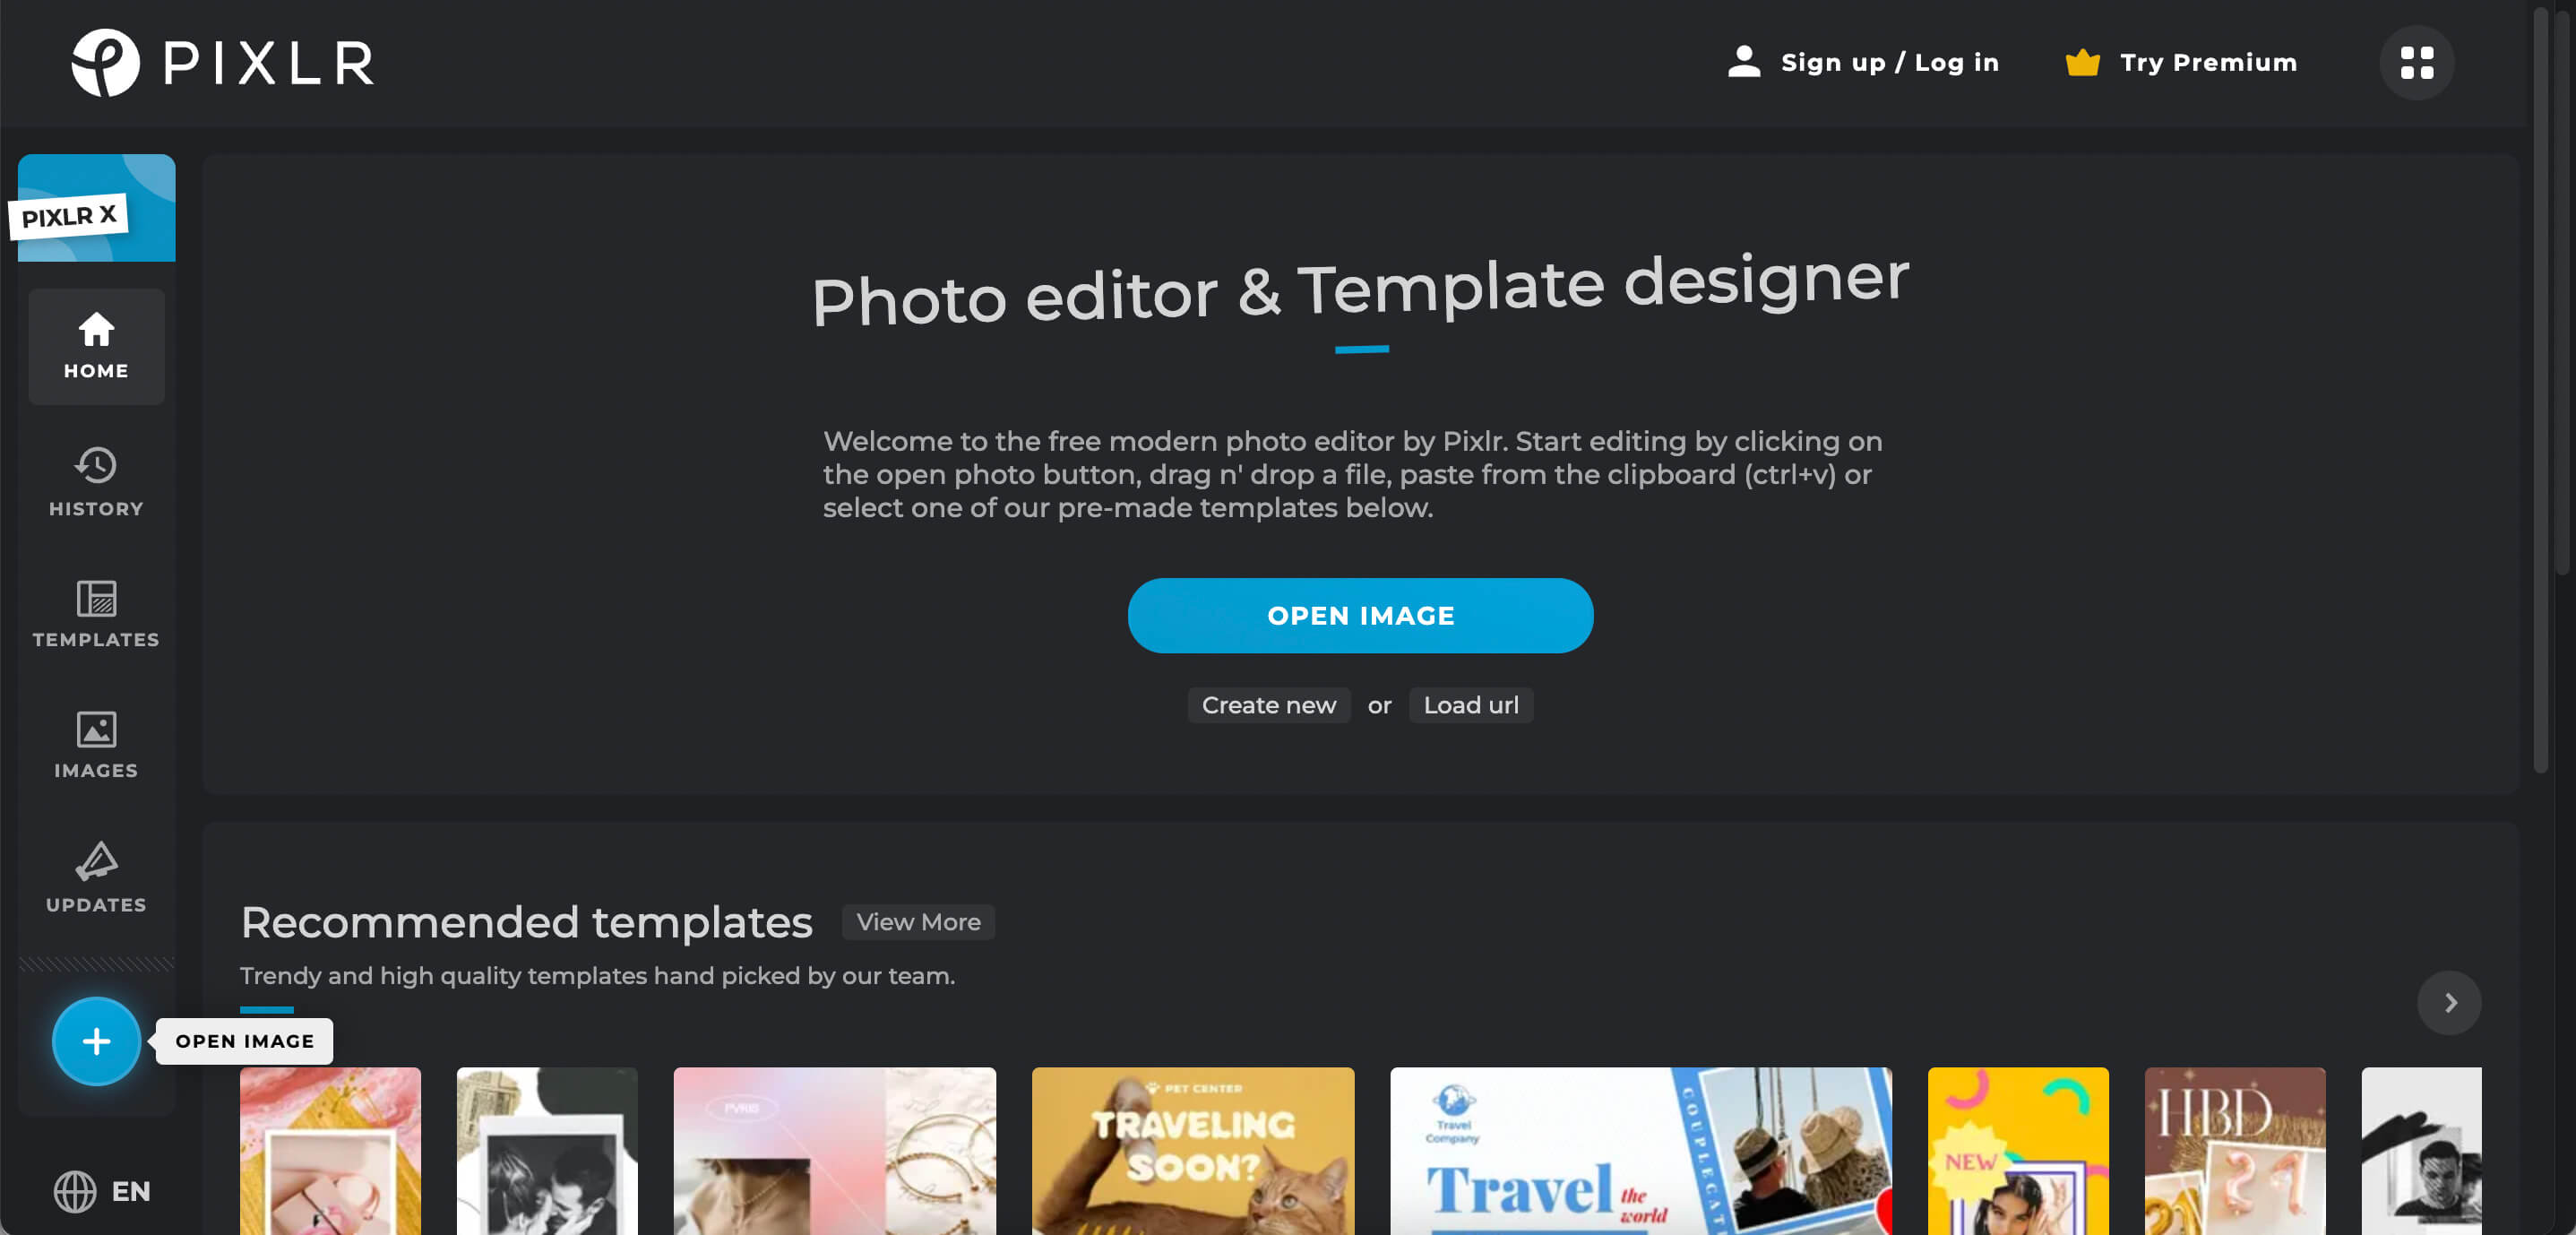
You should be inside the photo editor & template designer now. Before you begin editing, you'll need to upload the photo from your computer to Pixlr.
Look for a round button with a plus sign on the bottom left side of the screen. You'll see the label "Open Image" when you hover your cursor over the button.
- Click the Open Image button.
- Find the image file on your computer that you want to edit.
- Select the file and click open.
You're almost there... Just one more step!
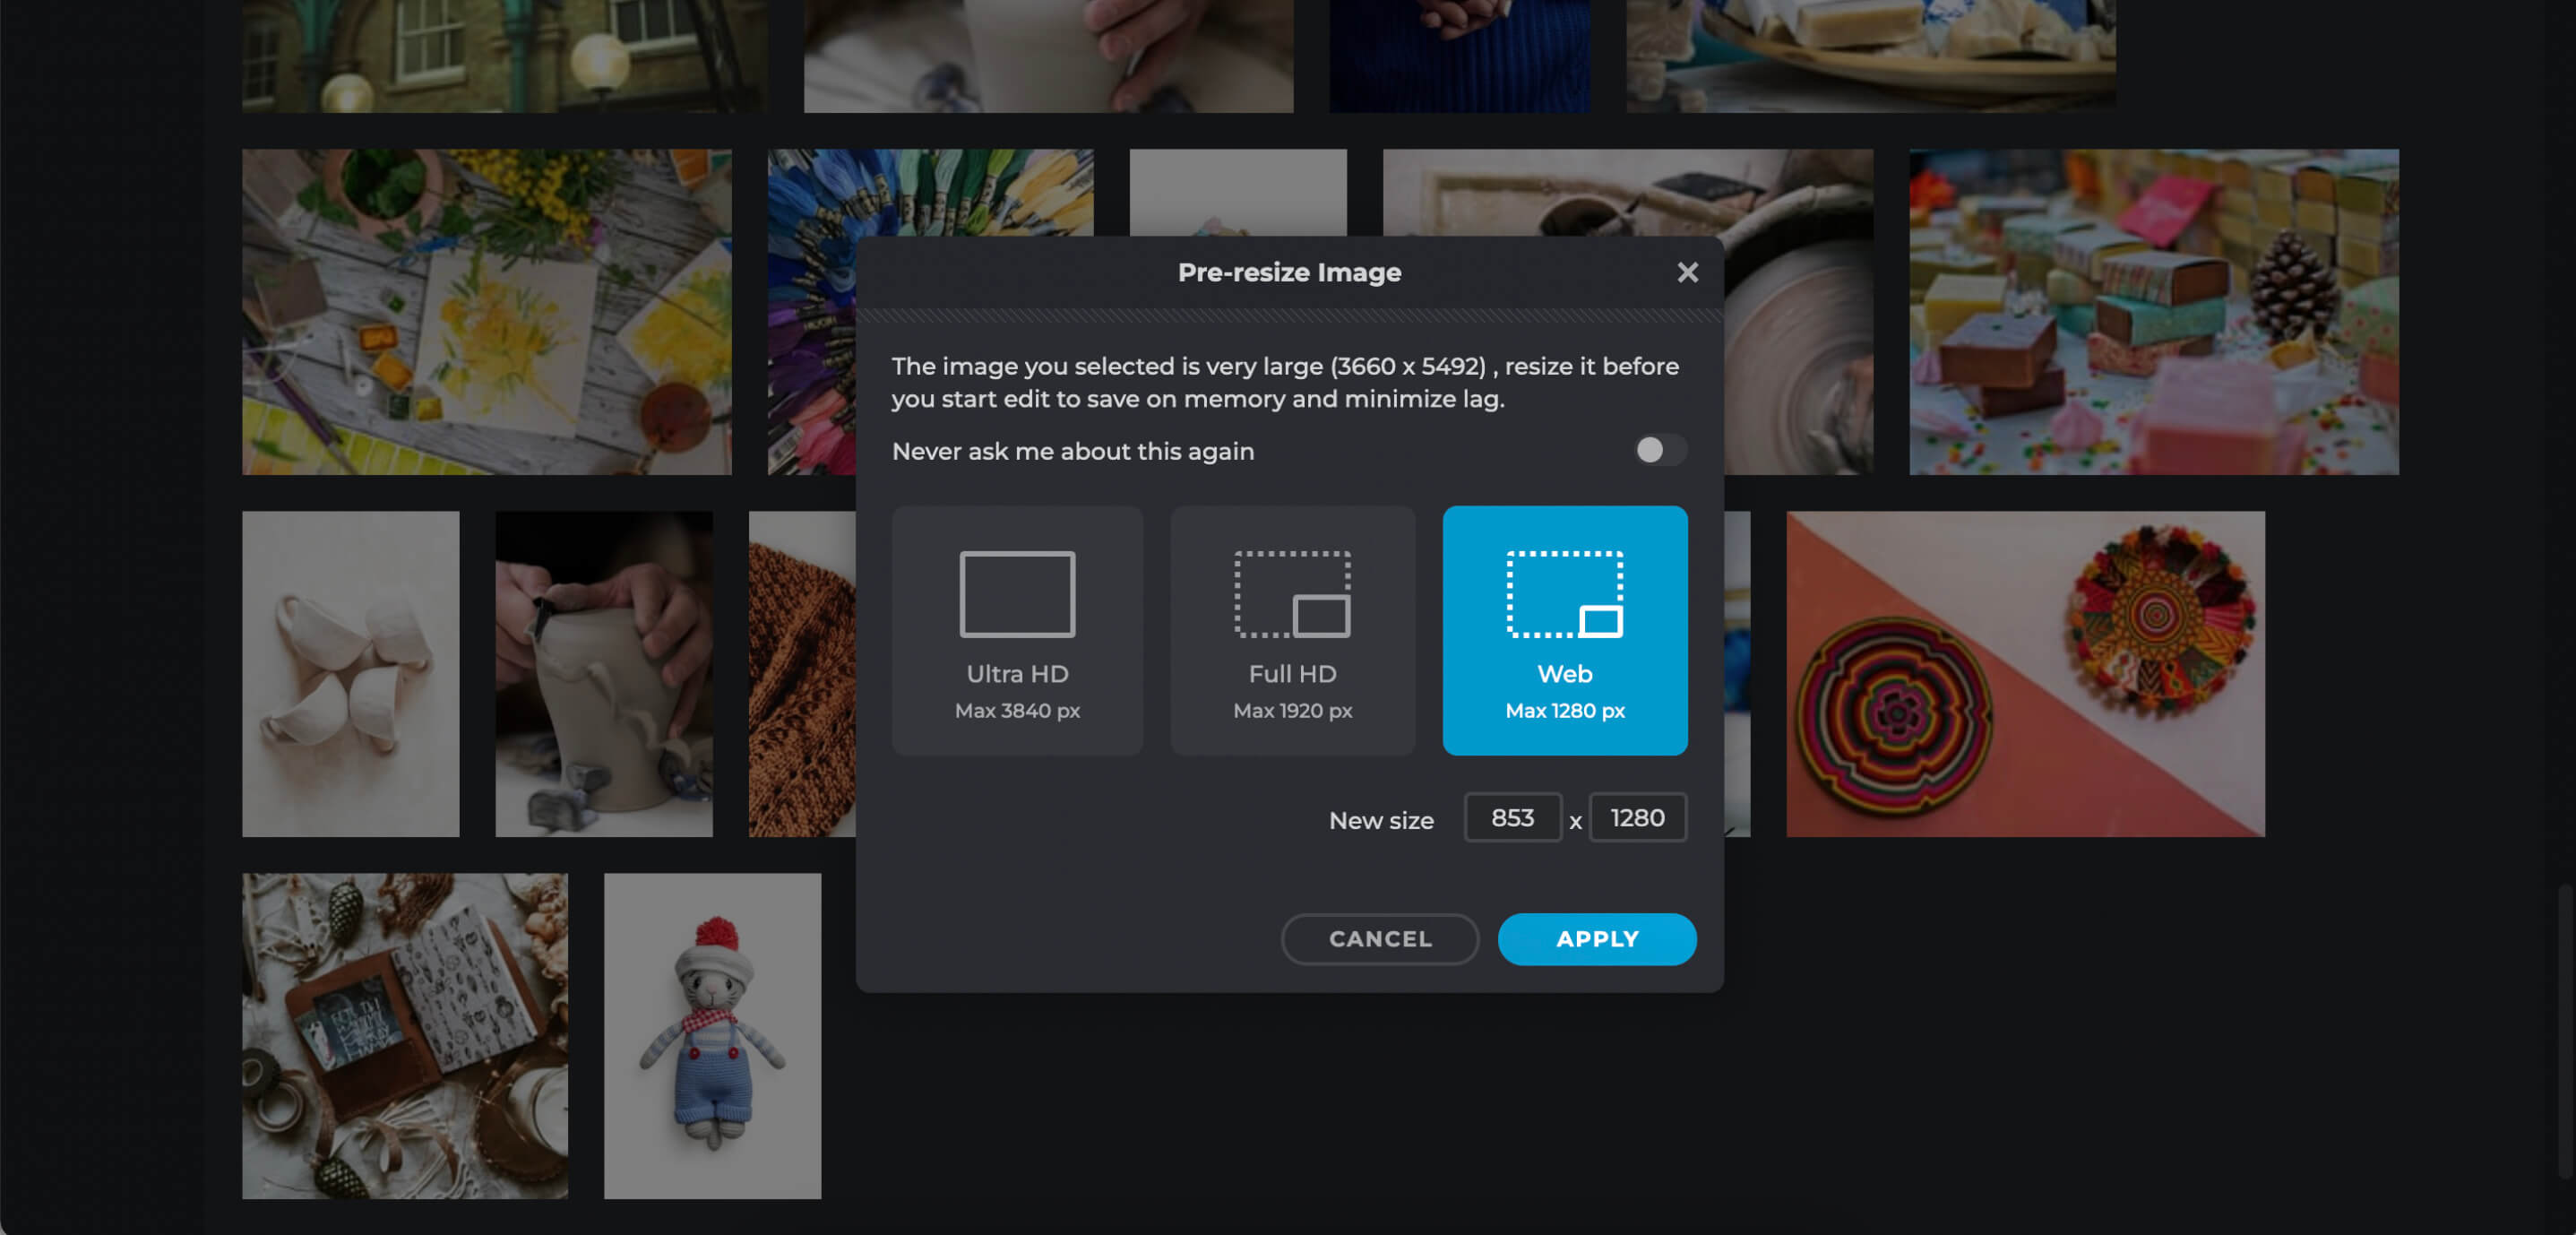
Pre-Resizing Images
Pixlr lets you pre-resize an image before you open it in the app.
What the heck does that mean?!
If you're working with a very large image, you may experience some lag. To avoid this issue, you can choose to make your image smaller before you start working on it.
I didn't experience any lag when I left my large images at their original size. But it's an option you might appreciate if your computer is working slowly.
Just don't make your images too small. Keep them as large as they need to be for their intended purpose.
Choose the image size you want to work with — original, full HD, or web — and click apply.
Your new image will open in Pixlr.
How Do You Crop in Pixlr?
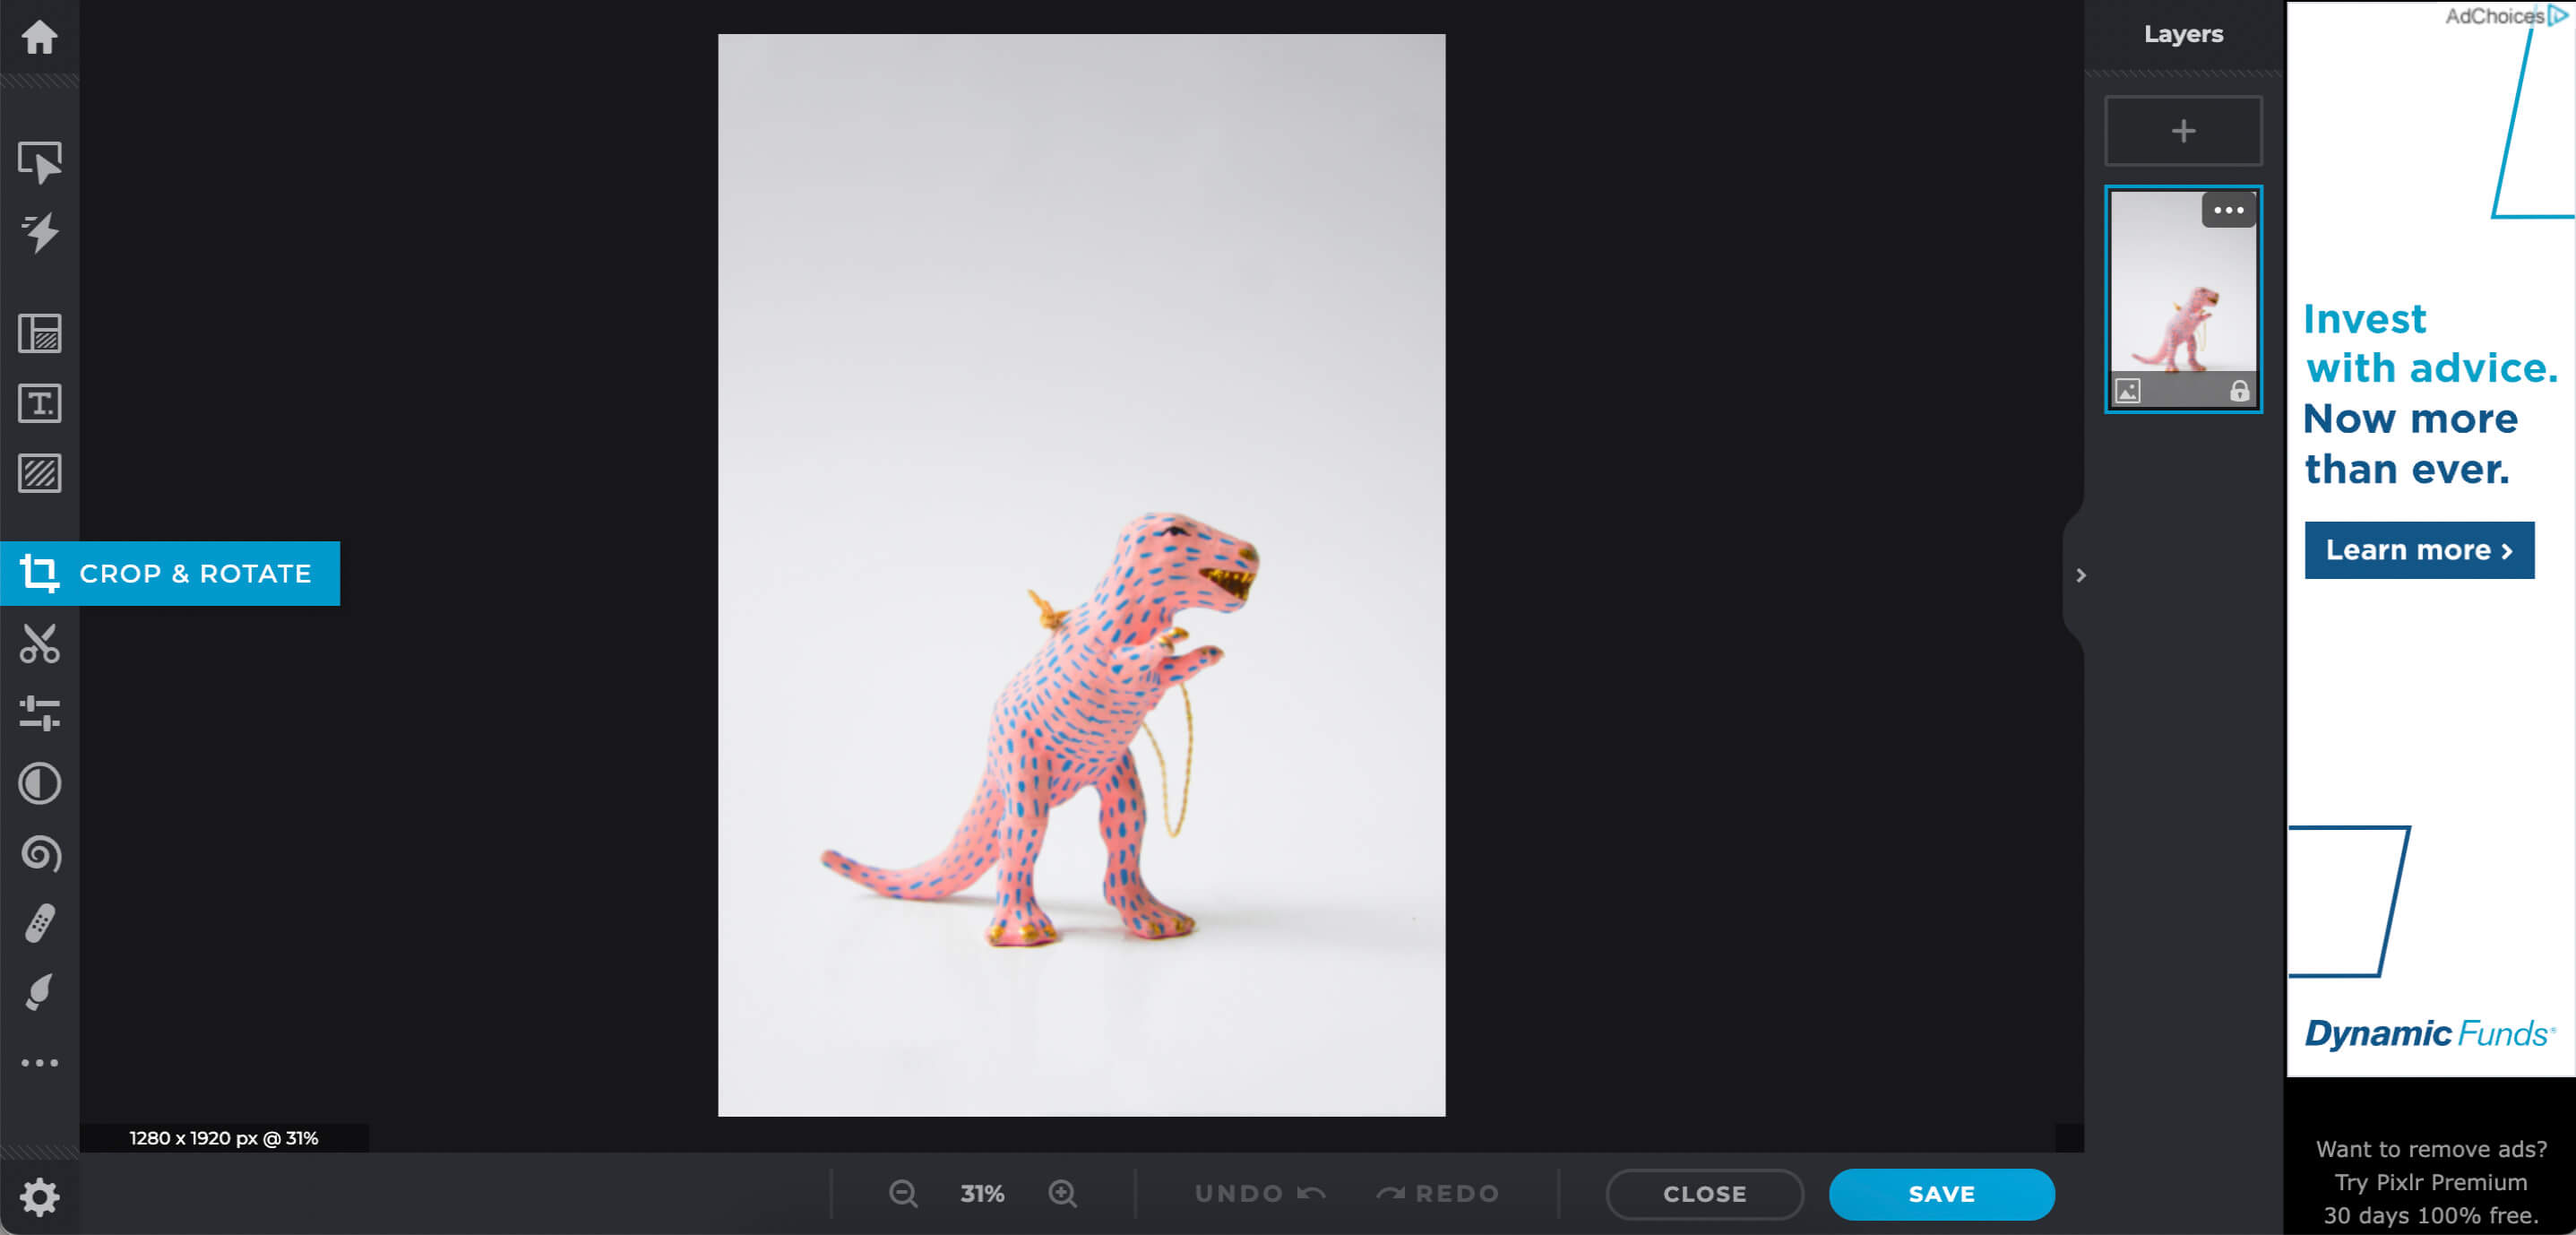
Whether you're editing your photos to use on social media, in your Etsy shop, or to submit with juried art show applications, you'll need to ensure the image fits the right dimensions for its intended use.
Pixlr photo editor makes it easy to crop your images so they meet those requirements.
Hover your cursor over the buttons on the left side of the screen. Labels will pop up describing what each tool does.
Find the tool labeled "Crop & Rotate." Click on it, and you'll see controls like the ones pictured below.
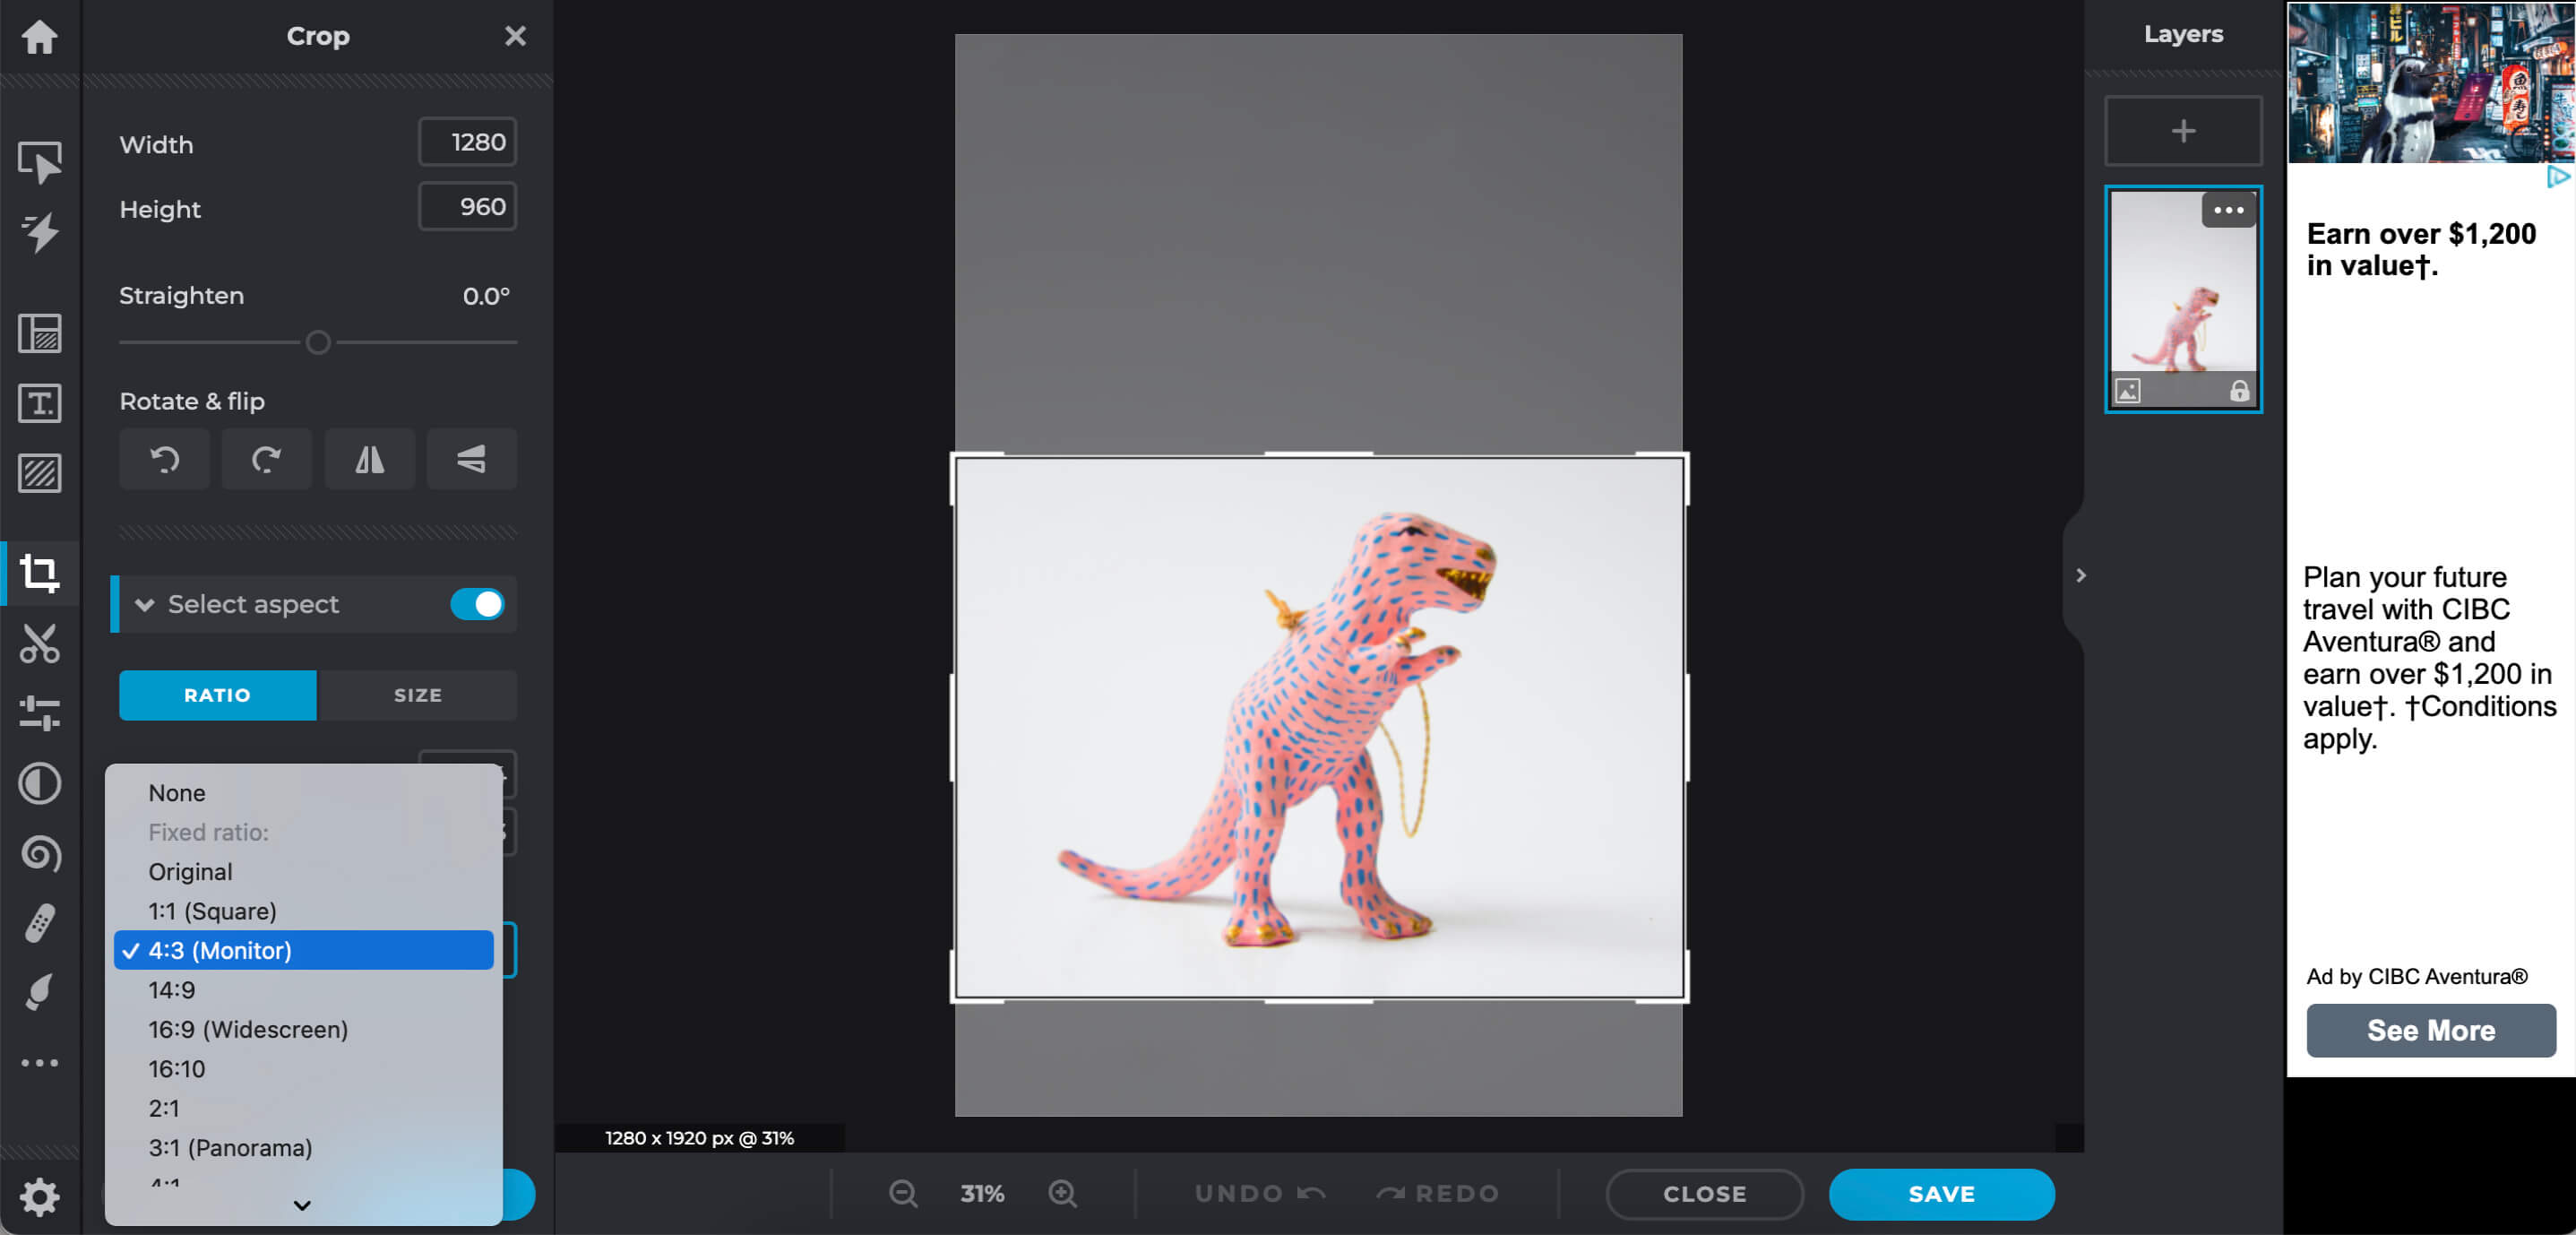
From the Crop & Rotate interface, you can crop your photos a few different ways.
Exact Dimensions
If you know the exact dimensions you need (measured in pixels), you can type them into the width and height boxes at the top of the screen.
A box (like the one around the dinosaur pictured above) will show you what will remain in the photo once you crop. You can move that box around to better frame your image.
Manually Select Dimensions
You can click at an edge of the bounding box a drag your cursor to manually change the area you will crop
Select Aspect
Here's a really useful feature!
Click on select aspect, then click the box under preset. A menu will pop up at the bottom left (pictured in the photo above).
This menu lets you automatically choose the right aspect ratio for a long list of places you might be editing images for. There's no need to remember the right image dimensions for one hundred social media platforms. Pixlr photo editor will do it for you!
If you're scratching your head and thinking — Aspect ratio? What the heck is that? — Digital Photography School has a good article that will clear things up.
Framing Your Image
When you click and drag anywhere on the box that shows the crop area, you can move it around to ensure the right parts of the image remain in the image.
You'll also notice, when you click and hold (or drag), a grid of nine squares shows in that box. That grid is a handy photography composition guide. It will help you use the rule of thirds to crop your image in the most visually appealing way.
Check out my photography composition tips for beginners if you have no idea what I'm talking about here!
How to Adjust Brightness
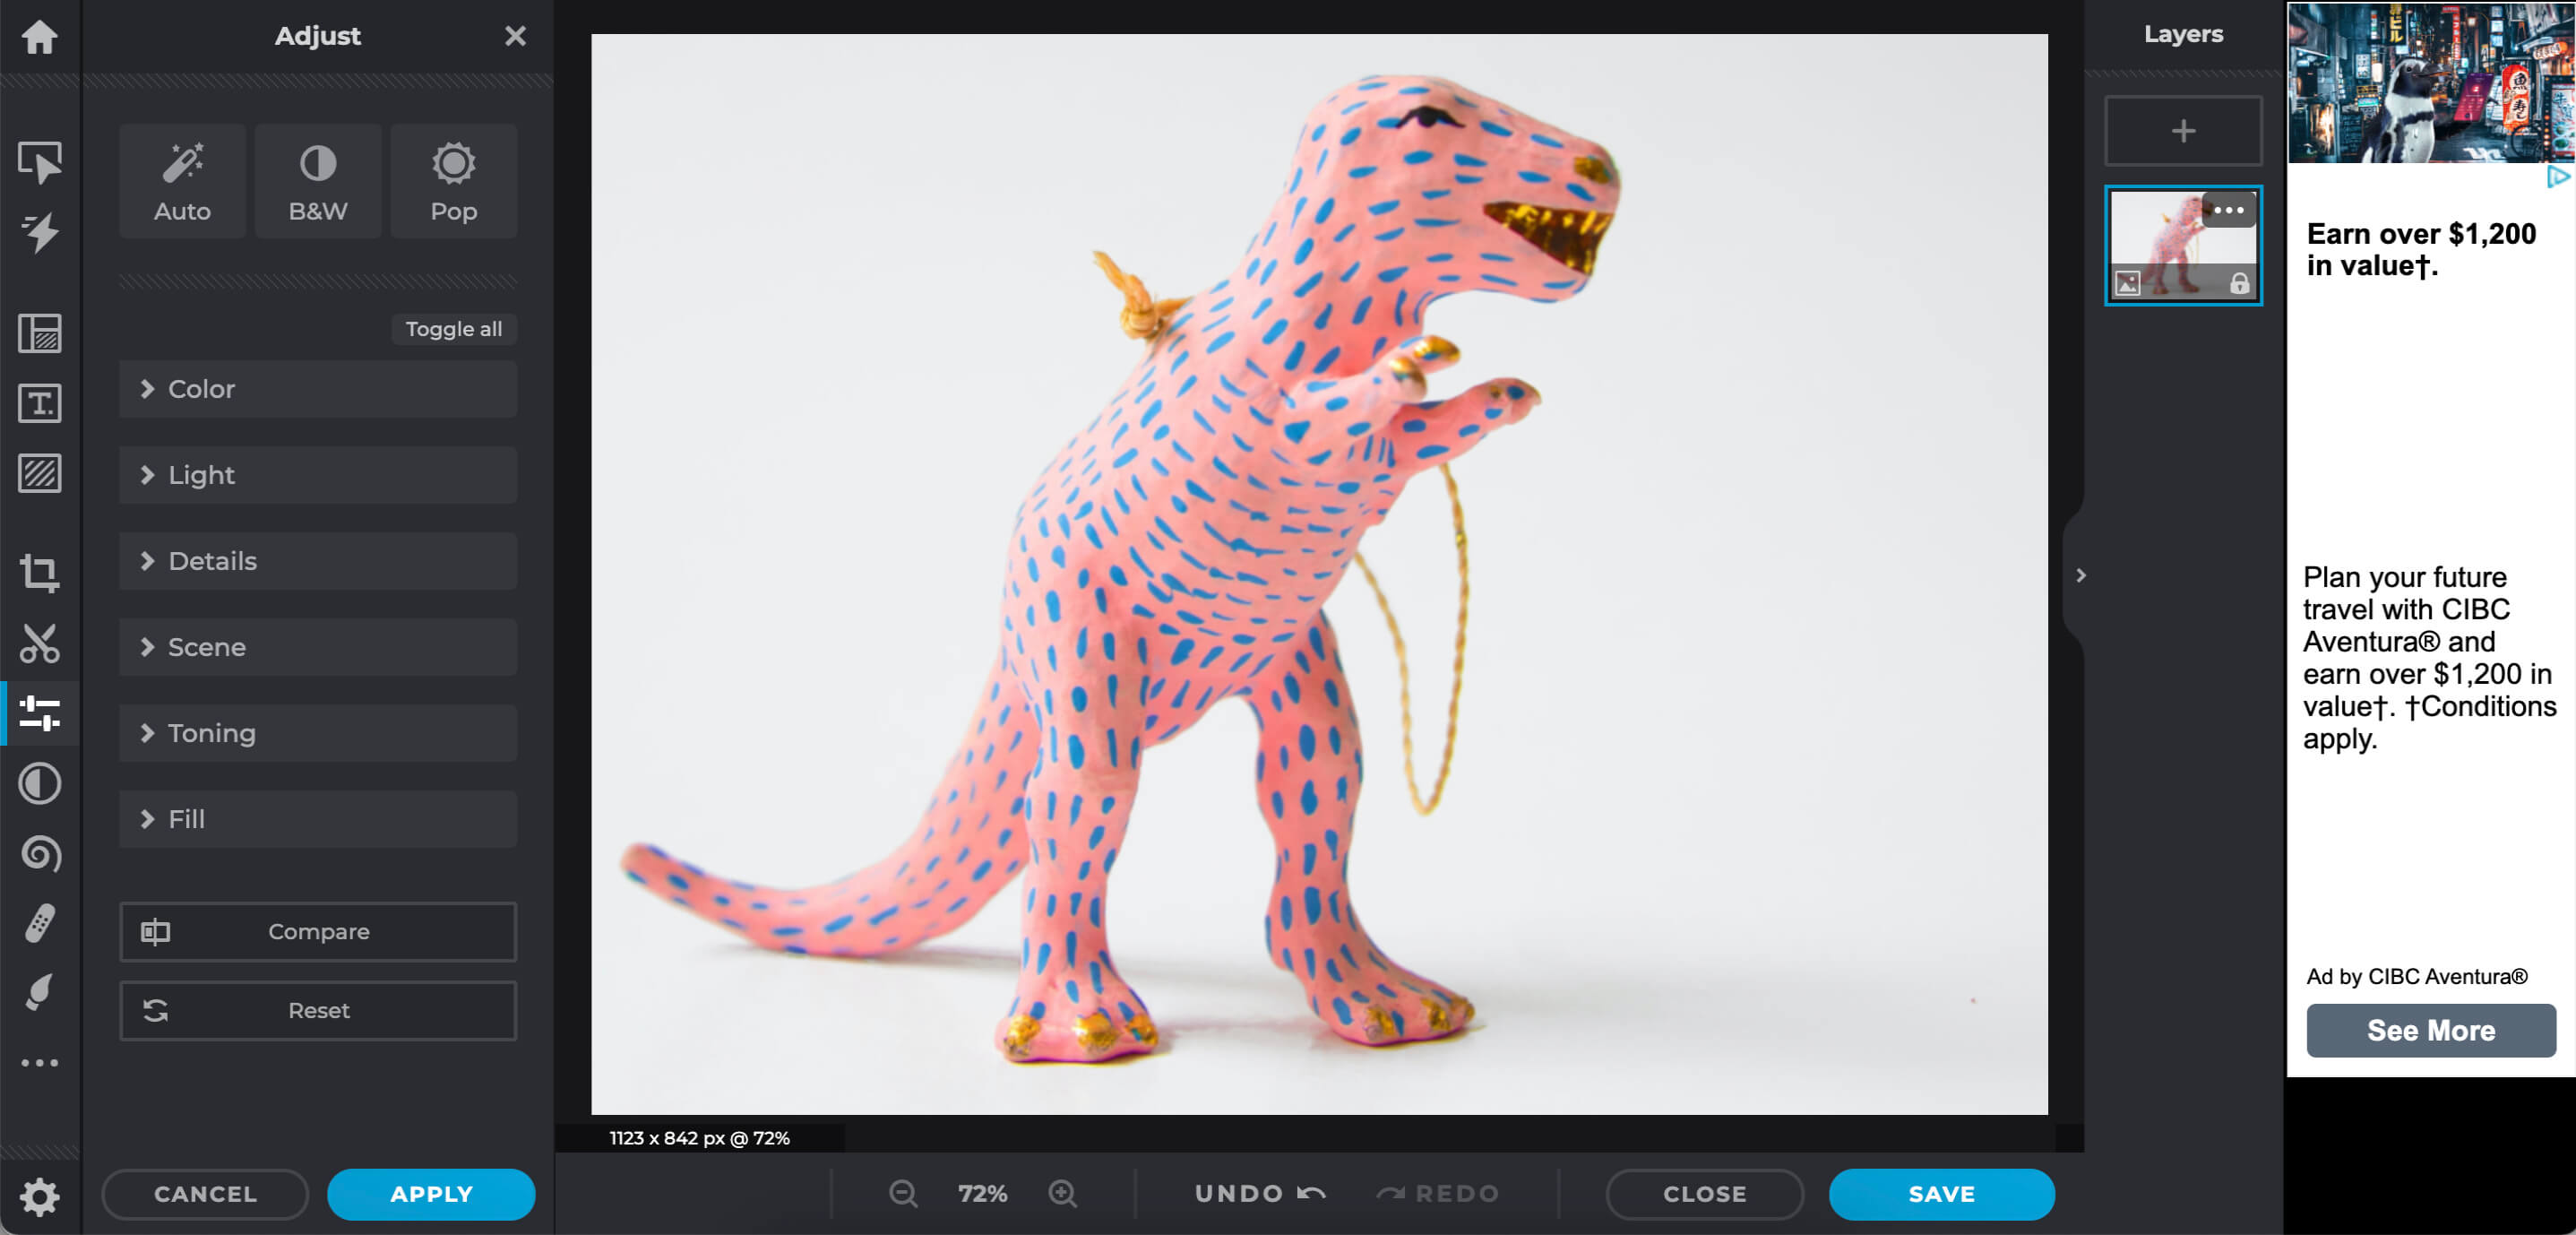
Move your cursor over the tools on the left side of the page until you find the one labeled "Adjust & Filter." Click on the Adjust & Filter button, and your workspace will look like the one pictured above.
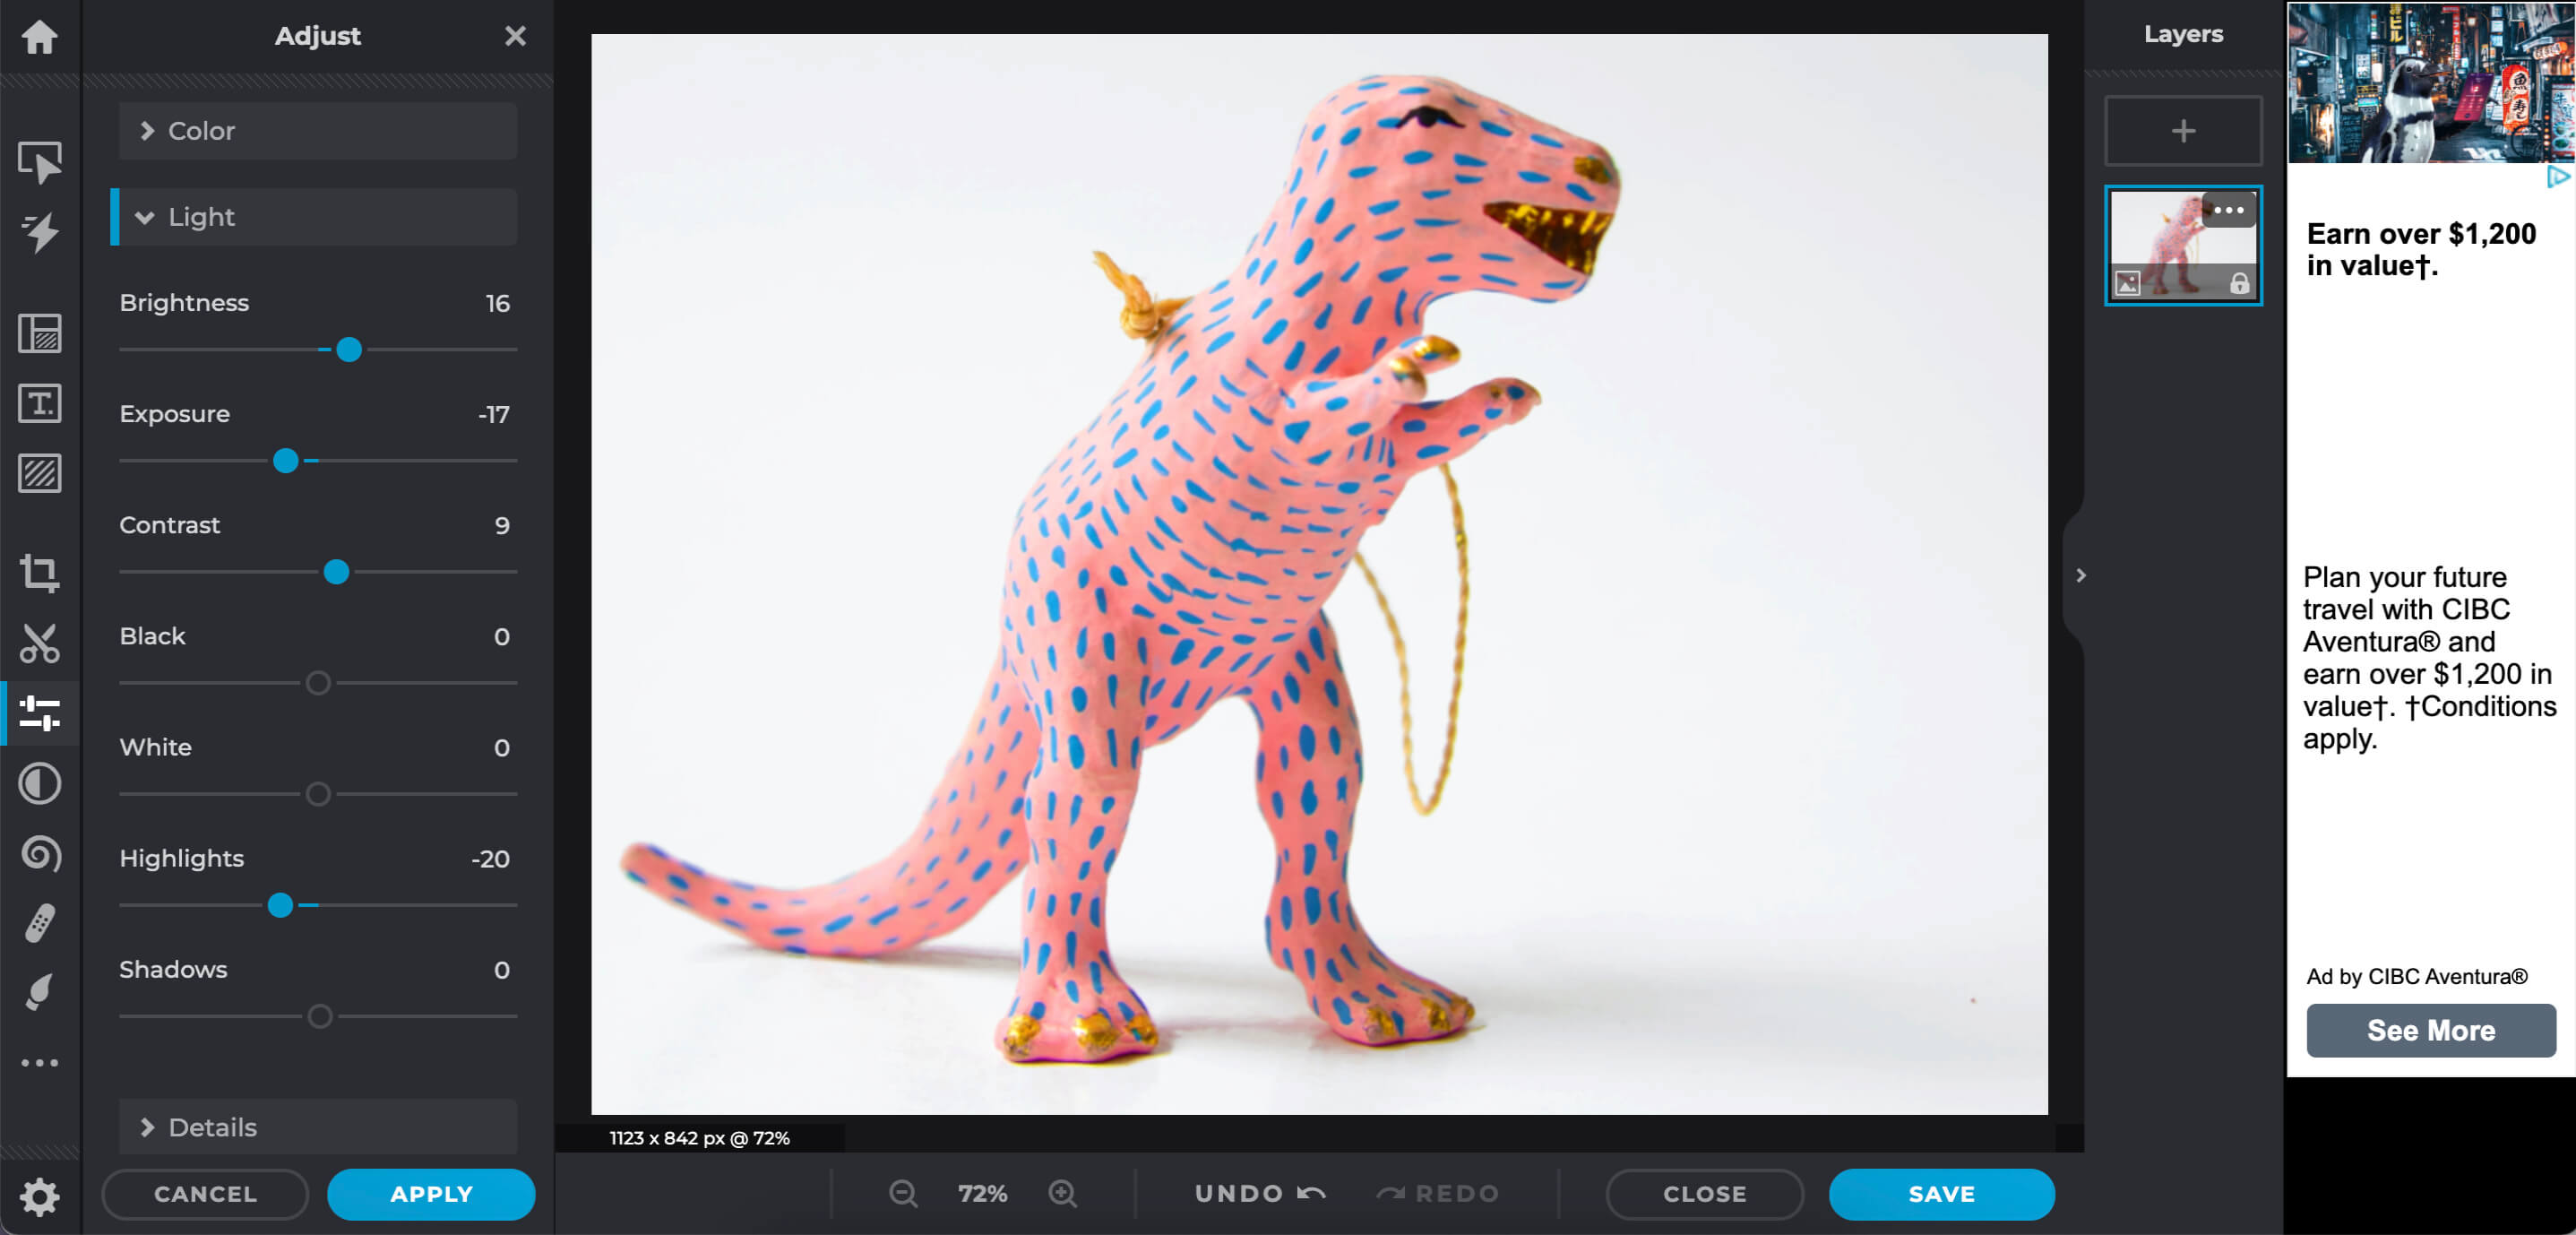
Click on Light, and you'll see slider bars for adjusting brightness, exposure, contrast, black, white, highlights, and shadows.
I often use brightness and contrast to brighten up an image. Experiment and see what looks good. Generally, it's best to make small adjustments to keep your image looking as realistic as possible.
How to Adjust Color

From the same Adjust & Filter section, click Color. It's just above Light.
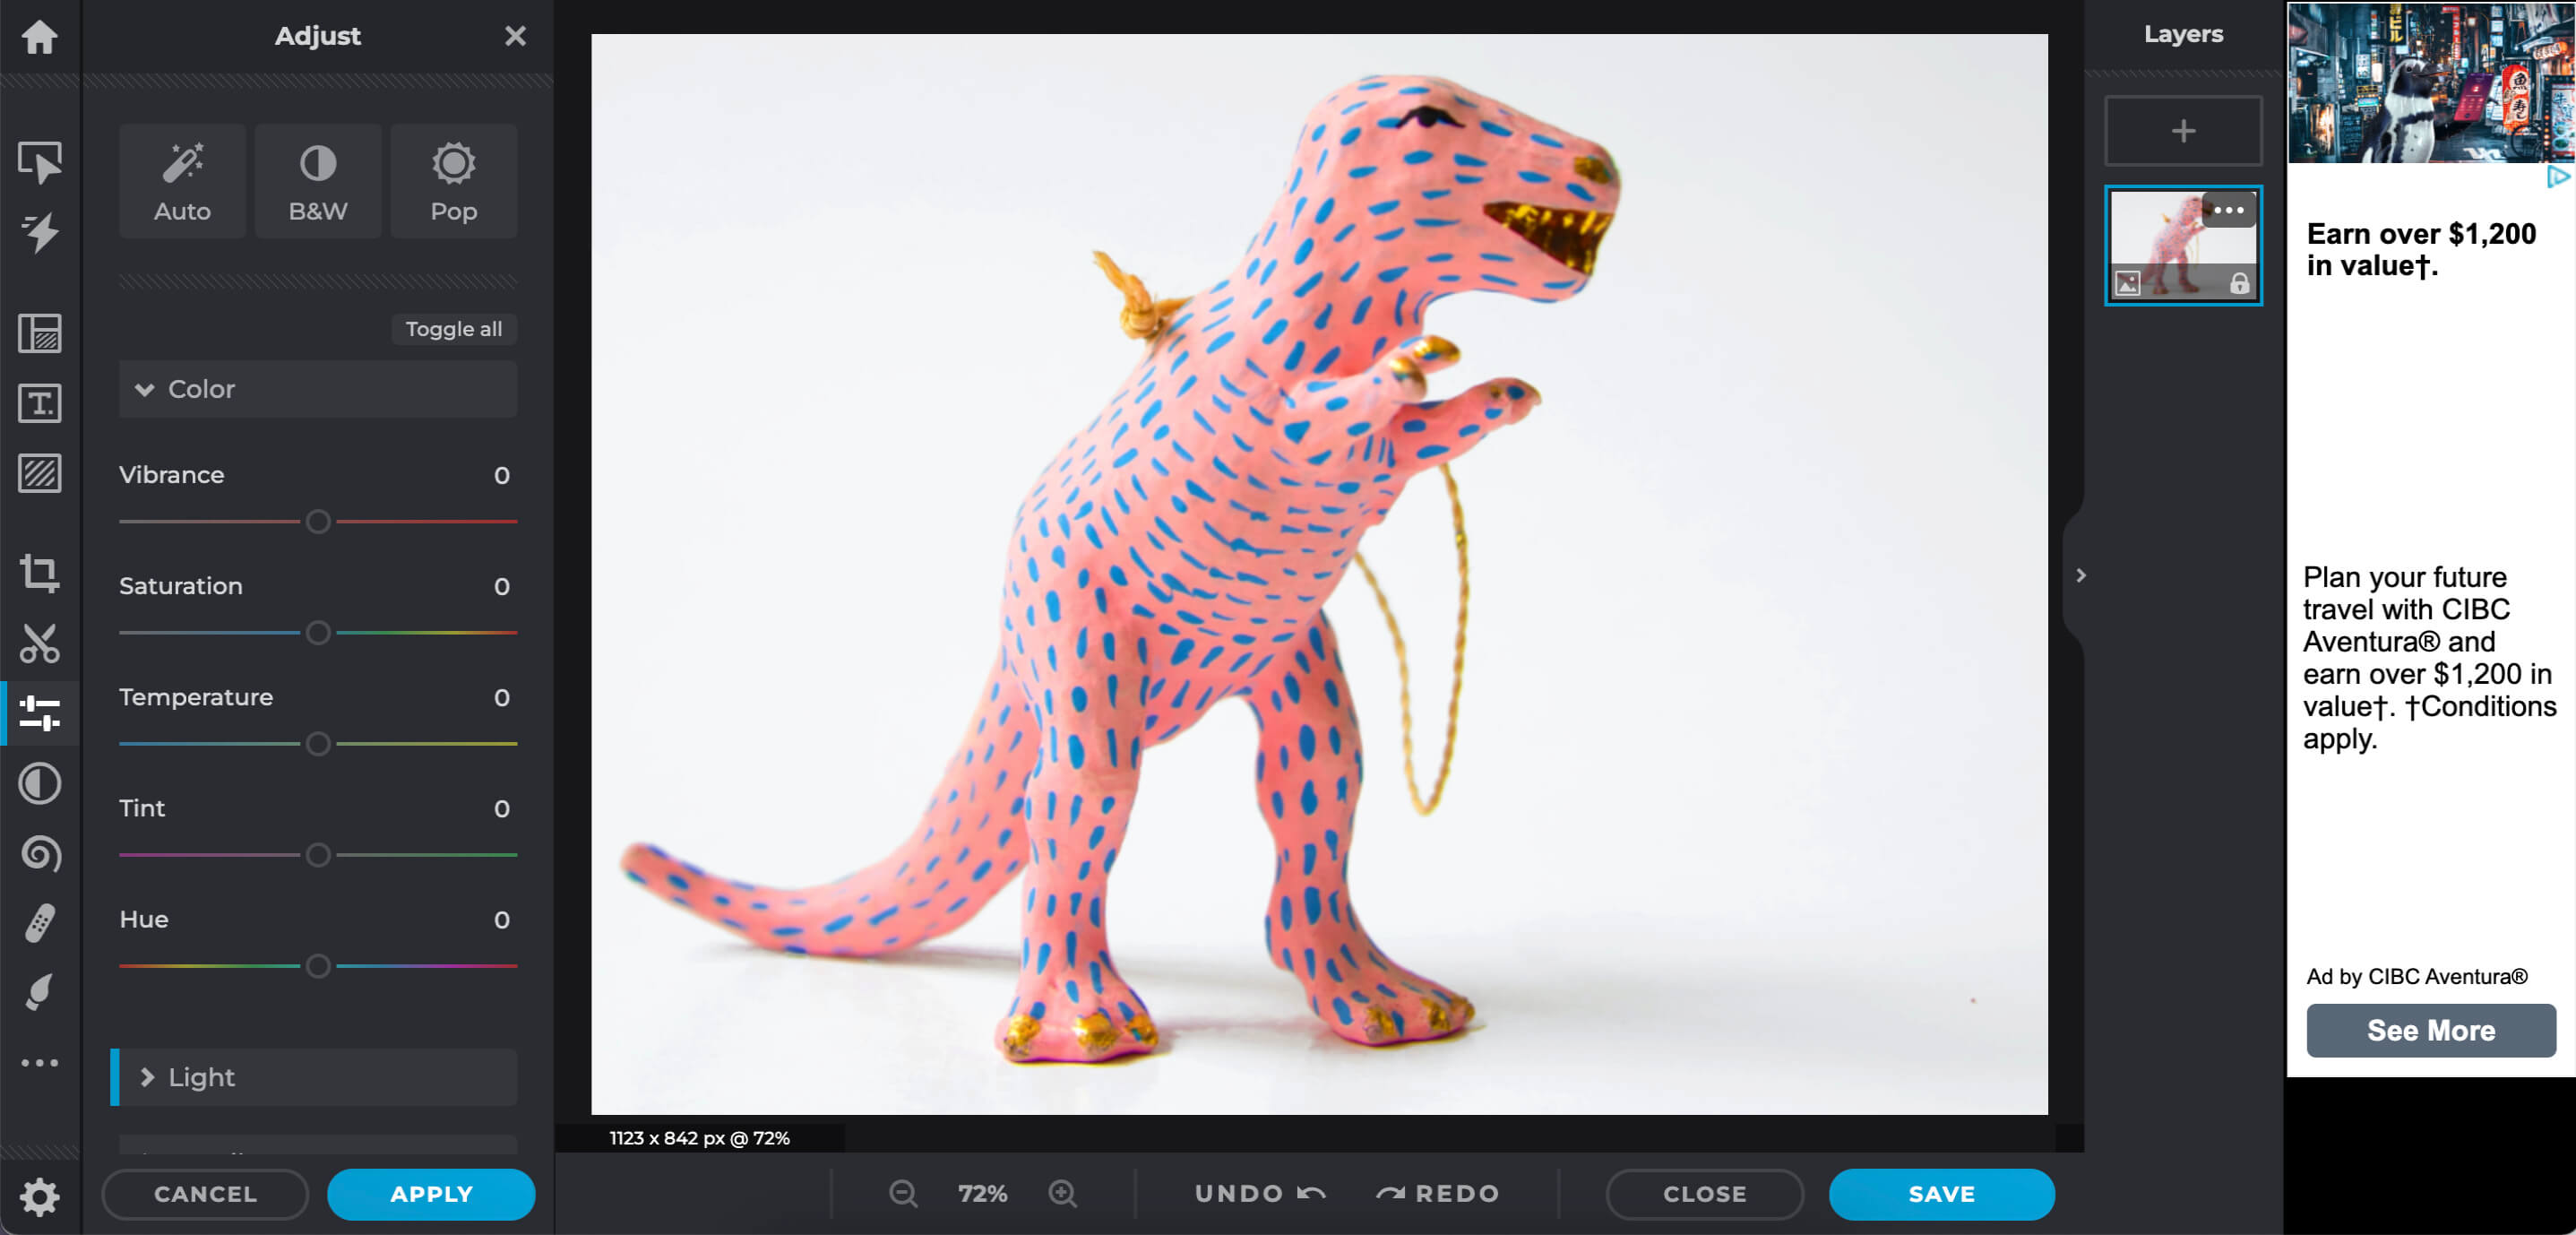
You should now see slider bars you can use to adjust vibrance, saturation, temperature, tint, and hue.
If you're editing images that need to appear as true to life as possible — product photos, for example — be careful to use these adjustments sparingly.
Don't turn your pink dinosaur into a blue dinosaur as I did in the photo above, or you'll be dealing with some angry customers!
How to Undo in Pixlr
Made a mistake?
Don't panic. Just use the undo button.
You'll find undo at the bottom center of the screen, and it may become your favorite button. If you made a change you don't like, just click undo. If you made several changes you don't like, just click undo several times to undo the last several changes you made.
The undo button gives you the freedom to experiment with the Pixlr photo editor because you can always undo anything you don't like.
How to Save and Download Images on Pixlr

When you're ready to save and download your image, just click the save bottom at the bottom right of the screen. You'll see a pop-up window like the one pictured below.
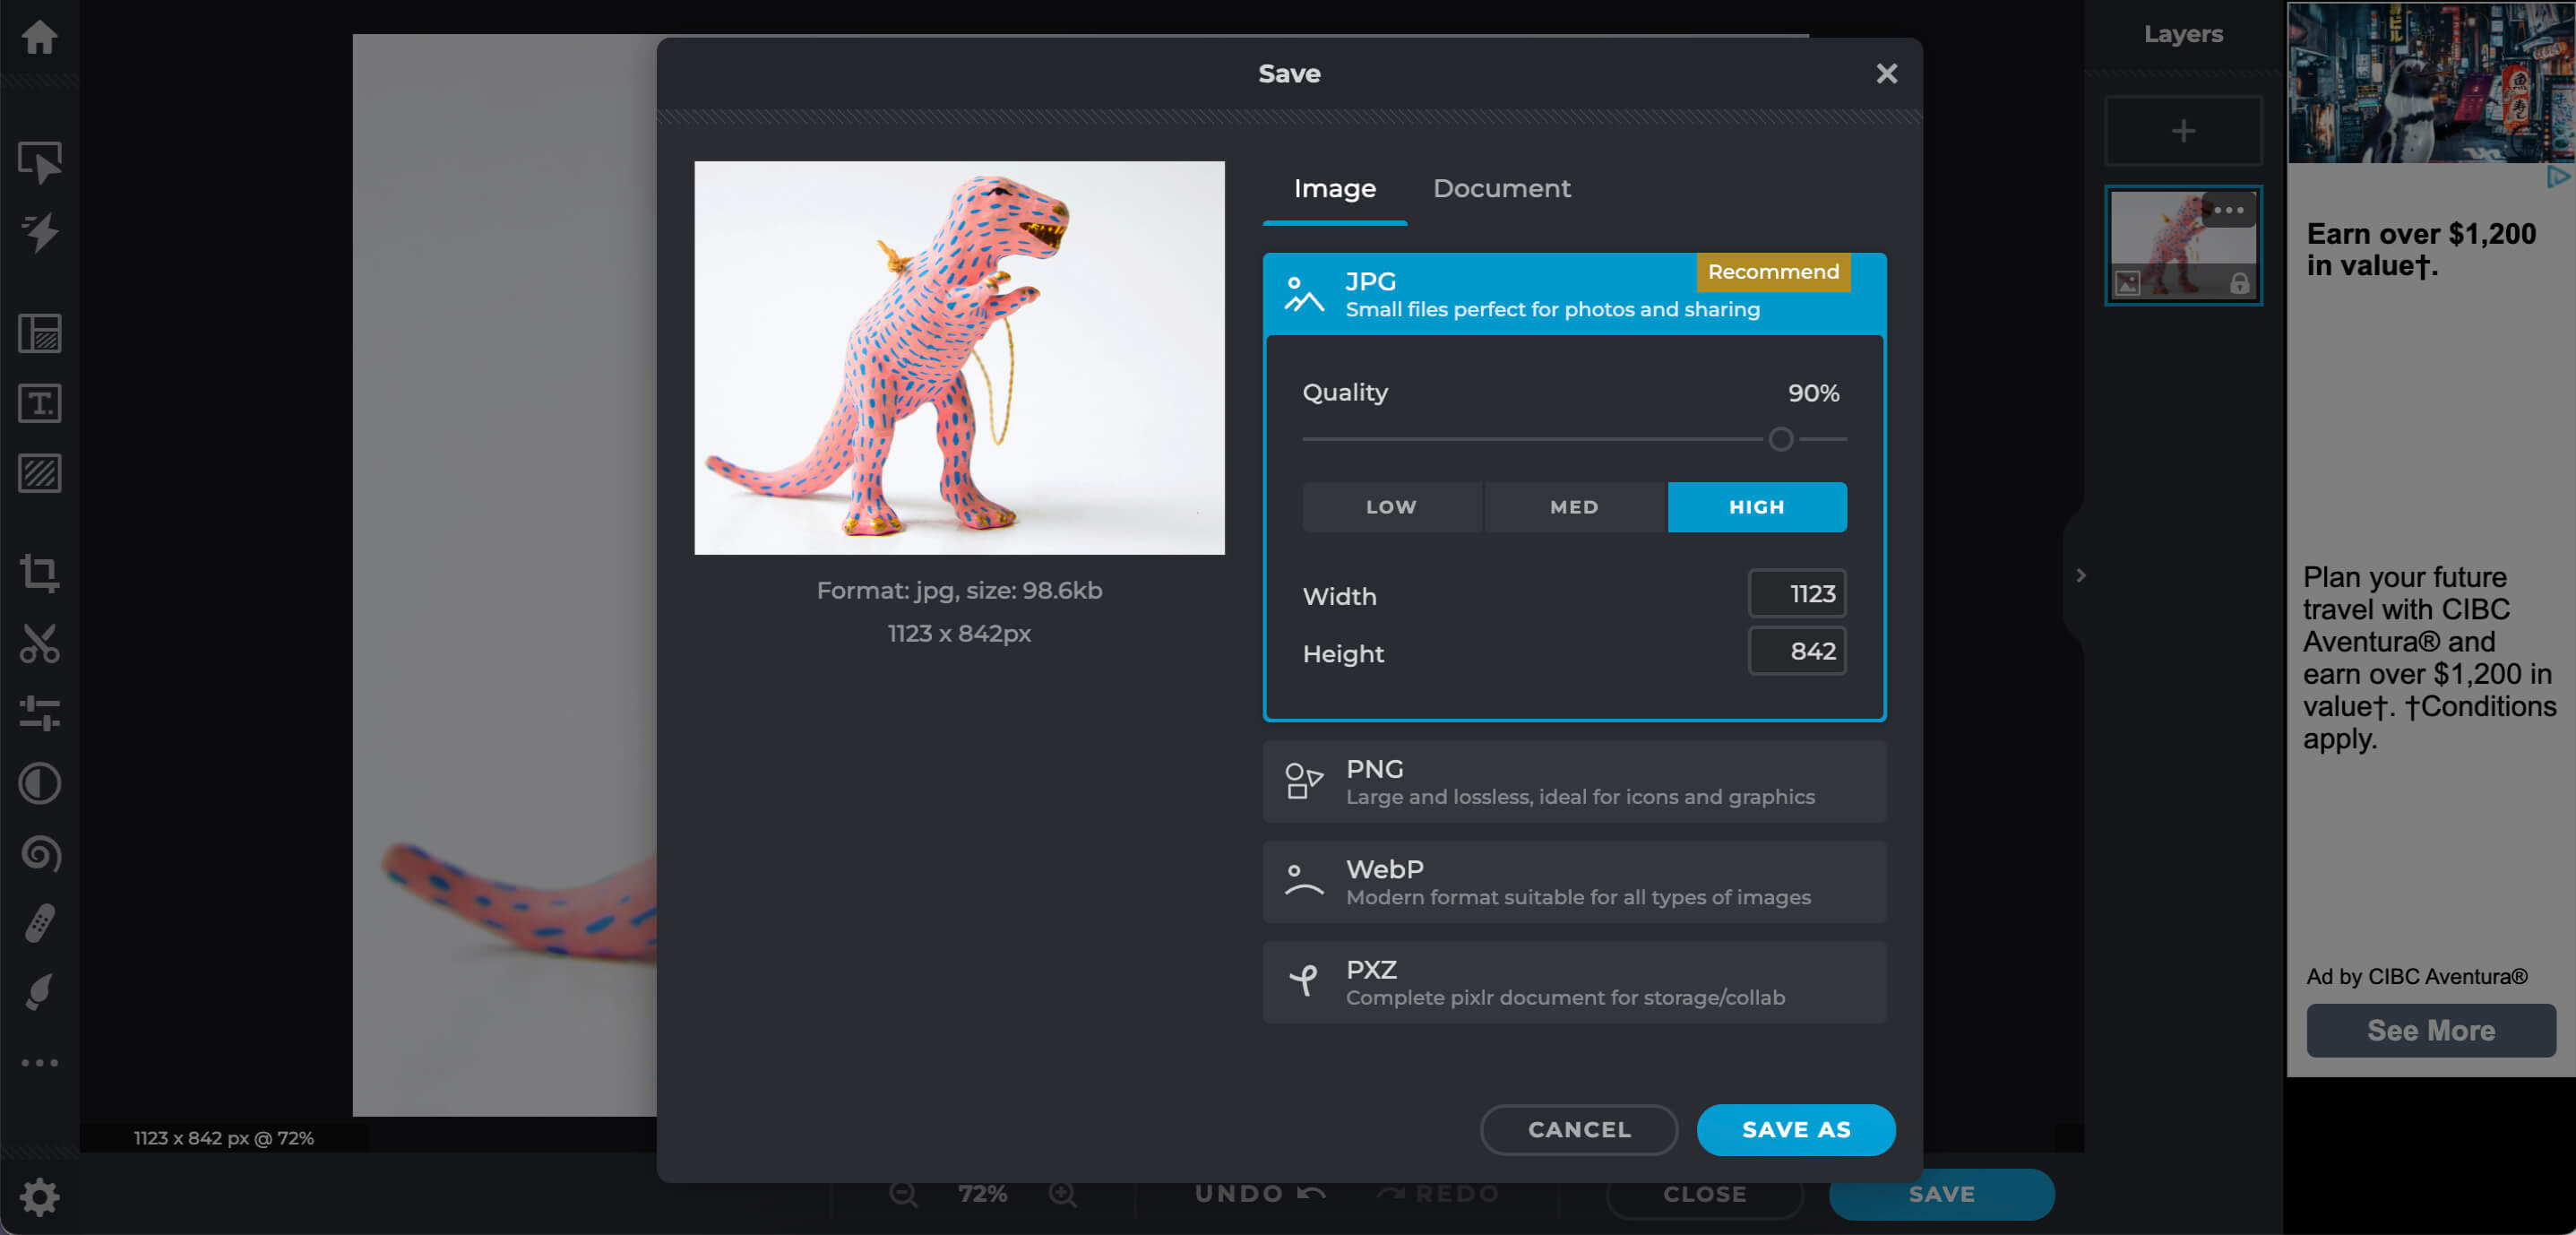
The pop-up window will give you the option to resize the image.
Resizing is different from cropping.
When you crop your photo, you cut off parts of the image. So, when I cropped the dinosaur image way back at the beginning of this tutorial, I cut off a lot of the white space above and below the dinosaur.
When you resize an image, you're not cutting anything out of the photo. You're making the overall file smaller.
For example: If you are editing product photos to submit with a craft show application, the show organizers will specify the required size for images.
If your final edited image was 3000px by 4000px (px = pixels), and the show organizers wanted you to send an image that was 1500px by 2000px, you would resize (not crop) the image to fit specifications.
How to Resize Images
If you're saving your photo as a JPG, you can change the size of the image in a few ways:
Quality Buttons
Click one of the quality buttons — low, medium, or high — to resize your file.
Quality Slider Bar
Move the quality slider bar to the left or right to adjust the file size
Exact Width or Height
If you know the exact width or height (in pixels) your image should be, use this option. Either type in the width in the width box or the height in the height box. The box you don't use will fill in automatically.
Choose the Right Image Size
Remember, there's always a tradeoff when you resize image files.
Larger Image Files: Look clear when displayed on larger screens, but use more memory and can be slow to load or work with.
Smaller Image Files: Look blurry when displayed on larger screens, but use less memory and are fast to load or work with.
Save and Download Your Image!
Once you're finished resizing your image file, click "Save As."
A dialog box will pop up giving you the option to rename your image.
Important: If you don't change the name of your image, you will lose the original.
I like to keep my originals and rename edited photos. It takes up more storage space on my computer, but I do come back to the originals from time to time if I don't like the way I've edited something.
Click "save" and you're done.
Are Pixlr X and Pixlr E Free?
Yes!
Both versions of the Pixlr photo editor are free.
Woohoo!!
If you're using Pixlr solely for editing your own photos, you'll probably find everything you need in the free online image editor.
If you're using Pixlr for graphic design — creating images for social media posts, for example — you may want to check out the Pro version of Pixlr. Pixlr Pro gives you access to lots of templates, fonts, and images that make designing social graphics quick and simple.
You're ready to go out and edit your photos!
Keep in mind, to get the best editing results, you need to start with the best quality images possible. The resources below will help you improve your photography skills.


New! Comments
Have your say about what you just read! Leave me a comment in the box below.