- Home
- Craft Photography
- Product Photography Ideas
Product Photography Ideas to Quickly Develop a Beautiful Brand Style
How to find product photography ideas, collect your favorite photos in a visual source binder and analyze those images to understand the looks you love and develop a distinctive photo style for your own brand.
Developing a distinct style that you use consistently through all of your product photography allows you to create a cohesive set of high-quality images designed for your target audience.
When you establish a defined style, it will be easier to:
- create photos that tell a clear story and appeal to your potential customers
- work more efficiently every time you photograph your products
- and even delegate your product photography to another photographer and get the results you want
As you experiment and explore product photography ideas, you'll start to see what works and what doesn't work for your product and your brand.
But that process can take a lot of time.
To help you develop your photography style and skills faster, we'll look at:
- How to create a collection of product photography ideas (a visual source binder) to inform and inspire your own style
- Where to find lots of great product photography ideas and examples
- How to analyze your example product photographs to learn what works and develop a distinctive product photo style for your brand
How to Create a Visual Source Binder
I recently finished a product photography course. For one of the assignments my teacher asked everyone in the class to create a visual source binder. It was an immensely useful project.
What is a visual source binder?
A visual source binder is a collection of product photography ideas. It's a great way to develop your own style.
It can take any form you like. It can be an actual physical binder, or a secret Pinterest board. Use whatever system works best for you.
Visual source binders aren't just for product photography. You could collect other types of photos if you were trying to develop your style in a different photography niche. For our purposes, we're going to stick with product photography.
How do you create a visual source binder?
Creating a visual source binder is simple, and I really enjoyed the process. Over a few weeks:
- Search for great product photos that you find compelling in some way.
- Save them to your binder or Pinterest board
- Ask yourself why each photo works, and make notes on your thoughts about each image.
Over time, an impression of what works and what doesn't will start to emerge. You'll get a sense of the look you want to represent your brand whether you need photos for your online store or social media promos.
Types of Product Photos to Review
You can find a huge range of product photography styles, from complex setups using models in outdoor action shots, to simple photos taken with a light box product photography setup.
As a beginner photographer, you should focus on less complex arrangements to set yourself up for success.
You might enjoy looking at some images by professional product photographers who use more advanced techniques. They can give you plenty of creative ideas and show you what is possible. But save yourself a lot of frustration, and don't try to emulate these photos if you're a beginner.
Luckily, photos using simple setups are perfectly suited to craft photography.
Find photos of the type of product you sell.
If you check out enough images of the product you sell, you'll start to see patterns emerge. You'll get ideas about the types of photos, arrangements, and different ways of styling props to show your product.
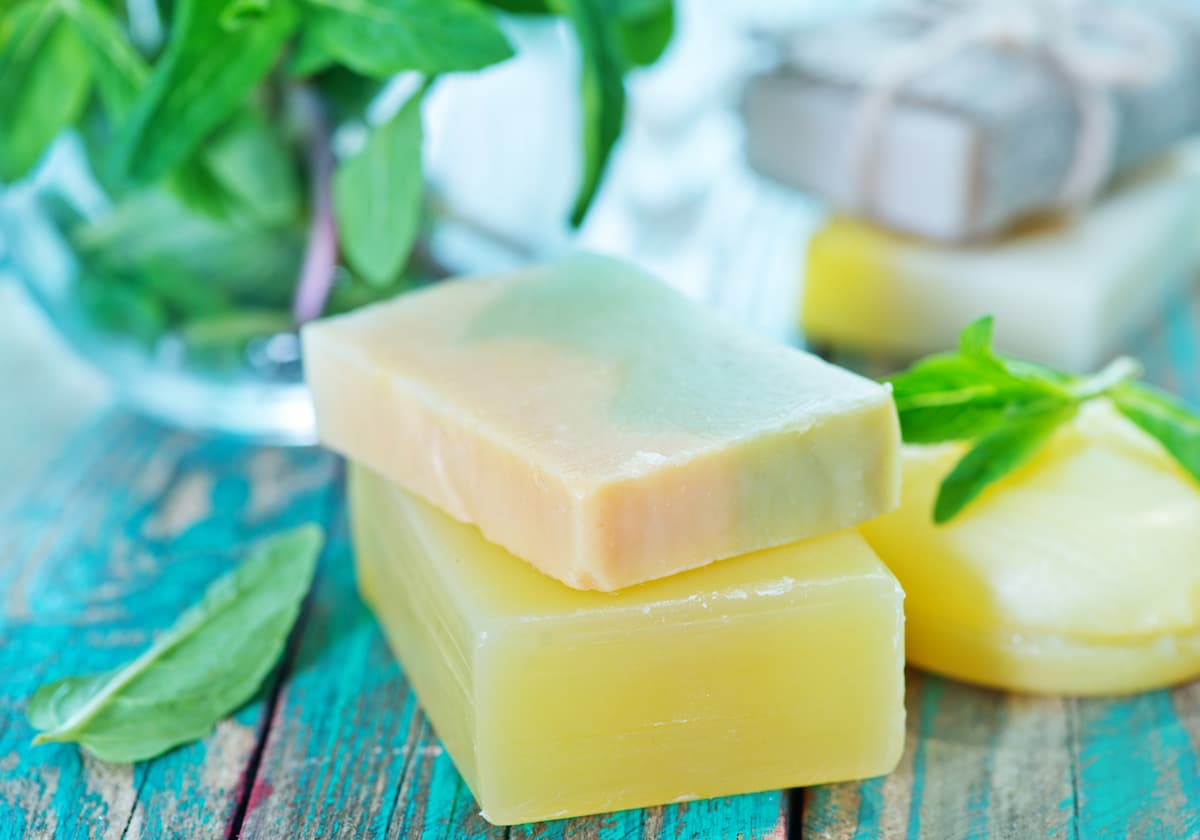
For example, if you make handmade soap and you look at a lot of product photos of handmade soap, you'll notice a lot of photos:
- with packaging, so shoppers can read all of the product information and see how the item is attractively packaged
- without packaging, so shoppers can see a full, unobstructed, view of the product
- with several bars of soap casually stacked at different angles
- styled with natural ingredients that evoke an emotional, sensory response and help shoppers imagine the scent of the soap
You won't find a lot of photos showing wet soap with bubbles. Photographing something as elusive and reflective as bubbles is a more advanced skill which, thankfully, you won't have to master!
 Handmade soap photographed stacked at an angle and styled with mint leaves.
Find photos of different types of products from companies you admire.
Seek out product photos from companies that have an aesthetic similar to the style you might like to use to represent your own brand. As you collect and study their images, you'll consider how they achieve the look and how you could interpret that look for your own product.
For example:
Imagine, again, you're looking for product photography ideas for your handmade soap. You like the use of fresh ingredients and the composition in the image shown above. But maybe the saturated blue and green color scheme doesn't work for your brand. You want a more neutral look.
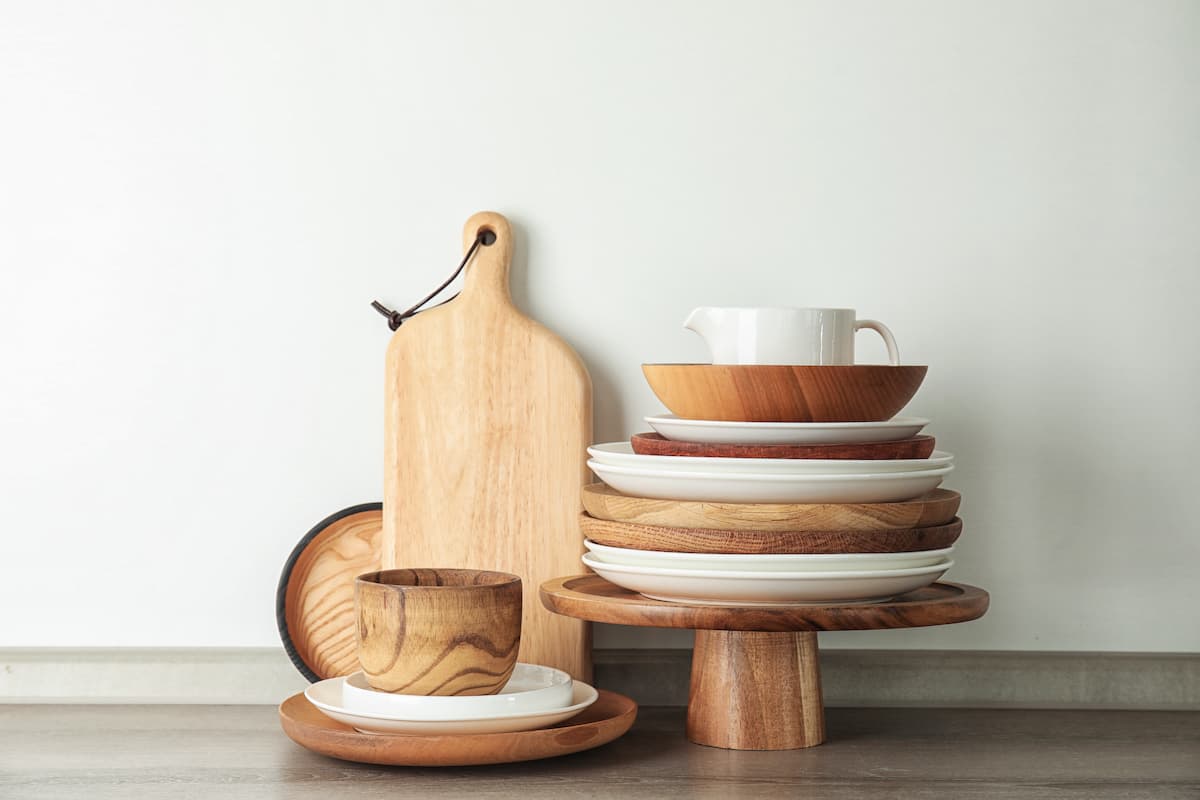
You don't need to limit yourself to handmade soap photos for inspiration. You can seek out examples elsewhere, like in the photo of handmade tableware below.
 Handmade tableware with a neutral color scheme.
Where can you find good examples of product photography?
Here's where I've had good success finding inspiring DIY product photography ideas.
Etsy
Etsy is a great starting point for handmade product photography ideas. Most of the images here are taken by the maker (not a professional photographer) using a simple home product photography setup a beginner could reproduce.
Start by browsing the site in your own product's category, but have a look at other types of products for photo inspiration as well.
As you collect images for your visual source binder, you'll begin to see that handmade product photography has a certain aesthetic. Etsy is a great place to get a sense of that aesthetic.
Instagram
You'll find lots of creative product photography ideas on Instagram. They won't all be handmade items, but they can still provide plenty of inspiration.
To get you started, here are a few hashtags to search:
- #productphotography
- #productphoto
- #handmade... followed by the type of product you make i.e. #handmadecards or #handmadeceramics
- the product you make followed by "photography" i.e. #jewelryphotography or #soapphotography
As you type any of these hashtags into Instagram's search bar, you'll get more suggestions. Some of the suggested searches can help you find more good product photography ideas.
The Crafter's Guide to Taking Great Photos (Book)
The book, The Crafter's Guide to Taking Great Photos, by Heidi Adnum is an excellent resource for learning creative ways to photograph handmade items.
Along with plenty of clear instructions for photographing specific types of crafts, the book has loads of beautiful sample photos with notes about the DSLR camera settings used to take each image.
When I was creating my own visual source binder, I checked out the websites, Etsy shops, or Instagram accounts belonging to the craft artists credited in the book and found plenty of inspiration.
Product Photography at Home (Craftsy Course)
The Craftsy course, Product Photography at Home , also features plenty of excellent craft photography examples.
It's a great class specifically created for beginner craft photographers.
I also explored and found plenty of inspiration on the websites, Etsy shops, or Instagram accounts belonging to the craft artists featured in this course when I was making my visual source binder.
My Pinterest Product Photography Ideas Board
I thought I'd share some of my favorite product photography ideas that I've found in my own searches. You can find them on my Product Photography Ideas and Inspiration board on Pinterest.
How to Analyze Your Inspiration Photos to Develop Your Own Product Photography Style
You'll learn more and develop your own style faster if you actively analyze the images you're collecting.
As you find and save photos that interest you, determine the elements that were used to make each image compelling or distinctive and write it all down.
I've created a list of questions (below) you can ask yourself to better understand a photo you love.
It's a long list.
Don't panic!
You don't have to answer every one of these questions for every photo you collect.
Some images will stand out because of their use of different color, others will use lighting you love. Note the characteristics and that are most important in your images.
A single dramatic effect or several small details can make a product photo look great!
After you've collected several photos and some favorites have emerged, you can analyze those images in greater detail if you like.
Questions to ask to find a signature product photography style for your brand:
Styling, Props, Surfaces, and Backgrounds
- What type of photography is used?
- Are the images lifestyle product photography or plain white background photos?
- What is included in the photo?
- Is it just the product?
- Did the photographer use props?
- What type of props are used?
- Are models used?
- Do the models have a distinctive look?
- What type of surface and background are used in the image?
- Did the photographer choose a distinctive background color or a more traditional white backdrop or black background?
- Are the same surfaces and backgrounds used consistently throughout all product photos?
- What camera angle is used? Is the camera at eye level to the product? Is it higher or lower than the product? Is the camera directly overhead creating a flay lay effect?
- How does the different perspective from each camera angle impact the look of the photo?
Color
- How is color used in the image?
- What types of colors dominate the photo — brights, neutrals, pastels?
- What type of color scheme is used — monochromatic, analogous, contrasting?
- What effect does the color choice create?
Before you read the next two sections:
If you read the next questions about design elements and composition and feel a bit lost because you're not familiar with some of the terms, don't worry!
Have a look at my photography composition tips for beginners. You'll find more detailed descriptions for all of those terms on that page.
Other Design Elements
- Beyond color how are other design elements used in the photo?
- Are there strong lines in the image?
- Where do the lines lead your eye?
- What type of shapes are in the image — geometric, organic?
- Does the arrangement of props create a shape?
- How is texture used in the photograph? What effect is created?
- Do the textures in the image evoke a mood?
- Are there areas in the image that are mostly plain, solid color?
- How does that plain area (negative space) impact the overall image?
Composition
- How are items arranged within the scene?
- What composition rules are used — rule of thirds, golden triangle?
- Are all of the product images composed in the same way?
Lighting
- Describe the quality of the lighting in product photography you find compelling.
- Is it even with no or minimal shadows?
- Is it coming from one location with shadows cast on the opposite side?
- What is the light source? Did the photographer use artificial light or natural lighting?
- Where is the light coming from?
- Where are the shadows cast?
- Is the light diffused, creating soft shadows?
- Is the light more focused, creating heavier shadows?
- Is the light coming from a high angle, creating shorter, more natural looking shadows?
- Is the light coming from a lower angle, creating longer shadows?
General Impressions
- Does the photo elicit an emotional response? What emotion?
- What is it about the photo that creates the emotional response?
- Does the photo tell a story? What is the story?
- What is the style or tone that is set? What creates that tone?
- Why are you drawn to the photo?
- Is there anything else you can learn from the photo?
Over time, as you analyze your images, you'll start to see patterns and develop a better understanding of what you like and don't like. You'll probably find yourself coming back to a few similar styles that you love and that feel right for your own products.
Your answers to the questions will help you understand exactly what you like in a product photo.
You won't be limited to thinking, "I love that photo." You'll be able to say you like product photos that create a specific kind of impression, and you'll know how those looks are created.
With that knowledge in place, you'll be ready to develop a distinctive look for you own company's product photos.
Experiment and Make Note of What Works
As you find product photography styles you like and learn what goes into creating that style, the next step is to experiment with your own photos.
Get out your photography equipment, and apply some of the techniques you love to your own product photos.
Be prepared to experiment. You may discover some techniques you loved in your collection of inspiration images don't work as well with your own products. Others will be perfect.
Create a Product Photography Style Guide
You didn't do all of this work to discover a distinctive photography style for your brand just to get sloppy in the implementation.
As you determine exactly how you want to photograph products, document it.
Create a product photography style guide that describes exactly what you do and don't do in your product photos. It will help you plan and set up for photo sessions more efficiently and maintain consistency over many photo sessions to create a cohesive brand image.


New! Comments
Have your say about what you just read! Leave me a comment in the box below.