GET NEW FREE PRINTABLES BY EMAIL. SIGN UP FOR THE PRINTABLES NEWSLETTER.
- Home
- Craft Business
- Display Booth Photos
- Craft Show Set Up Ideas
Craft Show Set Up Ideas
8 Easy Steps to Make a Great Display
Great craft show set up ideas & photos. Plus, a simple 8 step guide you can use to easily create your own fantastic craft fair booth.
Designing a display for shows can be pretty overwhelming.
There's a lot to know:
- What stands and furniture will work best for your products?
- How do you display handmade items to increase sales?
- What rules do you have to follow?
- How do you pack everything you need into a 10x10 booth space?
To simplify the process of designing your own display, I've broken it down into an 8 step action plan.
Photos of craft show set up ideas appear throughout the action plan. They will show you how different options look used in real displays.
How to Set Up a Craft Show Booth
- Choose your craft show booth layout
- Choose a portable canopy
- Get some canopy weights
- Select the main furniture or racks you'll use
- Choose smaller stands and visual merchandising props
- Choose a backdrop for your display
- Decide how you'll light your booth
- Get signs for your display

1. Choose Your Craft Show Booth Layout
How do you set up a craft booth?
Most 10 x 10 booth designs fall into one of 6 main layout designs:
1. U-Shaped
Display items on the front counter and two sides. Customers browse outside the booth space.
2. L-Shaped
Display products on the front counter and one side. Customers browse outside the booth space.
3. Front Counter
Display products only on the front counter. Customers browse outside the booth space.
4. U-Shaped
Display items on two sides and on the back wall, the front is open. Customers can enter inside the booth space.
5. L-Shaped
Display products on one side and the back wall. The front is open. Customers can enter inside the booth space.
6. Island
Display products in the center of the booth space. Customers can enter inside the booth space.
Each layout comes with pros and cons. You'll need to choose the layout that works for your products and for the booth spaces available at the shows you'll attend.
You can learn more about each of these popular 10x10 craft booth designs, and choose the one that works best for you.
2. Choose a Portable Canopy

If you're going to be selling handmade items at outdoor shows, you need a reliable tent.
Portable canopies can do more than protect you from the weather at outdoor shows. Some people use their tent frame without the canopy top for indoor craft show set ups. The frame creates a portable, sturdy, and perfectly-sized foundation for most indoor booth spaces.
When choosing a pop up tent to use at shows look for:
- 10x10 size
- straight (not slanted) legs
- a white canopy top
- four sidewalls
There are several brands of canopies you'll often see vendors using including:
To learn more about craft show tents, check out my in-depth guide to portable canopies.
3. Get Some Canopy Weights
You absolutely must have weights for your tent! In fact, most show organizers specify tent weight requirements in their vendor rules.
If your shelter isn't securely anchored, it can blow away with the slightest bit of wind.
What can I use for canopy weights?
- weight plates
- fillable sand bags
- fillable water weights
- DIY canopy weights
Weight plates, fillable sand bags, fillable water weights, and DIY PVC pipe weights are all popular options for securing a tent.
Don't waste money buying the wrong kind of canopy weights!
Show organizers may specify the type of weights you must use to secure your tent including:
- the minimum amount of weight you need on each leg of your tent
- the type of weights you must use
- certain types of weights you are not allowed to use
Make sure you are clear about those requirements before you go shopping for tent weights.
If you plan to attend a show, look up the vendor rules on the show's website. Search for any information about the tent weights vendors must use, so you can make sure you get the right type.
4. Select the Main Furniture or Racks You'll Use

Next, you need to choose the larger racks and furniture you want to use to show your products.
You can show craft items for sale using:
- Portable tables
-
Portable display shelves
-
Grid walls
-
Slatwalls
- Portable display pedestals
-
Racks and stands designed for specific products such as: mannequins, hat stands, and clothing racks
Each type of furniture comes with its own advantages and disadvantages. The type of products you sell will largely determine what type of craft show set up will best suit your needs.
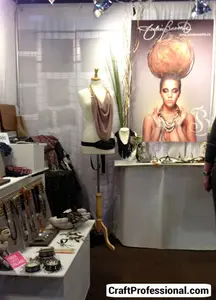
I've posted loads of booth photos to show plenty of craft show set up ideas. The pages linked below feature each type of furniture. They will show you how different types of stands work within a 10x10 booth space.
- Craft booth design using portable tables
- Tabletop jewelry displays
- Craft show set up ideas using portable shelves
- Booths using gridwall panels
- Slat walls used in craft fair booths
- Portable display pedestals
- Several pages of clothing displays feature craft show set up ideas using mannequins and portable clothing racks
- 10 hat display photos including some that use hat stands

5. Choose Smaller Stands and Visual Merchandising Props
To help showcase your products at their best, you may need some smaller stands and props.
Many of these smaller stands are designed to show a specific type of product, but some of them can work with a wide variety of products.
You can make your products and your booth appealing to customers using:
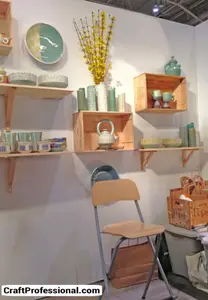
Wood Crates or Baskets

Wood crates or baskets can hold all kinds of items from soap to knit socks.
Just make sure the baskets or crates are the right size to keep your products looking attractive and inviting for customers to pick up.
Upside down wood crates can be used as risers to add height to a tabletop display.
Clear Acrylic Blocks
Clear clear acrylic risers and blocks come in smaller sizes. They allow you to vary the heights throughout your displays. They are an affordable and valuable item in any visual merchandising toolkit.
Added bonus! Clear acrylic blocks are also extremely helpful to have on hand for styling craft product photography.
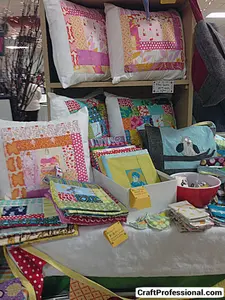
Trays

Trays of all types can be a great addition to a tabletop display.
Trays can be used to group similar items together. They will keep your table looking organized.
Displaying items on trays can also make your products seem more valuable and special than they would if they were placed directly on the table.
Some product-specific stands you can use to display craft items for sale include:
Jewelry Busts and Stands
Jewelry busts and stands are ideal for displaying jewelry. There's a huge range of styles to choose from.
Art Easels

An art display easel can be used to feature a special painting in your booth. Make sure the easel you choose is sturdy, so it will safely and reliably support the art on display.
Mannequins, Dress Forms, and Mannequin Torsos

Mannequins or dress forms are a great way to display clothing. A mannequin dressed in an interesting outfit and placed in an outside corner of your booth is an excellent tool to attract shoppers.
Mannequin torsos can be used to feature shirts in a tabletop display. They can also be a great option for showcasing accessories like scarves or handbags.
Related: Learn how to display items at a craft fair more effectively using visual merchandising techniques.
6. Choose a Backdrop for Your Display
You can hang a backdrop from the back wall, as well as from the side wall of your booth space. A backdrop can block the view beyond your booth, so customers pay attention to your products. It can also hide unattractive elements of your set up.
If you use a portable canopy, you'll be able to attach most types of backdrops to the tent frame.
Some backdrop ideas:
-
Your tent's sidewalls
-
Curtains
-
Mesh walls designed for hanging art — Avoid regular mesh screen canopy walls. They are not strong enough to support any weight
- Gridwalls — Consider hanging curtains or tent sidewalls behind grid wall panels to fully block the view.
-
Slat wall panels — Be aware, slat wall panels can be heavy. They aren't the right choice for every situation.
7. Decide How You'll Light Your Booth
If you're selling at indoor shows, you'll need to illuminate your space with several portable lights.
Your lighting could include:
- Overhead booth lighting to brighten up your entire 10x10 space
- Lights with adjustable arms to give you freedom to direct the light wherever you need it
-
Accent lighting to draw attention to a special item
- Puck lights or string lights under shelves to ensure lower levels of your display are well-lit
8. Get Signs for Your Display
A few simple signs can communicate important information.
Your company name printed prominently on a sign will help customers remember you. In fact, some shows require vendors to display this type of sign.
You can use craft fair signs to let shoppers know what methods of payment you accept, to encourage them to ask about custom orders, or to thank them for shopping locally and handmade.
More Craft Display Ideas
Craft Show Success
Craft show success hinges, in part, on bringing customers into your booth. Here are 9 strategies to entice customers into your booth.
Craft Show Display Ideas
Find craft show display ideas with three free and easy ways to find great booth photos that will give you inspiration to create your own great displays.
Craft Show Success Secrets - Merchandising
These craft show success secrets will help you use effective merchandising strategies to make the sale at your next craft show.


Hi, I'm Lisa, the creator of Craft Professional. I create and share printable coloring pages, calendars, and simple creative resources for kids, adults, teachers, and busy families. Learn more about the site and the person behind it.
Home | About | Contact | Newest Updates | Newsletter | Privacy | Terms of Use | Advertising Disclosure
If you buy something through links on Craft Professional, I may earn a referral fee. Details are in my disclosure.
Copyright © 2006-2026 CraftProfessional.com - All rights reserved.