GET NEW FREE PRINTABLES BY EMAIL. SIGN UP FOR THE PRINTABLES NEWSLETTER.
- Home
- Craft Business
- Display Booth Photos
- Visual Merchandising Techniques
6 Visual Merchandising Techniques You Can Use in Your Craft Booth
Learning about visual merchandising techniques can help you create a beautiful craft show display that draws in more customers, showcases your most profitable products, and encourages customers to shop more.
Retail shop owners have used visual merchandising strategies for years to increase profits. They even test and study the effects of different techniques to find the ones that are most effective.
A lot of the visual merchandising techniques retailers use can be easily translated into a 10x10 booth space for a craft show display. So, why not use the wisdom of experienced retailers to make your own booth more appealing to shoppers?
Visual Merchandising Techniques for Table Displays and Wall Spaces
While you can use a variety of types of display furniture, a lot of your displays will end up being some type of tabletop display, or a wall display (think large shelves, grid walls or slat walls). Let's look at visual merchandising techniques smart retailers use to create effective tabletop and wall displays.
Tabletop Displays

Pyramids aren't just for ancient Egyptians. Pyramids, both symmetrical and asymmetrical, can be your best friends if you use tables to display your products.
Pyramid displays are exactly what they sound like - products and possibly props set up to create the rough shape of a pyramid on your table.
Pyramids work so well with tabletop displays because they bring products up to the all-important eye level. The top of the pyramid will be the customer's eye level, and that's where you'll want to feature your most profitable item.
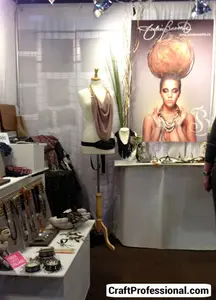
Do make sure customers can find your products easily. Notice, in the example image above, the shirts on the mannequin busts form a pyramid on the tabletop, and those shirts are available to shop on the same table, all around the mannequins.
The mannequin bust display makes the clothing more appealing to customers. It makes the products far more visible than they would be if you just had a bunch of shirts folded neatly on the table.
However, no customer is going to strip off your mannequin because they want to buy that particular shirt.
Okay, you meet all kinds of people at craft shows, maybe somebody would do it, but the vast majority of shoppers won't want to ruin your lovely display.
That's why you need to have the same item nearby, displayed in a way that is unfussy and very easy to shop.
Ensure your table is well stocked, but don't let it get too crowded with product. Retailers have trained customers to expect to see less product when items are high-end, and more product when prices are lower.
If you want to be able to sell your crafts for higher prices, consider displaying fewer items at once to create a higher-end feel to your shop.
Crowded tables not only carry the risk of devaluing your product, they can also be unappealing to shoppers. If you allow just a little bit of breathing space between different types of products on your tables, you can show customers, at a glance, all of the options you offer, and make shopping your table more enjoyable.
Finally, make sure your table looks good from every side the customer could approach from. We always think about how a tabletop display looks from the front, but if customers could also approach your table from the sides, be aware of how your display looks from that direction as well.
Recap - Merchandising Strategies for Tabletop Displays
- Use pyramid shaped displays
- Be aware of what's at eye level
- Keep product to shop near the display
- Avoid over crowding
- Keep some space between types of products
- Make sure the table display looks good from all sides
Craft Displays on Wall Spaces
If you're displaying products on your walls at craft shows, you're most likely using a grid wall display system, or possibly slat walls or large shelves. Some of the concepts that apply to tabletop displays hold true for wall space displays with a few new concepts to consider for the vertical design.
Just as you would do on a tabletop display, put the most profitable items at eye level on a wall display, and leave gaps around products so your display is easily shoppable and not too crowded.
Vertical displays on walls are a great place to use repetition and alternation.
Repetition simply refers to displaying more than one of an item. Odd numbers are best. If you're going to repeat something, show three, not four of the item.
Alternation in visual merchandising terms means to alternate showing two different products. For example, if you wanted to display some blue and orange shirts, you might alternate the colors, so your wall display consisted of: orange shirt, blue shirt, orange shirt, blue shirt, orange shirt.
You can learn more about the visual merchandising techniques of repetition and alternation here.
Consider mixing up the way you display products on grid walls or slat walls.
These systems come with different types of display accessories you can attach to the wall. Choices like shelves, single hooks, waterfall racks for clothing, hat stands, or bars give you the option to mix up your display, so you don't end up with rows and rows of straight lines that aren't appealing to the eye.
The top portions of slat walls or grid walls are typically too high to be shoppable. Customers just can't reach the uppermost areas of your booth.
If you're not going to place product in the space, you don't have to let it go to waste. The upper wall space of your booth is a great place to create displays that can be seen from a distance.
Just be sure you don't place your only, one of a kind product up high where you and customers can't reach it. This display option is best if you create a range of products, so you can display one item up high, and then arrange that same item just under the display where customers can easily shop for it.
The top section of your walls is also a great place to display large-scale posters that show off your work. If you want to display several posters, remember the rule of repetition, and use an odd number of posters.
Recap - Merchandising Strategies for Displays on Walls
- Put the most profitable item at eye level
- Leave gaps around products
- Use alternation and repetition in your displays
- Mix up the types of display hooks and shelves you use
- Use the top of your walls effectively
Tables and Wall Displays - Mix it Up
It's often smart to use a mixture of both tabletop and wall space displays in your space. The combination can enhance the look of your booth and provide you with more display options.
Don't be afraid to mix up the types of display furniture you use.
I earn a commission for purchases made through links on this page.
To learn more, please see my disclosure.
6 Visual Merchandising Techniques To Enhance Your Overall Display
Now that you have some solid visual merchandising techniques for styling your tables and wall displays, let's take a look at a few concepts that can enhance the overall look of your display including:
- Color
- Themes
- Lighting
- Graphics and signs
- Less is sometimes more
- Lifestyle displays
1. Color
 Soaps arranged by color (left to right) for spring, fall, and Christmas craft shows
Use color purposefully. In your focal displays, aim to use a maximum of three colors. This approach to color will create a look that's strong and not cluttered.
You can even can change the seasonal look of your booth simply by featuring different colors. In the spring and summer feature products that have the bright colors of the season, in the fall go for earthy tones, and at a Christmas craft show, feature your red, green, and white products.
Using color effectively can be a smart way to dress up your booth for different seasons without committing to developing season-specific products that you can only sell at certain times of the year.
2. Themes
If you're going to use a theme in your display, stick to one single theme or trend. Decide what you want to present, whether it's a current trend reflected in your product, or a seasonal look, but say one thing only.
This concept is important for retailers who have more display space than you would at a craft show, so you can imagine how essential it is to stick to a single concept when you're limited by a 10x10 booth space.
If you try to say too much or reflect too many trends, you end up saying nothing. Choose a statement that will resonate with your target customers, and make that single statement loud and clear.
3. Lighting
Lighting is essential to good display design. You might get away without a lot of lighting at some outdoor shows, but it's absolutely essential for indoor craft shows.
Installing a track of lights across the top of a booth space is a common strategy used to illuminate displays at shows. If you use this setup, consider using lights that can be moved and adjusted, so you'll be able to focus them however you like to feature the most important elements of your display.
If, for example, you've created a tabletop pyramid-shaped focal area in your display, you'll be able to ensure you light it well if your lighting system has some flexibility.
4. Graphics and Signs
If you use signs or posters in your display, these retail techniques can help to ensure your signage is effective:
1. Make sure the rest of your display doesn't hide your signs.
Take a step back from your booth, and check from several angles to ensure your signs are completely visible and not hidden behind your displays.
2. The rule of three can be applied to signs
The principle that odd numbers of items create a more effective display can be applied to your signs. For example, a jewelry designer might show three posters of large scale photos of her most beautiful work along the top of the back wall of her booth.
Alternatively, one large sign can be effective. Perhaps a clothing designer could post a single, tall, life sized photo of a model wearing a design that best represents the brand.
If you're going to use graphic signs to communicate information to customers, do be sure the colors used work with your product.
5. Less is Sometimes More
When you want to develop a high-end brand, less is typically more. That is, customers expect to see fewer items on display at higher-end boutiques. When they see a lot of product on display, they typically expect to see lower priced items in that shop.
If you want to prove this concept to yourself, take walk around a mall that has both higher and lower end shops and compare their windows. I think you'll see a noticeable different in the amount of product displayed in each type of shop.
6. Lifestyle Displays
Consider displaying your products as they would be used. You can use props to tell a story and help your customers imagine how their lives would be improved if they bought your product.
For example, if you sold elegant wine jellies, why not set up part of your booth to look like a wonderful party? Customers, then, are buying into the lifestyle as well as the product.
More Visual Merchandising Techniques
Read Another Article
Are you eager to learn more visual merchandising techniques?
Here are 6 more visual merchandising techniques you can take from retailers and use in your craft booth.
REad a Trusted Book
And if you're looking for more resources on the topic, I highly recommend the book Visual Merchandising: Windows and in-store displays for retail by Tony Morgan.
Take a Fabulous Course
On Udemy, you can find the course
Visual Merchandising Course For Retailers and Students
. It is fabulous. While the focus is on creating great retail shop displays, and there are parts of the course that don't apply directly to craft booths, this course is full of loads of information you can use to create an effective craft show booth.
More Craft Display Ideas
Craft Show Success
Craft show success hinges, in part, on bringing customers into your booth. Here are 9 strategies to entice customers into your booth.
Craft Show Display Ideas
Find craft show display ideas with three free and easy ways to find great booth photos that will give you inspiration to create your own great displays.
Craft Show Success Secrets - Merchandising
These craft show success secrets will help you use effective merchandising strategies to make the sale at your next craft show.


Hi, I'm Lisa, the creator of Craft Professional. I create and share printable coloring pages, calendars, and simple creative resources for kids, adults, teachers, and busy families. Learn more about the site and the person behind it.
Home | About | Contact | Newest Updates | Newsletter | Privacy | Terms of Use | Advertising Disclosure
If you buy something through links on Craft Professional, I may earn a referral fee. Details are in my disclosure.
Copyright © 2006-2026 CraftProfessional.com - All rights reserved.