- Home
- Craft Business
- Display Booth Photos
- Visual Merchandising Tips
Visual Merchandising Tips for Craft Show Displays
Why should craft business owners be interested in visual merchandising tips? And what, exactly, is visual merchandising anyway?
Savvy retailers use visual merchandising techniques to make their items look more appealing to customers, so they can sell more product.
You might be familiar with the strategies used in grocery stores to encourage customers to spend more:

- The most profitable items are placed on shelves at eye level, and the least profitable items are easy to miss on the bottom shelves.
- Candy is placed at a child's eye level at the checkout, so your kid will beg you to buy a treat while you're waiting for your turn to pay.
- Staples like milk and bread are placed at the back, so you have to walk through the whole store to get them and maybe end up making some impulse purchases.
Visual merchandising is simply a set of strategies used to set up your shop layout and display your products in ways that entice shoppers to purchase more items in general, and to buy more of the most profitable items.
Why Should Craft Business Owners Be Interested in Visual Merchandising Tips?
Large retailers study the way product displays impact their sales, and they've developed a series of tried and true strategies that have been proven time and time again to boost sales.
If it works for big retailers, craft business owners who sell at craft shows could also benefit from using some of these time-tested techniques in their own booth design.
Why Try These Visual Merchandising Tips in Your Craft Booth?
Good Visual Merchandising Can Give You an Edge Over the Competition
These techniques are not used in a lot at craft displays. But they have been proven effective for retailers. If you use good visual merchandising, and your competition doesn't, it can really help you stand out from the crowd.
In preparation for writing this article, I went on a search through my craft booth photos for examples of the visual merchandising tips I wanted to write about.
Unfortunately, I didn't find many photos of booths using these strategies. In fact, I'll have to use graphics to illustrate some points because I just don't have photos with great examples.
Keep in mind, I have over 1000 booth photos on this site, and I have another collection of new, not yet published photos from a very high end craft show where vendors bring their "A" game and spend thousands of dollars to participate. It was a struggle to find good photos of booths using these visual merchandising tips, even at the high-end show where craft artists are truly experienced pros.
These Strategies Will Help You Arrange your Displays With More Confidence
Once you're aware of these strategies, you'll begin to see retail displays in a totally different way.
Have you ever put together a display and felt that something was not quite right, but you couldn't figure out what was wrong and how to fix it?
If you have had that experience when arranging product to display for craft shows, you will benefit from learning these visual merchandising tips.
Once you know these strategies, you'll be able to see exactly what's wrong with a display and know how to make it right.
I earn a commission for purchases made through links on this page.
To learn more, please see my disclosure.
You Might Be Able to Implement These Strategies for Free
If you could use a free strategy to potentially boost your sales at craft shows, wouldn't you give it a try?
For the most part, visual merchandising is about how you arrange your product on the tables, shelves, grid walls, or other display furniture that you already use.
You might decide to buy a few handy tools, like clear acrylic risers to help you arrange better tabletop displays, but for the most part, if you already have the bulk of your craft display furniture, you should be able to try some of these strategies without investing in a lot of new display furniture.
You Can Encourage Shoppers To Buy Your Most Profitable Items
You might have items that you hope to sell a lot because they bring you more profit than other products. Instead of just crossing your fingers and hoping customers will be drawn to your most profitable items, you can actively direct your customers there.
These visual merchandising tips will show you how to create displays that draw the customer's eye to key products that you want to promote.
Key Visual Merchandising Techniques
Now that I (hopefully) have you convinced that visual merchandising techniques can help you design a more effective display, let's dive in and look at the strategies savvy retailers us to encourage customers to shop.
We're going to look at six key principles retailers use to display product effectively:
- symmetrical pyramids
- asymmetrical pyramids
- repetition with odd numbers
- alternation
- elevation to eye level
- gaps between product lines
Symmetrical Pyramids

Symmetrical pyramids are a collection of products and possibly props displayed in a pyramid shape. The high point is in the middle, and the two diagonals are equal in length on both sides. If you drew a straight line down from the top of the pyramid, both sides would be equal.
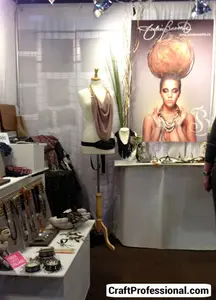
Symmetrical pyramids are used frequently on retail tabletop displays, and a pyramid effect can be created with mannequins as well.
The Top of The Pyramid
The most impactful product belongs at the top of the pyramid. Impactful might mean the most eye-catching product, or it might mean the most profitable product that you most want to sell.
Never place something inexpensive or unexciting at the top of your pyramid.
The top of the pyramid should fall at your customers' eye level, so it will be what people notice the most. You might need to use wood crates , boxes, or acrylic risers to elevate your most impactful product to the top of the pyramid.
The Sides of the Pyramid
Arrange the rest of your products so they roughly angle down in height on both sides to create the pyramid shape. The display can be a mirror image on both sides, or not, depending on what you have to display.
If you're creating a tabletop display, avoid building a flat pyramid. Add some depth. Bring items out in front, or place items on an angle. All of these small adjustments will add interest to the display.
Asymmetrical Pyramids

Asymmetrical pyramids are like the symmetrical pyramid in that the focal point is at the top. However, if you drew a line from the highest point of the display to the bottom, one side of the pyramid would be larger than the other.
Asymmetrical pyramids are more flexible than symmetrical pyramid displays, and they give you more room to display a variety of products.
They usually go from left to right, that is, the right side is longer than the left, and that arrangement is designed to draw the eye into the shop.
Repetition With Odd Numbers

Repetition in visual merchandising simply means showing more than one of an item. Creating effective repetition in a display is all about embracing odd numbers.
Whether you're using repetition with mannequins, or posters, or anything else, you should focus on odd numbers, in particular groups of three.
You might have heard this rule in interior design - if you're displaying things in groups, make them groups of three, five, or seven because odd numbered groups are more pleasing to the eye. The same principle holds true in retail display design.
Odd numbers of repeated products encourage the eye to focus on the item in the middle, while even numbered repetition doesn't give the eye a single place to focus.
Of course, if you know customers' eyes will focus on the middle product, you'll be sure to place the item you most want to highlight (perhaps the most profitable product) in the middle of the display.
Alternation

Alternation is like repetition, just fancier. To create a display using alternation, you'd alternate between two different types of products or display types.
For example, if you sold t-shirts, you might create a wall display that alternates between two contrasting colors of shirts.
Repetitive patterns are effective in retail displays because they are attractive and eye catching.
Elevation to Eye Level
Within your booth, any space that falls at customers' eye level is prime real estate. It's the space that provides the best opportunity to sell to customers because it is what they notice first, and what they see the most.
Therefore, to maximize the effectiveness of your display, you need to be very aware of what you have displayed at eye level.
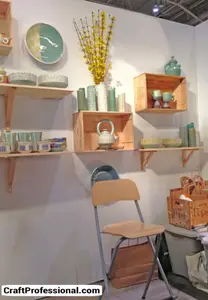
Elevating Small Objects
You may need to really work to elevate your products to eye level, particularly if you sell smaller items.
Pyramid-shaped displays are fantastic for getting your most impactful items up to eye level. You also may need to use risers, wooden crates, acrylic cubes, display stands or busts to raise your products to that all-important eye level.
Beyond Eye Level
The top of your booth space normally can't be shopped easily. Instead of allowing that space to go to waste, you can use it to draw in customers from a distance.
The upper area of your booth space can be used for displays that draw interest. Either signs featuring large scale product shots (ideal for craft artists who create smaller items) or a product display (ideal for people who make larger items that can be seen from a distance) placed at the top of your booth space can draw attention from a distance, so you don't waste any of your precious 10x10 booth space.
Bonus Virtual Merchandising Tip: Make sure the product you featured in the display can be easily found by shoppers right under the upper area where it is displayed.
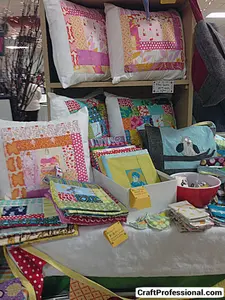
Gaps Between Product Lines

If you sell several different versions of the same product, try creating small gaps in between the product lines in your displays.
For example, if you sell several flavors of homemade jam, group each flavor together, and leave just a little bit of space between each different flavor.
Leaving an inch or so between different versions of the same product makes it immediately obvious to customers that there are several different choices and makes it easier for customers to browse all of the options you offer.
Moving Forward
These six visual merchandising tips are just the beginning of the strategies you can borrow from retailers to create a booth that helps you sell more crafts. There are a whole lot of techniques, tested by retail shop owners, that you can put to work in your booth.
If you want to learn more about visual merchandising here are some more resources to check out:
6 Visual Merchandising Techniques You Can Use in Your Craft Booth
In part two of this article I share 6 more merchandising strategies you can use to create an effective display booth.
Visual Merchandising: Windows and in-store displays for retail
This book by Tony Morgan is full of information, diagrams, and photos to help you develop a solid understanding of the topic.
I love this course on Udemy. It is full of fantastic visual merchandising tips you can apply to a craft booth. The course is focused on retail shop displays, so there will be some sections (like creating window displays) that don't apply as easily to a craft booth, but there's enough information that applies to a booth space to make this course worthwhile for people who sell at craft shows.
More Craft Display Ideas
Craft Show Success
Craft show success hinges, in part, on bringing customers into your booth. Here are 9 strategies to entice customers into your booth.
Craft Show Display Ideas
Find craft show display ideas with three free and easy ways to find great booth photos that will give you inspiration to create your own great displays.
Craft Show Success Secrets - Merchandising
These craft show success secrets will help you use effective merchandising strategies to make the sale at your next craft show.

Hi, I'm Lisa, the creator of Craft Professional. I create and share printable coloring pages, calendars, and simple creative resources for kids, adults, teachers, and busy families. Learn more about the site and the person behind it.
Home | About | Contact | Newest Updates | Newsletter | Privacy | Terms of Use | Advertising Disclosure
If you buy something through links on Craft Professional, I may earn a referral fee. Details are in my disclosure.
Copyright © 2006-2026 CraftProfessional.com - All rights reserved.