GET NEW FREE PRINTABLES BY EMAIL. SIGN UP FOR THE PRINTABLES NEWSLETTER.
- Home
- Craft Business
- Display Booth Photos
- Visual Merchandising Display Strategies
Visual Merchandising Display Strategies for Your Craft Booth
Retailers use visual merchandising display strategies to boost sales. They employ all kinds of clever tactics that have been tested and proven to make products more appealing and eye-catching to shoppers, so they can sell more of their most profitable items.
Happily, plenty of those retail store design strategies can be used in your portable booth at craft shows.
Let's take a look at three visual merchandising display concepts at work in several craft show booths.
You'll see how to display your crafts at their very best using the visual merchandising strategies:
- eye level product placement
- pyramid-shaped displays
- and repetition and alternation
Make Excellent Use of Display Space at Eye Level

Any space in your booth at eye level is prime real estate. That's where customers will look first and focus their attention, so that's where you need to display your most appealing or most profitable items.
Eye level will vary depending on your target customer.
For the majority of people who sell at craft shows, your target customer will be adult women. If that's your customer, then eye level in your booth is the space between about four and five feet high.
If your products appeal primarily to men, you'll target a slightly higher eye level space. And, of course, if your product appeals primarily to children, eye level will be a bit lower.
Let's take a look at a few craft show booths that make good use of the space at eye level.
I earn a commission for purchases made through links on this page.
To learn more, please see my disclosure.

In this booth, the pretty chalk board calendars are the most visually impactful, and probably the most profitable items for sale. Placing them directly at eye level effectively draws customers' attention to them.
Smaller items displayed lower on the wall don't have the same visual impact, and they probably don't generate the same degree of profit, so it's smarter to give them a less prominent space in the booth.

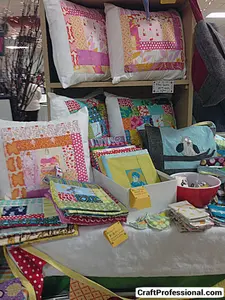
How cool are these DIY macrame display shelves!?
They are perfect for placing the featured handmade pillows at eye level and work well with the product that's on display.
Notice the lighting above each shelf. It is perfectly placed to draw customers' attention to this area of the booth.
Below, you'll see two examples of very different products elevated to eye level in the same way.
Handmade purses in one booth, and beautiful wood cutting boards in another are hung from the walls of each of their booths, elevated to eye level.
Both of these booths were at a large, multi-day show where displays are left up over night. In this case, the substantial walls make sense. If you're doing a single day show, you might prefer a more portable option, like grid walls, to create the framework for hanging items along your booth's walls.


Pyramids Are a Smart Visual Merchandising Display Strategy
Pyramids are a fantastic way to highlight your most impactful product and raise items up to eye level. To use pyramids in a display, you simply use risers and props to arrange your products in a pyramid shape.
What's so great about creating pyramid shaped displays in retail merchandising? Pyramids are a time-tested way to create an aesthetically pleasing grouping of products
Tony Morgan, author of Visual Merchandising, says, with a pyramid-shaped grouping of products, "the eye focuses on one main point first and is then led on to other focal points around it. The pyramid also enables the eye to remain for longer on the key product that is being emphasized."

You can use pyramids in visual merchandising display in many ways, but one of the simplest is to create pyramids on your tabletop displays as you can see in this soap booth.
The pyramid-shaped tower of soap in this booth raises the product to eye level while keeping the display simple and easy to shop.
Grouping all of the soaps into a larger unit (the pyramid shape) also serves to give a small product more presence and makes it a little more prominent from a distance.
Notice the lighting at the top of the pyramid. It helps to draw attention to this fantastic display.

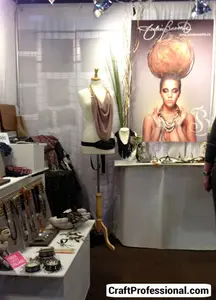
Here's an asymmetrical pyramid created with jewelry busts of varying heights.
What's an asymmetrical pyramid? It's simply a pyramid that has one side longer than the other when you measure from the top point of the pyramid.
In the jewelry booth pictured here, the largest jewelry bust forms the top of the pyramid. On the left of that bust, a small bust creates a steep slope down. On the right, though, there's a more gentle slope, creating a longer line on that side of the pyramid.
Notice the longer, right side of the pyramid flows into the rest of the display creating a line that draws the eye from the pyramid and into the rest of the booth.
Repetition in Odd Numbers
Using repetition to display products in odd numbered groups is another way to create a focal point with impact in your craft booth.
Most commonly, you'll see groups of three. The item in the middle of the group should be the most impactful product because that will be where the customer will focus the most attention.

Here, we have three mannequins grouped together.
Notice the scarf with the boldest color (and trendiest pattern at the time) is in the center of the grouping where it becomes the focus of the display.
The repetition gives added presence to the display

Here's another clothing booth that uses a group of three mannequins to create an effective visual merchandising display.
This photo is taken from a bit of a distance, so you can see how the group of three mannequins creates a focal point within the overall display.
Also, if you look closely, you'll see that the middle mannequin is just a bit taller than the two outside mannequins, creating a slight pyramid shape within the grouping.
Next up, we have a jewelry booth that uses repetition of odd numbers.

This booth, with necklaces displayed on clipboards, uses two groupings of three. There's a horizontal group of three across the top of the display, and a vertical group of three beside the mirror.
All of the pieces are statement necklaces, but in each group of three, the most substantial necklaces are in the middle forming the main focus of the grouping.
Using Visual Merchandising Display Strategies in Your Own Craft Booth
These techniques, eye level display, pyramids, and repetition, along with other strategies have been tried and tested for years among retailers. They work for larger retailers, so why not put them to use in your own display.
If you'd like to start using more strategic retail merchandising techniques in your booth, instead of simply placing your product without a real strategy or plan, you can learn more with these resources:
Visual Merchandising by Tony Morgan: An excellent book on the topic with plenty of examples. The focus of this book is on retail shops, but there is plenty of information that will translate into a smaller, portable craft display.
Visual Merchandising Course For Retailers and Students:
If you prefer to learn through a video-based course format, Sarah Manning's Udemy course is an excellent choice. Sarah shares the effective and affordable visual merchandising strategies she's developed through her years of professional experience designing displays in popular London shops.
Visual Merchandising Tips for Craft Show Displays: How to use six key visual merchandising strategies:
- symmetrical pyramids
- asymmetrical pyramids
- repetition with odd numbers
- alternation
- elevation to eye level
- and gaps between product lines
to create a craft booth that customers will love to shop and draws attention to your most profitable products.
6 Visual Merchandising Techniques You Can Use in Your Craft Booth: How to work with six more effective merchandising strategies including:
- color
- themes
- lighting
- graphics and signs
- less is sometimes more
- lifestyle displays
to create an effective display designed make the most of your sales at craft shows.
More Craft Display Ideas
Craft Show Success
Craft show success hinges, in part, on bringing customers into your booth. Here are 9 strategies to entice customers into your booth.
Craft Show Display Ideas
Find craft show display ideas with three free and easy ways to find great booth photos that will give you inspiration to create your own great displays.
Craft Show Success Secrets - Merchandising
These craft show success secrets will help you use effective merchandising strategies to make the sale at your next craft show.
Home | About | Contact | Newest Updates | Newsletter | Privacy | Terms of use | Advertising Disclosure
Copyright © 2006-2026 CraftProfessional.com - All rights reserved.