GET NEW FREE PRINTABLES BY EMAIL. SIGN UP FOR THE PRINTABLES NEWSLETTER.
- Home
- Craft Business
- Sell Crafts Online
- How to Use Pinterest for Business
How to Use Pinterest for Business in 2019
How I use Pinterest for business in 2019. I've updated my Pinterest marketing strategy, and traffic to my site has grown with that update. In fact, Pinterest traffic has increased by 140% compared to the same time last year. Here's how you can implement the same strategy to market your own creative business online.
IMPORTANT: Pinterest announced some big changes to its algorithm in 2020, and I'm no longer using the strategy described below.
I'm testing some changes, but until I'm able to update this page, I would suggest you read Tailwind's Pinterest Best Practices FAQ.
It was compiled with the information that came out of a Q&A session with a representative from Pinterest and reflects the newest information about what works for businesses on Pinterest.
I started experimenting and researching how to use Pinterest for business in early 2019. With several new insights, I organized and finally implemented the plan in mid-March.
I've been eager to share the strategies I'm using for quite some time because the results have been impressive and fairly quick. However, I wanted to get the strategy fully implemented and let it run for a while, so I would have better insights to share.
Not sure why you'd want to use Pinterest for business? Here's why Pinterest marketing is important for creative entrepreneurs.
Why I Needed a New Pinterest Marketing Strategy for My Business
Pinterest has always been good to me, but I had become a little complacent with it.

I was using old strategies and routines that I had implemented a few years ago. I knew Pinterest had changed since the last time I updated my marketing strategy. However, everything Pinterest-wise was going along fine. So I focused my energies on other business-building tasks.
I was happy with the status quo until I was suddenly walloped out of my complacency. I joined a new blogging community, and I saw how much traffic other bloggers were getting from Pinterest.
While I knew my website traffic from Pinterest was respectable, I couldn't ignore the fact that I could be doing much better. I needed a new plan that reflected the best practises to use Pinterest for business in 2019.
Pinterest Business Strategies for 2019
I started my quest at the beginning of the year. I spent a couple of months learning and experimenting before I implemented a new strategy.
What I found in my research were some strategies that would require a lot of work but seemed solid and sensible. I also found some more aggressive strategies, but they made me nervous.
I'll skip the strategies that make me uneasy. If you're curious, you can read more about those Pinterest marketing strategies and why I stay away here.
How I Use Pinterest for Business
My Pinterest marketing strategy for 2019 comes down to:
- Create multiple unique pins per post
- Schedule them to multiple relevant boards with Tailwind
- Space pins to the same post several days apart
- Track things with a spreadsheet
It's not a fancy or complicated strategy, but, for me, it has been an effective way to use Pinterest for business.
MY Pinterest Traffic is Up 140%
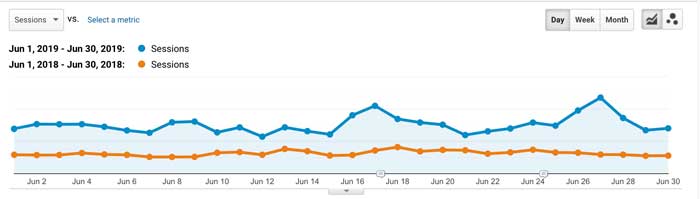 Traffic to this site (measured in sessions) from Pinterest is up 140% compared to the same time last year. The blue line represents June 2019, after I implemented the new Pinterest marketing strategy. The orange line represents June 2018, when I was using old Pinterest marketing strategies.
Getting More Visibility on Pinterest
I felt I was already creating pins that encouraged people to click through, and I was usually making reasonably good use of keywords. To grow my traffic from Pinterest, then, I felt I needed a larger presence. I needed to get more pins out there.
One way (probably the best way) to get more pins out there and get more visitors to your site is to write more new articles, and then share them on Pinterest. While I try to write as many new articles as I can, writing good information takes me a long time. I wanted to supplement new articles with something else.
Another strategy people use to try to get more presence on Pinterest is repinning old pins of theirs. I do some of that, but I'm careful not to reshare pins too frequently. Quick and repetitive resharing is one of the things that might land you in Pinterest jail. I use this strategy in moderation, but I didn't think it was enough to really get the Pinterest boost I wanted.
Pinterest saying that says the way to grow your presence on Pinterest is to add more new content. I wish I had thought to screenshot the page that pops up with that advice. I can't remember how to trigger it, but it's there. Pinterest does say they want you to add more new content to grow your audience.
Since the number of new articles I can write is limited by time, I figured the next best plan was to create several new pins for existing articles.
Here's how I created those pins, schedule them to be shared on Pinterest and keep track of it all.
1. Create Multiple Unique Pins Per Post
I invested time to create multiple (4) pins for most of the articles on my site. It was a massive project. Honestly, it's probably a good thing I didn't realize how long it would take until I was well into the project. If I had known, I might not have done it.
I'm happy I did, though because traffic from Pinterest is way up since I started the project.
If the thought of creating so many pins is too daunting, try a scaled-down version of this strategy. Choose your most important, most impactful pages to promote, and make a few new pins for those pages.
Decide what items on your site could have the biggest impact on your business if you could just more people to see them. Create extra pin images for those items. See how that works for you. If it goes well, you might decide it's worthwhile to invest even more time creating and sharing more pins.
How did I decide I'd make 4 pins per post instead of 3, or 5, or 10?
There was nothing scientific about the decision. 4 was a common number I kept seeing every time people talked about making multiple, unique pins for posts. It seemed like a manageable number. Other people who use Pinterest for business create more or fewer pins per post as their time and priorities allow.
How did I create all of those pins?
Image Editing
I have a subscription to Adobe Creative Cloud, which includes access to Adobe Spark. That's what I used to create my pins. It automatically sizes images for social media and has plenty of great Pinterest pin design templates. You can save your brand colors and a logo in Adobe Spark to maintain consistency with the look of your pins.
If you don't have access to that kind of image editing software, and you want a free option, try Canva.
You can read my review of Canva here.
Finding Images
For the most part, I used my own photos. Sometimes my own photos don't fit the topic, so I also bought some stock images through DepositPhotos and StockUnlimited.
Designing Images
I tried to take a slightly different angle with the text on each different pin I'd create for an article. I looked through the article, and tried to find some combination of:
- different ways someone would benefit from the information
- different important ideas that were presented in the article
- or different ways to think about the information in the article
I'd feature a different "angle" on each pin, so each pin was clearly different but relevant to the article.
Optimizing Images
You need to find a balance when choosing image file sizes. They must be large enough to look good online, but small enough to ensure your site loads quickly. Page speed is important to Google, and larger images slow down your site.
I optimized my images using squoosh.app. It works well, it's fast, and it's free.
Posting the Pin Images on My Site
Although I made four pin images for most articles, I've only included one pin image on each article. Why don't I post all of the pin images on my articles? Two words - page speed.
Pinterest images are large; large images make your site slower to load, and a slow loading site makes readers and Google angry.
As certain pins becoming more popular on Pinterest, I make sure the pin that's most popular is the pin image that's used on my site.
I also make sure whatever "angle" I've focused on in the most popular pin is mentioned near the top of the article. That way, people who click through to my site from my most popular pins will immediately know they've landed in the right spot.
I earn a commission for purchases made through links on this page.
To learn more, please see my disclosure.
2. Schedule Pins to Multiple Relevant Boards With Tailwind
My plan was to maximize visibility for each new pin by pinning each one to a few different but relevant boards.
Saving the same pin image to a few different boards is a strategy that has gained popularity. It is recommended by online business mentors I trust implicitly, so I'm comfortable this strategy is reasonable and not too aggressive.
Pinning to multiple boards is something I had done a bit of, but it was kind of hit and miss. I wanted to implement this strategy more fully and systematically.
List the Topics You Want to Pin
I went through my site and made a list of the main subtopics I write about.
For example, I write about topics such as:
- craft show displays
- where to sell crafts
- selling online
- photography and image editing
I listed out all the subtopics that fit with articles I wanted to share on Pinterest. I needed that list of subtopics so I would know what kinds of Pinterest boards I would need to have in order to pin articles to several boards.
Create Multiple Relevant Boards
Next, I made sure I had a few different Pinterest boards that any pins from those subtopic areas would fit into.
For example, if I was making sure I had boards that could take pins for photography and image editing articles, I would note that those pins would fit on boards I have such as:
- craft business articles
- selling crafts
- sell crafts online
- starting a blog
- product photography tips
I went through all my subtopics, noted which boards would work with each subtopic, and noted any subtopic that needed more boards.
For the most part, I already had enough boards to allow me to save pins onto a few different boards. I've used Pinterest for a long time, and boards kind of have a way of proliferating over the years.
Where I did need to add some new boards, I was careful not to add too many at once. I've read that adding too many boards at once might get your Pinterest account flagged for spam. I have no idea if that's true. It's just something I've read somewhere online. But I didn't want to take the risk, and it wasn't a big deal to limit my board making to one a day over several days.
Organize Your Pinterest Boards for Quick Repinning
Here's the part in the process in which Tailwind is absolutely essential.
Tailwind is a tool that allows you to schedule pins to Pinterest ahead of time. I wouldn't even attempt this strategy without Tailwind. It would just take too much time, and there would be far too many moving parts to track without Tailwind's help.
Tailwind has a board lists tool, which is brilliant and extremely helpful. The board list tool allows you to sort your Pinterest boards into all kinds of groups.
I created board lists that match all the subtopics I identified earlier in the process. I have board lists such as:
- craft show displays
- where to sell crafts
- selling online
- photography and image editing
Within those board lists, I added any Pinterest board that fits the subtopic. For example, any Pinterest board that could take a pin about creating a display for craft shows was put in a board list called Displays. Any board that could take a pin about photography and image editing went into a board list called Photography and Image Editing.
I also made a board list called General Craft Business that contains a few broader topic Pinterest boards. This board list is for any pins that don't quite fit into the more specific categories.
 Board lists on Tailwind make it easy to organize several related Pinterest boards into groups. Grouping related boards makes it easy to schedule a pin to be posted to several relevant boards.
Pinning the First Pin From My Site
Once everything was organized, it was time to start pinning.
If the pin image was posted on my site, I pinned the first instance of that pin directly from my site.
For pin images that I did not post on my site, I created the first instance of a pin from Pinterest.
After I created the first instance of a pin, I copied the link for that pin and pasted it into a spreadsheet I use to track my Pinterest marketing (more on the spreadsheet later). I figured saving the pin link would be a handy way to help keep track of all of the different pins.
I was adding several new pins per day, so I tried to spread them out throughout the day. It seemed smart to avoid dumping several new pins to my Pinterest account all at once.
Scheduling the Rest of the Pins
To schedule the new pin that I had just saved to Pinterest to a few more relevant boards, I went back to Tailwind.
Tailwind allows you to create a new pin in a few different ways. You can:
- use the "Create New Pin" button on the Tailwind website
- install the Tailwind extension on your web browser, so a handy Tailwind pin button will pop up on images
- use Tailwind's mobile app
Whatever method you prefer, do be sure to add the correct link to the page and a keyword-rich description.
When it was time to choose a board, I chose a group of boards from my board list.
Choosing a group of boards from the boards list tells Tailwind to schedule multiple pins - one to each board in the list.
The board list makes your pinning life so much easier. You don't need to go in every time you schedule a new pin with Tailwind and find all of the boards that are relevant to a pin. All of the relevant boards are already in a handy list.
 Tailwind's board list tool feature makes it easy to schedule the same pin to several boards with just a click.
3. Space Repins of the Same Post Several Days Apart
Before I clicked the schedule button, I needed to space out those repins.
Tailwind allows you to set time intervals when you're scheduling multiple pins at once, so you can spread them out.
I chose to schedule the first pin at least 20 days after the current date. Since I had just manually added the pin to Pinterest, I needed to make sure I put some time between that original pin and the repin.
Then I used Tailwind to adjust the interval between pins so there was at least 20 days between each pin.
Why did I space repins at least 20 days apart?
Spacing repins 20 days apart is not official advice from Pinterest. It's more of a judgment call. I'm careful to avoid repinning the same pin quickly because Pinterest says repetitive behavior is spammy.
Pinterest does not provide specific numbers to let us know how frequently we can safely repin, so you need to use your best judgment.
Some people repin the same pin every day. That strategy makes me nervous. I've also read advice from a trustworthy source that you should wait 30 days before repinning a pin to be safe.
I went a little more aggressive with 20 day spacing. You could easily use this strategy and space everything out more than I did if you feel more comfortable with a longer interval between pins.
 Tailwind will schedule multiple pins to different Pinterest boards spread out at a selected interval. Just choose the time interval you want between pins, and the date you want to schedule the first pin, and Tailwind will do the rest automatically.
Pinning Recap
When written out in full, the pinning process sounds awfully long and tedious. It's actually just a matter of a few clicks. Tailwind makes it pretty easy.
- Create a new pin with Tailwind.
- Be sure to include the pin image, the link to the correct page, and a keyword-rich description.
- Choose the most relevant group of boards from the groups you created earlier in your board list.
- Choose a start date at least 20 days after the current date.
- Adjust the interval between pins to 20 days or more.
- Click schedule.
Getting Through the Work
I wanted to get through the initial pinning of the new pins in about 3 months. That meant I had to pin about 13 new pins per day.
Here's the math:
- 300 articles I wanted to promote
- 4 pins for each article
- 1200 pins in total (300 articles x4 pins)
- 3 months (91 days) to do the work
1200 pins over 91 days works out to adding about 13 new pins per day, and then scheduling repins of those pins to other relevant boards using Tailwind.
4. Track Things With a Spreadsheet
I use Tailwind to schedule everything as I've described, but I also track some things on a spreadsheet.
Some say one benefit of Tailwind is that it frees you from the need to track your pinning with spreadsheets. Plenty of people are perfectly happy to use Tailwind without any other tracking.
When I live on the edge, spreadsheet-free, I never feel I have a complete grasp on what's been pinned, where and when. That's why I don't mind taking a couple of extra minutes to track things on a spreadsheet.
I wanted a way to make sure I wasn't completely forgetting pins or accidentally posting pins too frequently.
I also wanted a way to know when a pin had cycled through its group of relevant boards. That information would let me know when I need to take action on a pin that had run through the cycle.
Once a pin runs through the whole cycle of being pinned to several boards, I could either set up Tailwind to repin that pin again to different boards. Or, perhaps, I might create a new pin for that post.
It doesn't take long to update my spreadsheet, it helps me keep on track, and it makes me happy.
Here's what I track on my spreadsheet for each pin:
- Site URL: The address of the page on my site I'm promoting
- Pin URL: The web address of the pin on Pinterest
- Date first pinned: The date I first pinned the item on Pinterest and scheduled it out on Tailwind
- Date for next pin*: The date when the whole repinning cycle can be started again for that pin
- Tailwind board list name: The name of the Tailwind board list that the pin fits into
- Number of boards in the board list: The number of boards that are in that particular board list (so I know how many boards that pin will be repined to)
*To calculate date for next pin:
Take the number of boards in the board list times 20 (the number of days I've allowed between pins) and add that number of days to the date first pinned.
Here's an example to clarify:
If I pinned a new pin on August 1st, and it was associated with a board list made up of 5 relevant Pinterest boards, the date for next pin would be:
5 (number of boards) x 20 (number of days between pins) = 100 days
August 1st (date first pinned) + 100 days = November 9th
On November 9th, 20 days would have passed since that pin had been pinned to the last of the 5 boards.
Here's how the pins would be scheduled:
- board 1 - August 1st - Pinned manually by me
- board 2 - August 21st - Scheduled to pin automatically via Tailwind
- board 3 - September 10th - Scheduled to pin automatically via Tailwind
- board 4 - September 30th - Scheduled to pin automatically via Tailwind
- board 5 - October 20th - Scheduled to pin automatically via Tailwind
- new pin cycle - November 9th - 20 days after the pinning cycle has finished. I could start a new cycle and repin it some more to relevant boards. If the pin isn't doing well, perhaps I'd create a new pin instead and schedule that out to a few relevant boards.
I also have a separate list of a few seasonal posts that should be promoted at specific times of the year.
Results of How I Use Pinterest for Business
This whole project was a lot of work. Happily, it has been effective, and it should continue to bring more visitors to my site for a long time.
June 2019 traffic (measured in sessions) from Pinterest is up 140% compared to June 2018. I think my Pinterest traffic before doing this project was pretty respectable, so I'm thrilled with the boost.
June 2018 traffic from Pinterest compared to June 2017 was about equal, so I believe the 2019 growth is not just a natural growth of Pinterest traffic that would have happened without all of the extra work.
I started the pinning portion of this project in mid-March 2019, so traffic growth was pretty much immediate.
Summary of my Pinterest Marketing Strategy
I'm sorry the instructions here aren't shorter. I know it's a log read, but I wanted to include as much detail as possible for anyone who wants to try this type of strategy.
To help you wrap your mind around the whole thing, here's a quick recap with the details omitted:
Summary of How I Use Pinterest for Business in 2019
1. Create multiple unique pins per post.
- Create 4 pins for most of the articles on my site. You can create more or fewer pins, and you don't have to promote as many pages if you don't want to invest so much time in this project.
- Each page on my site has one of the Pinterest images. The other three images will be used only on Pinterest.
2. Schedule pins to multiple relevant boards with Tailwind.
- Make a list of the topics you want to pin
- Look at your existing Pinterest boards. See if you already have several boards that could take pins in all of your topic areas. If you don't have boards that fit all of your topics, create more Pinterest boards.
- Use Tailwind's Board List tool to create lists that group your boards into the main topic areas you'll be pinning.
- Pin the first instance of a pin.
- Schedule that pin to be shared to the rest of the board in the category. Tailwind will make this task quick and easy.
3. Space pins to the same post several days apart.
- As you're scheduling pins to several boards, be sure to space the repins several days apart. Again, Tailwind makes this job easy
4. Track things with a spreadsheet
- Track essential information on a spreadsheet.
- Check your spreadsheet regularly. When a pin has run through its cycle of boards, decide what you'll do next (repin some more, or create a new pin).
That's all there is to it. It's really pretty simple. Everything else is just detail and instructions.
Tools and Resources I Use to Make My System Work
Image editing: Adobe Spark, Canva
Image sources: Your own photos, or paid stock images where appropriate
Optimizing images for the web: squoosh.app
Pin scheduling: Tailwind
Home | About | Contact | Newest Updates | Newsletter | Privacy | Terms of use | Advertising Disclosure
Copyright © 2006-2026 CraftProfessional.com - All rights reserved.