GET NEW FREE PRINTABLES BY EMAIL. SIGN UP FOR THE PRINTABLES NEWSLETTER.
- Home
- Craft Business
- Display Booth Photos
- DIY Folding Craft Tables
DIY Folding Craft Tables Tutorial for Your Display Booth
How to DIY folding craft tables for your display at craft shows - no carpentry skills required! Build your own custom collapsible table that's the perfect size and height for your booth.
Folding craft tables form the foundation of many fantastic craft booths. Tabletop displays are a practical and affordable way to show many types of crafts. However, there's a big problem with a lot of foldable tables - they are often far too wide and not tall enough to work well in a typical 10 x 10 craft show space. That's why I decided to DIY my own folding craft tables when I was designing my own booth.
Here's how I did it, so you can create your own custom tables that are exactly the size and height you want for your own craft show display.
When it was time to get tables for my booth, I had to go through two thought processes:
- First, I had to decide exactly what size and height I needed
- Then I had to figure out how to get or create what I needed
This article takes you through both parts of the process.
The first section, Determining Your Needs, describes how I decided on the best dimensions for the folding craft tables. It will help you to think through your own needs for your display.
The second section, How I Built My Folding Craft Tables, describes how I built my display table and how you can build your own collapsible craft table to your own specifications even if you don't have carpentry skills.
I earn a commission for purchases made through links on this page.
To learn more, please see my disclosure.
Determining Your Needs
The whole point making DIY foldable craft tables instead of buying commercial ones was to get exactly what I wanted, so I put a lot of thought into the exact specifications for my tables. Here are the features I decided I needed in a display table for craft shows:
Flat Folding
I needed legs that could be fully folded down for easy transportation and efficient storage when not in use.
Height
I wanted a height of about 33 inches. Standard table height is about 30 inches, which is just a bit too short for use as part of a display. For people to browse and look at items (especially smaller items) comfortably, you need a height of about 33 to 36 inches. I knew I wanted to use risers on my tables to help vary the display height, so I opted for the lower, 33 inch table height instead of 36 inches because the risers would add more height, and I didn't want to disappear behind a display that was too tall.
Your own collapsible craft table will probably, ideally, be somewhere between 33 and 36 inches tall, depending on what you plan to put on top of the table. Also, consider how tall you are if you're going to stand behind your tables. If you're shorter, be careful to avoid making your table too tall. You don't want to disappear behind your display.
Width
I wanted tables that were about 24 inches wide. Most of the commercially made collapsible tables I found were 30 inches wide, which was too wide for my needs.
I figured, if I created a U shaped craft booth, and I placed two 30 inch tables across from each other in a standard 10 x 10 booth space, they would take up 5 feet of width in my booth, leaving only 5 feet for customers to walk around (see diagram below for further clarification).
If the tables were only 24 inches wide, the floor space for customers would be a full foot wider, as you can see in the diagram below. One foot may not sound like a lot, but when you only have a 10x10 foot space to begin with, every bit of space counts.
Also, I felt that a 30 inch wide table would create wasted space at the backs of the tables or make items in the back difficult to reach.
Customers would have to stretch to reach any items placed at the back (i.e. the edge farthest from customers) of a 30 inch table. If your display tables are too wide, you either end up placing items at the back of the table and creating an awkward reach, or you push all of your items to the front, which creates unused, wasted space.
If you make larger items, 24 inch wide folding craft tables may be too narrow for your needs, but it seems to be an ideal width for people who sell smaller items.
Here's Why Standard-Width Tables Can cause Problems in a 10 x 10 Booth Space
Below, you'll see a bird's eye view of two u-shaped booth layouts using folding craft tables. The first photo shows a display using 30 inch wide tables, and the next image shows what a difference it makes to use 24 inch wide tables.
U-Shaped Display With 30 Inch Tables
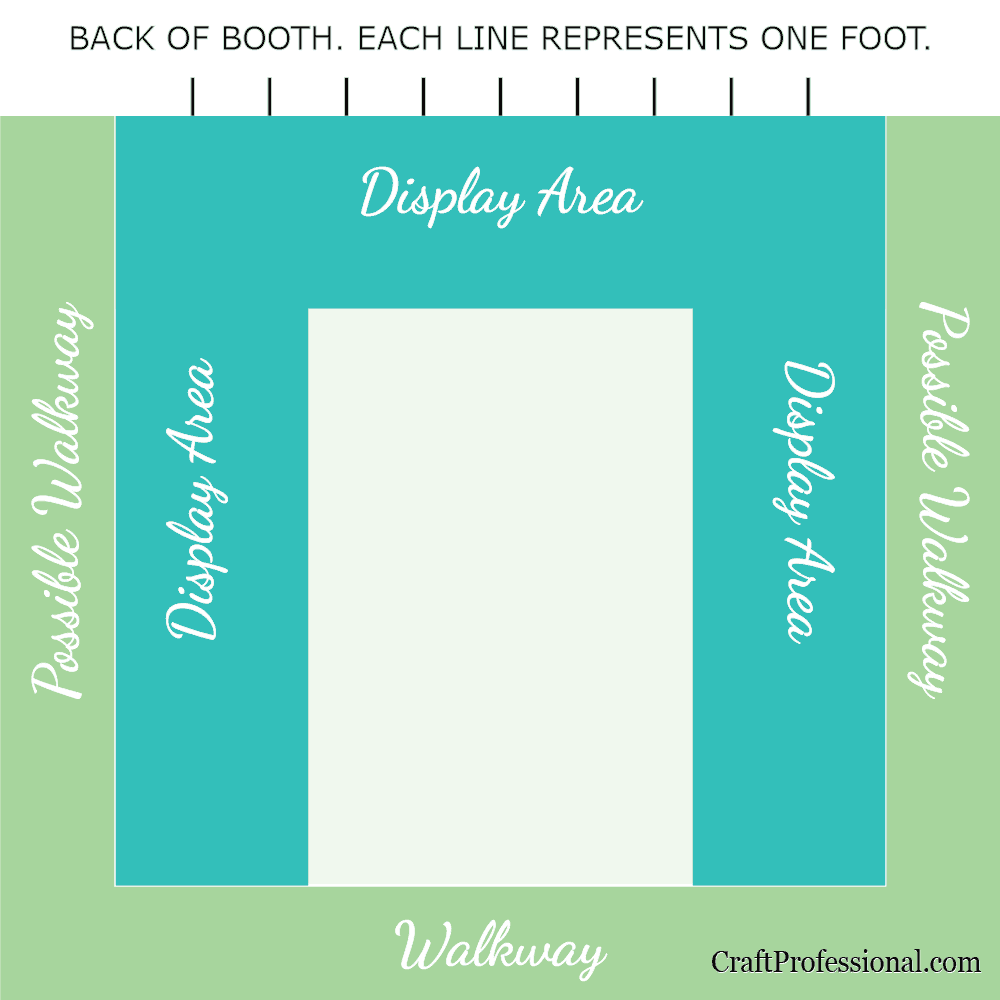 This 10x10 display uses 30 inch wide tables. Notice how deep the tables are, which creates a lot of hard to reach, wasted display space at the back edges. Also, see how narrow the floor space becomes. When you put 30 inch wide tables on both sides of your booth, you lose half of your interior space to tables, which doesn't leave much room for customers to browse.
U-Shaped Display With 24 Inch Tables
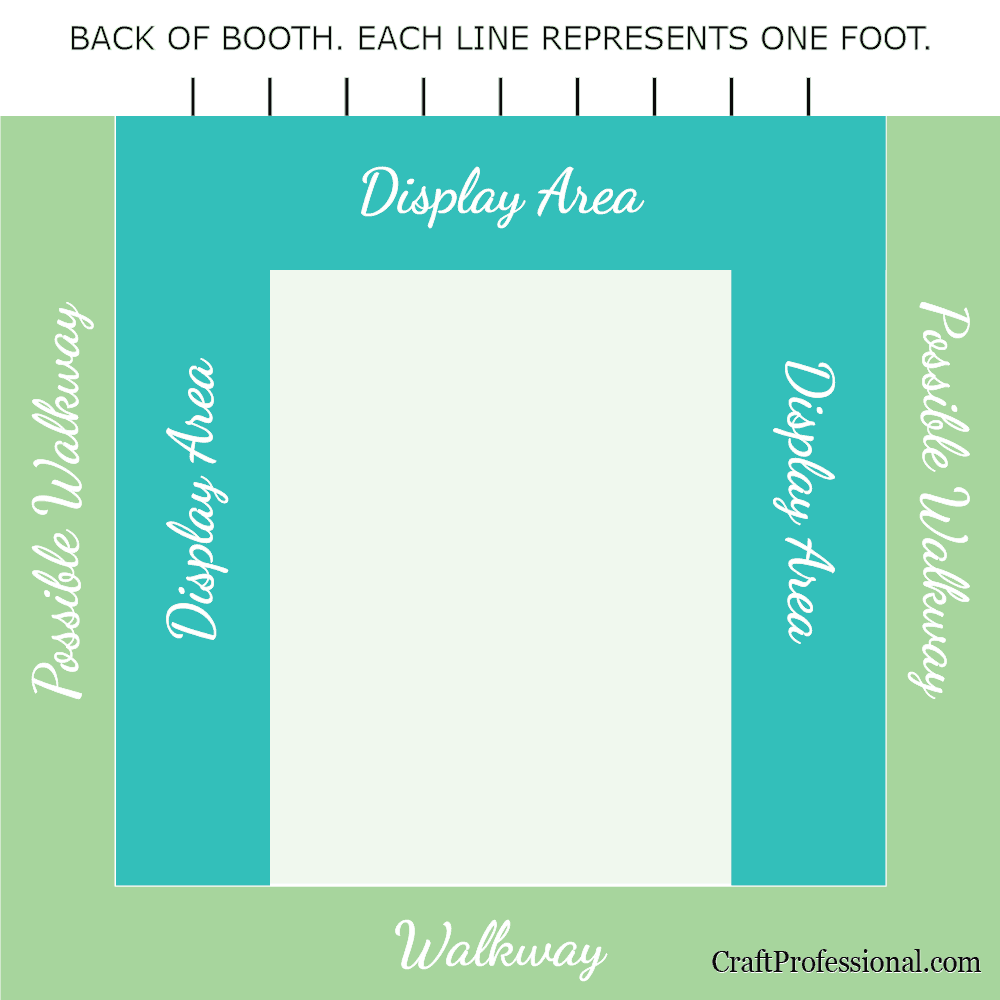 This booth has 24 inch wide tables. There is not much wasted space on the tabletops as the full 24 inch width can be reached by customers and used for display. Also, there is more room for customers to walk around in the booth, which will encourage more comfortable browsing.
Of course, you're not limited to this type of booth layout if you're using portable tables. The images above are shown to help you see how the width of your tables affects the entire display space. If you want to explore more booth layouts, you can see several popular booth designs here.
Length

I decided I wanted several 4 foot long folding craft tables.
That size fits within the standard 10 x 10 space, they are easy to transport and that length provides enough flexibility to configure them in several different ways.
4 feet isn't a magic, perfect length; it's just what worked for me. You may prefer longer or shorter tables. Just be sure to think through how the tables will fit within your booth and how you might configure them in different ways if you want to change up your booth layout.
The big decision...
I could not find exactly what I wanted in a ready-made product, so I decided I needed to custom make my folding craft tables myself.
How I Built My Folding Craft Tables
My tables were actually quite easy to make, and they meet my needs perfectly. I really have no carpentry skills. I can hammer a nail, or screw in a screw. I can also measure carefully and think through how something will function, but don't ask me to cut wood with any degree of precision or follow carpentry plans because I will fail.
If you have a similar lack of carpentry skills, don't be intimidated by this project. It's not that difficult.
The Legs
The legs I bought were designed to create a table that was 30 inches tall, so I was careful to examine the legs before I bought them to ensure I'd be able to rig something up to extend the height a few inches.
I bought folding legs from a hardware store, but my options were somewhat limited. If I was making my folding craft tables now, I'd have so many more good choices for table legs.
How to Make a Table Taller with Wooden Shims

The legs are hollow, so I simply popped the end caps off the bottoms of each leg and inserted shims into the hollow legs. The shims are secured with a screw so they won't shift and cause wobbles.
Shims can be added to the legs before or after the top has been screwed on, but the legs are easier to work with before the top has been attached. If you find it wobbles a bit once you attach the legs you can always shave off a little bit of length on any shim that is too long.
If you can't or don't want to use shims to raise the height, you can also use PVC pipes (more on that below) to extend the leg height.
The Table Top
Keep in Mind...
If you use legs like mine that come in sets of two, (as opposed to four separate legs) you'll need to measure the width of the legs to determine the minimum table width you can have.
My legs are about 24 inches wide. I originally wanted my table tops to be 24 inches wide, but to accommodate the width of the legs, I had to make the tops 26 inches wide.
There's no need to cut the tabletop yourself. You can get a piece of wood cut to size for you at a building supply store. You don't have to worry about what the wood looks like if you're going to cover it with some type of tablecloth. However, you may want to add a protective finish to help extend the life of your table.
One huge mistake I made when building my portable folding tables was choosing the least expensive material instead of a more light-weight material. My table tops are made of fiberboard. They were cheap, but they are outrageously heavy. In fact, I can't easily move the tables myself. I need my husband's help to move them and get them standing upright.
Cheaping out on my tabletop material is my biggest regret when it comes to my folding display tables. If I were making new fold up craft tables today, I'd spend a little more money and get lighter material for the tops so I could handle them on my own.
Attaching the Legs to the Table Top
When you attach the legs to your tabletop, measure carefully and mark the location where you will screw the legs into the table top. Ensure there is room for the legs to fold completely, and ensure the screws you use aren't too long so they don't come through to the top side of the table.
How to Make a Table Taller with PVC Pipe Table Risers
Some people insert their legs in lengths of PVC pipes to add height to their portable folding tables.
PVC pipe over the legs is a less permanent solution than using shims, so if you want to be able to return a table to standard height to use in your craft rom, for example, PVC pipe is a good option.
Also, if your legs are not hollow (and, therefore, you can't insert shims) PVC pipe is a good solution.
Here's how to measure the length of PVC pipe you'll need:
- Measure the diameter of your table leg, and make sure you buy PVC pipe that has a wider diameter than your table legs, so the table legs will fit inside the PVC pipe.
- Measure from the bottom of the leg to the point where the leg bends or there's a join that will stop the PVC pipe.
- Add the number of inches you want to add to the height of the table
Example:
If the length from the bottom of the leg to the bend was 6 inches, and you wanted to raise the table height by 3 inches, you would need to cut 9 inch lengths of PVC pipe for each leg.
- Once you determine the length you need, cut 4 lengths of PVC pipe all to the same length
- With the table standing upright, slip the PVC pipes over the legs
- Measure the height of the table to see how close it is to the height you want. If the table is too high, you'll need to cut off each PVC pipe to get the height you want
Be very careful to cut the PVC pipes to exactly the same length so the table doesn't wobble. I would buy my PVC pipe at my local building supply shop and ask them to cut the pipe for me, which makes the project super easy for you because there's no need to do any cutting.
Finishing Up

Making your own folding craft tables is really not a lot of work and not all that difficult. You can buy legs online, and you'll have a much better selection than I had when I made my own tables. Your table top can be cut at your local building supply store, and you can pick up screws, and PVC pipe while you're there, and you'll have what you need to make a custom display table with folding legs that exactly meets your needs.
Home | About | Contact | Newest Updates | Newsletter | Privacy | Terms of use | Advertising Disclosure
Copyright © 2006-2026 CraftProfessional.com - All rights reserved.