Jewelry Display Stand
Step by step instructions for making a handmade jewelry display stand.
This inexpensive craft show jewelry display stand is one of the first displays I used. It is attractive and easy to make.
I still love this type of stand because it:
- Is easy to make
- Can be made from inexpensive items that are easy to find
- Can be made in any color or style to suit the style of your craft display
- Is sturdy and stands up to use and wind at outdoor shows
- Stores well
- Is easy to transport and set up
- Can be used to display a variety of light, small items, not just jewelry
Supplies You'll Need to Make This Jewelry Display Stand
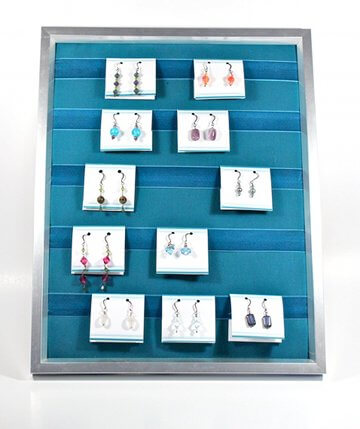
- Picture frame (any size that is appropriate for displaying your items)
- Enough fabric to cover the picture frame (measure the length and width of the picture frame and add about three inches to the length and the width to determine the amount of fabric you need)
- Batting
- Ribbon in a color that matches your fabric
- Elastic that is narrower than your ribbon
- Black bristol board (optional)
- Staple gun and staples
- Tape measure
How to DIY Your Own Jewelry Display Stand
Please don't be put off by the long instructions. I wanted to provide a lot of detail. It really is a very simple project.
Step 1: Remove the back of the picture frame, and remove the glass from the picture frame. You will not use the glass that came with the picture frame, so you can set the glass aside in a safe place.
Step 2: Take a small amount of batting and place it on the picture frame backing (the sturdy board at the back of the picture frame) in a thin, even layer that covers the entire front of the picture frame backing. Be sure the batting is on the front of the picture frame backing, not on the back side (i.e. not on the side that has hooks for hanging).
Don't use too much batting, or the picture frame backing won't fit back into the frame.
Step 3: Measure the length and width of your picture frame and cut the fabric so it is about 3 inches longer and wider than your picture frame. So, if your picture frame is 9 by 12, your fabric should be about 12 by 15.8 This measurement does not have to be absolutely precise. You just need enough fabric to work with to secure it to the back of the frame
Step 4: Center the fabric over the picture frame backing on top of the batting.
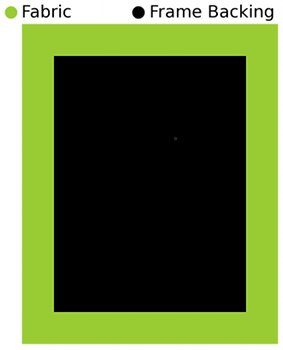 STEP 5 - Fabric centered over frame backing, back side of frame backing is facing up.
Step 5: Carefully pick up the picture frame backing, ensuring that the batting and fabric does not slip out of place. Flip it over so the back of the picture frame backing is facing up.
Next:
Stapling the Fabric to the Picture Frame Backing
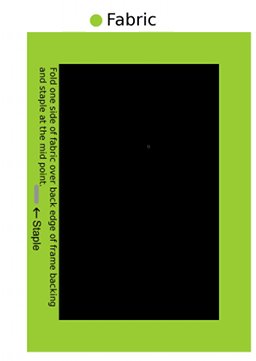 Step 6 - Fold over one edge and staple.
Step 6: Staple the fabric to the picture frame backing. Fold the edge of one side of the fabric over onto the back of the picture frame backing and staple the fabric to the picture frame backing by placing a staple at the mid-point of that edge.
Do the same with the fabric on the opposite edge. Be sure to pull the fabric fairly tight.
Repeat this with the other two edges of the frame. Be sure the fabric is pulled somewhat tight.
At this point you should have one staple at the mid point of each edge of the frame.
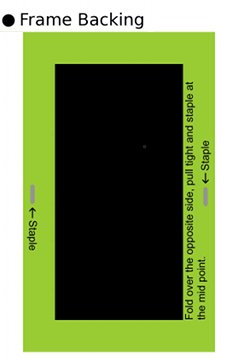 Step 6 - Fold over the opposite side and staple.
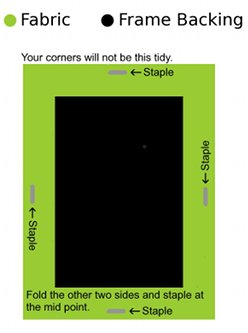 Step 6 - At the end of step 6 you'll have one staple at the mid point of each side.
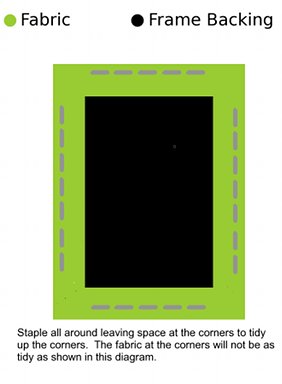 Step 7 - Staple all around, but leave space at the corners.
Step 7: Now staple the fabric all around the edges ensuring you pull the fabric so it is tight. Leave about 2 inches at each corner.
Step 8: Fold the corners neatly as you would if you were wrapping a present or making a bed. Trim excess fabric if you need to to make your corners neat. It is crucial that the top side of the fabric is smooth and tidy, but if the back (stapled) side is a bit messy, don't worry. You can cover up the back if you need to.
Once you are certain that the corners are smooth and wrinkle-free, staple the fabric down (on the back side where you have been stapling all along).
Next:
Adding Rows of Elastic
Securing elastic and ribbon horizontally across the frame provides you with a sturdy place to hang jewelry cards (or other small items)
When I first started selling jewellery, I was able to get my jewellery into a great local shop on a consignment basis right away. In fact, it almost happened too fast.
I had just decided to sell my jewellery. I didn't have a jewellery display stand, and I didn't even know where to buy such a thing.
But I needed some stands immediately so I could get my jewellery set up in the space the shop owner was providing for me.
I didn't feel as though I had the time to purchase jewellery display stands online and wait for them to come in the mail, and that is why I decided to make these handmade jewelry display stands from inexpensive items that I could buy locally.
Step 9: Decide how you want to orient your jewelry display stand. Do you want it to be taller or wider?
Next, decide how many rows of ribbon you want to have across your frame. Think about how large your items are to determine how widely you should space your rows - remember, you don't want your items to be too cluttered.
My frame is oriented to be taller, and it has 5 rows of ribbon, so I will use that example in these instructions (but remember you can space your rows any way you like).
Step 10: Assuming you are making 5 rows for hanging your items, cut five lengths of ribbon so they are about 2-3 inches longer than the width of the frame.
Step 11: Then cut 5 lengths of elastic so they are about 2-3 inches longer than the width of the frame.
Step 12: With the back side of the picture frame backing facing up (i.e. the messy, stapled side is facing up), determine how you want to space your rows for hanging your items. Use a pen and put a small mark on the edge of the fabric where you want each row to be.
For example, if your picture frame backing is 12 inches high, you might want 5 rows that are 2 inches apart with a one inch border at the top and bottom. So you would measure one inch from the top and make a mark (so you know where to staple the elastic), then measure down two inches from there and make another mark, and continue measuring and marking two inch sections.
Step 13: Staple one end of each elastic at each location that you have marked off.
Step 14: Mark off the opposite side of the frame as described in step 12 so you'll know where to staple the other end of the elastics.
The elastic is the secret to this handmade jewelry display stand functioning as well as it does.
The ribbon on its own does not provide a sturdy support for hanging jewelry cards. The elastic does a much better job of holding the items in place. The ribbon is simply used to cover up the elastic and make the display prettier.
Step 15: Starting from the top, grasp an elastic by the unstapled end. Pull it around the front of the frame and line up the end of the elastic on the back side of the frame with the mark you made. Ensure the elastic is perfectly straight across the front of the frame and pull the elastic so it is slightly tight. It should be tight enough to hold a jewelry card in place, but not so tight that it pulls and creates tension.
Staple the elastic to the back of the frame backing.
Repeat with all of the other elastics
Step 16: Check the front side of the frame backing to ensure all of the elastics are perfectly straight (this is crucial if the jewelry display stand is going to look professional) and make any necessary adjustments.
Next: Adding Ribbon on Top of the Elastic
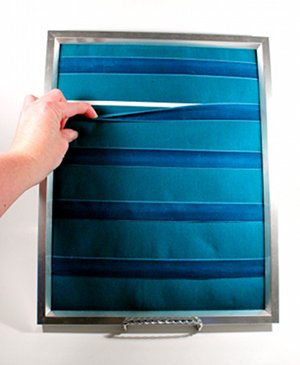 The elastic under the ribbon keeps your items secure.
The ribbon is more decorative than functional. It simply covers up the elastic so your handmade jewelry display stand will look prettier.
Take one length of ribbon that you cut in step 10. Line one end up with one of the elastics, and staple the end of the ribbon to the back of the frame backing.
Run the ribbon around the front side of the frame backing then bring the unsecured end of the ribbon around to the back side of the frame backing. Ensure the ribbon is perfectly straight and covers the elastic, and staple the end of the ribbon to the back of the frame backing.
Repeat for each row you have created.
Next: Assemble the Jewelry Display Stand
Place the frame backing back into the picture frame and secure the backing as you would if you had just put a photo in the picture frame (remember, you will not use the glass that came with the frame)
The back of the frame will be quite messy looking with all of the fabric, ribbon and elastic raw edges and staples. If no one will see the back of the frame, you can leave it this way.
If customers might see the back of the frame, simply cut a piece of black bristol board so it will fit inside the back of the frame. Secure the bristol board (I just tucked mine into the back edges of the frame) so it covers the frame backing and all of the raw edges.
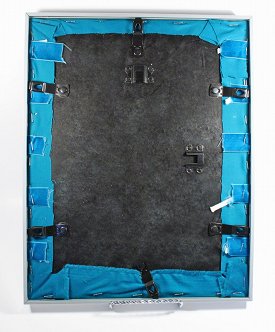 The back of the frame is messy looking.
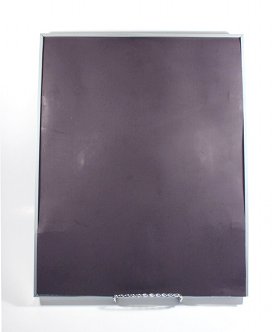 Cover the back with bristol board to hide raw edges.
Finished Jewelry Display Stand Ready to be Used in Your Craft Booth
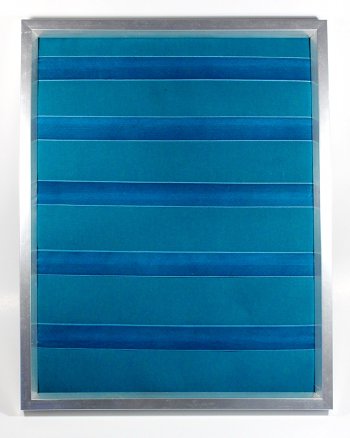 Jewelry display frame complete and ready for your craft booth.

New! Comments
Have your say about what you just read! Leave me a comment in the box below.