GET NEW FREE PRINTABLES BY EMAIL. SIGN UP FOR THE PRINTABLES NEWSLETTER.
- Home
- Craft Business
- Display Booth Photos
- Craft Show Success
Craft Show Success Secrets - Merchandising
These craft show success secrets will help you use effective merchandising strategies to make the sale at your next craft show.
If you've created a display that draws customers into your booth, then your next step is to make the sale. At this stage, your larger display should fade into the background and not be noticed by customers. Good merchandising should take over so customers notice your work and not your display.
Craft Show Success Secrets
9 Merchandising Tips To Help You Make the Sale
1. Ensure that your booth is not too crowded with merchandise.
If you put all of your items out at once, it can be confusing to customers. They won't know where to look first. Also, if you load your booth with piles and piles of items, it can reduce the perceived value of your work. If there's a lot of it, it can appear less special.
2. Whenever possible, let people touch and pick up your items.
When it's practical, ensure any displays you use don't limit your customers' ability to touch and pick up items. Also, try to avoid elaborate displays that discourage touch. If your display is too fussy, customers will avoid picking up items; they'll say they don't want to ruin your lovely display.

3. Reflect your work and show your product in its best possible light.
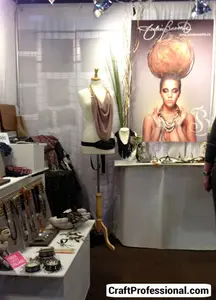
Ensure that your displays play up the best qualities of your work. When I started selling my jewelry, I made gemstone and Swarovski crystal jewelry. I displayed my jewelry on clear acrylic busts that allowed light to pass through the jewelry, so it really sparkled and took center stage on the displays.
Later I focused on making resin jewelry; my clear resin pieces just disappeared on the clear acrylic busts. I created some white velveteen displays, and my resin jewelry took on a whole new life on those displays.
4. Make people comfortable so they'll stay longer.
Anti-fatigue mats are a nice way to make people feel comfortable and encourage them to stay longer. I've caught myself at shows lingering longer in a booth that has extra comfortable flooring and I often end up buying things I may not have noticed if I had passed more quickly through the booth.
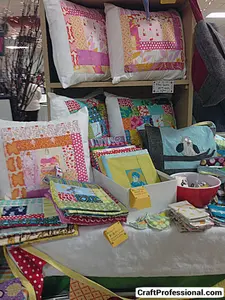
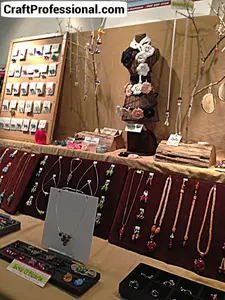
5. Use levels to create a flow and make items stand out.
Avoid row upon row of straight lines. Using risers to display your work at varying heights will help customers' eyes to move around your booth. When items are displayed in rows, individual pieces just don't stand out.
Risers can be purchased from craft display suppliers, or they can be made easily from anything from wooden boxes to empty coffee cans. Cover your risers in a fabric that fits with your color scheme, and no one will ever know the truth about what's under there (you can keep you craft show success secrets under wraps!).
6. Display items at or near eye level.
If you are displaying your items on tables, consider adding some height to your tables, particularly if your items are fairly small. Standard table height is not an effective counter height. Adding wood, metal or plastic shims to the bottoms of the your table legs to raise your tables 3 to 6 inches will bring all of your items closer to eye level for your customers.
7. Group similar items together.
If you mix primitive style crafts with sleek and sophisticated items, you'll only create confusion in the minds of your customers. Keep similar items together to quickly communicate an image and sense of style to your customers.
8. Think carefully if you're considering displaying items in closed glass cases.
When items (like jewelry) are displayed under glass, it can create an air of mystique and high quality about your pieces. However, the downside of using closed cases is that it makes it difficult for customers to touch. If you're considering using cases for fragile or high end pieces, ensure that you can access the items quickly and easily for customers.
9. Choose your tables wisely.
Tables that are about two feet wide are typically ideal for displaying crafts. Standard tables are often too wide to make good use of your space in a craft show booth. Customers can't easily reach items at the back of tables, so the extra width just takes up valuable floor space.
You can find legs for folding craft tables at most building supply stores, and while you're there, you can get a piece of wood (choose light weight materials when you're buying your table top) custom cut to your exact specifications. Once you have your supplies, it's pretty simple to make your own custom table for your craft booth.
More Craft Display Ideas
Craft Show Success
Craft show success hinges, in part, on bringing customers into your booth. Here are 9 strategies to entice customers into your booth.
Craft Show Display Ideas
Find craft show display ideas with three free and easy ways to find great booth photos that will give you inspiration to create your own great displays.
Exhibitor Booth Teardown
Tearing down your exhibitor booth at the end of an art and craft show can be simple with a bit of organization and planning.

Hi, I'm Lisa, the creator of Craft Professional. I create and share printable coloring pages, calendars, and simple creative resources for kids, adults, teachers, and busy families. Learn more about the site and the person behind it.
Home | About | Contact | Newest Updates | Newsletter | Privacy | Terms of Use | Advertising Disclosure
If you buy something through links on Craft Professional, I may earn a referral fee. Details are in my disclosure.
Copyright © 2006-2026 CraftProfessional.com - All rights reserved.