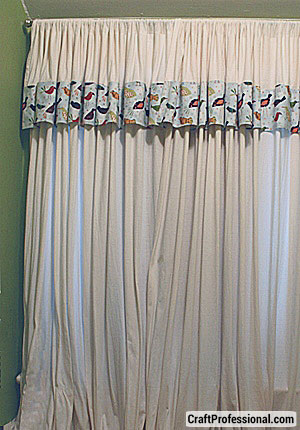
Baby Room Curtains Tutorial
Here's how I made the easy baby room curtains for my son's room using two flat twin bed sheets and some fabric that was left over from his baby blanket to create an inexpensive but coordinated look.
The curtains were fairly easy to make, but they would have been a lot easier if I hadn't chosen to work with a stretchy knit fabric.
Step 1
Determine the size of sheets you will need for your baby room curtains.
Measure the width of the window. Double the width of the window to determine minimum width of fabric needed for the baby room curtains. The curtains I made are actually more than double the width, but to ensure your curtains have enough fullness, use double the width of your window as a minimum.
Measure the length of the curtains. Decide where you want to put your curtain rod and where you want your curtains to end. Measure that length to determine the length of fabric you will need.
I wanted my curtains to hang from floor to ceiling, so I just took the measurement from floor to ceiling, which was 68 inches.
I also added 10 inches on to the length of the fabric required. The extra 10 inches allows for a decorative edge at the top of the baby room curtains.

Step 2
I wanted to minimize the amount of sewing required, so I bought two very inexpensive twin sheet sets (I used other components of the set for the crib skirt that I made). I chose twin sheets because they were long enough to provide the length required (based on my measurements in step 1), and the width of two twin sheets accounted for more than double the width of my window.
Step 3
Lay the flat bed sheet out on the floor (my table was too small, so I had to spread this project out on the kitchen floor).
Measure the fabric to the desired length of the curtains (68 inches, in my case) and fold the fabric over at that length. Be very careful to ensure your fold is straight.
Iron the fabric to get a crease and help keep your fold in place.
Step 4
From the edge of the fold, measure down 2 inches and lightly mark a line in chalk (this may not be necessary if you have a patterned fabric that will allow you to use the pattern as a guideline).
Step 5
Sew along the chalk line to make a pocket for the curtain rod.
Step 6
Next, I decided where I wanted the band of decorative fabric to go and how wide I wanted it to be.
I decided I wanted the decorative fabric to be 5 inches wide and to be placed 5 inches below the seam I just sewed for the curtain rod. You can vary the width and placement of your decorative fabric to suit the scale of your curtains.
I cut a length of the decorative fabric that was 6 inches wide (to allow for seams) and equal to the width of the flat sheet plus one inch (again, to allow for the seams). Since my decorative fabric was only 45 inches wide, and my flat sheet was wider than that, I actually had to sew two pieces of the decorative fabric together to get the right size.
Step 7
With the flat sheet laid out on the floor, measure 5 inches down from the seam that was sewed in step 5 (you can measure lower or higher depending on where you want your decorative fabric to be placed) and mark that with chalk.
Step 8
Fold the edge of the length of decorative fabric you cut and iron that edge to create a straight line.
Step 9
Lay the decorative fabric strip right side up on the flat sheet. Line up the ironed edge of the decorative fabric with your chalk line. Pin the decorative fabric to the flat sheet. Be sure to keep the edge along the chalk line so it will be straight.
Step 10
Sew the top edge of the decorative fabric strip to the flat sheet.
Step 11
Cut the remaining fabric from your flat sheet so it is even with the bottom edge of the decorative fabric.
Step 12
Fold the bottom edge of the decorative fabric under, iron to create a crease, and sew the bottom edge.
Step 13
Fold the sides of the decorative fabric strip under and sew each side to create a clean edge.
Step 14
Remember, if you're making two baby room curtain panels, you'll need to repeat steps 3 through 13 to make your second panel.
That's it. Hang your new baby room curtains and enjoy your inexpensive, and coordinated new baby room!


New! Comments
Have your say about what you just read! Leave me a comment in the box below.